 Kimai Docs
Projects
Projects are assigned to customers and are linked to activities
The project administration can be found at Administration > Projects.
Create a project
There is a configuration (can be configured at System → Settings), which allows to copy teams of the current user to newly created projects. This is mostly useful when teamleads manage their own projects and should have immediate access to them after creation.
Copy a project
In the listing page you can open the context menu of any project and click “Create copy”.
By copying a project, you will create a new project, whose name is applied the string ` [COPY]` and in addition to that, the following happens:
- A new project number will be created
- The start of the project is set to the end of the copied project
- The end of the new project is empty
- Assigned teams will be assigned to new the project
- Rates for the project will be created and attached to the new project
- Custom field content will be duplicated and saved for the new project
- ALL project specific activities will be copied and linked to the new project (their names will not be changed)
- Activity specific rates will be applied to the new activities
Manage projects
Colors
Each project can be assigned its own color, for easier identification in many places throughout Kimai.
If no color is applied, Kimai will fall back to the customers color and finally to the default color.
Start date / end date
Both dates are optional and define the time range in which times can be booked on this project.
If a date is set, the project is only offered in the project dropdown when the date of the record falls inside that range. Records outside the range are rejected when saving as well, so the restriction also applies to the API and to imports.
Both dates are inclusive: a record on the start date or on the end date is still allowed.
This avoids ghost bookings on projects that have not started yet or are already finished. If a booking outside the range is necessary, a teamlead or admin can widen or remove the dates in the project settings.
Existing records are not changed when you set these dates.
They stay visible in all listings, reports and invoices, but a record that now lies outside the range can only be saved
again after it was moved back into the range. Use Times locked until if you want to freeze records instead of restricting new ones.
Times locked until
This optional date closes a project period: all times up to and including this date are frozen and can no longer be created, edited, deleted, copied or stopped (this applies to every user, including administrators).
The project itself is not affected. It stays visible in listings, reports and invoices, and its settings (name, budget, rates, end date, customer, …) can still be changed - the lock only protects the timesheet records. Locking a period therefore does not stop you from exporting or invoicing it, which is the main reason to use this field instead of hiding the project.
To reopen a period, clear the date or move it further into the past.
A timesheet that is still running and was started before the lock date cannot be stopped, because that would write into a closed period. Such a record can still be edited, so you can move it to a date after the lock and stop it there.
The Time-clock and Duration time-tracking modes do not offer the begin date
in the users edit form - an administrator has to move the record or clear/move the lock date to release the record.
This field locks one project at a time. To close a period for the whole installation, use the Lockdown period setting under
System → Settings instead - unlike this field, the lockdown period can be bypassed
by users with the according permissions.
Billable
The Billable configuration of a Project defines whether new timesheet (in Automatic mode) will be billable.
Please read the billable documentation to understand the billable flag.
Budgets
Budgets help you to watch your progress and to stay within contract boundaries.
If the System → Settings configuration Allow overbooking of stored budgets is not active,
Kimai will prevent that records will be created, which would go beyond your configured budgets.
Currently, the visibility of budgets cannot be limited independently. So if you want to show progress to your users, you cannot show only the time budget (this will be changed in the future).
The permissions budget_team_project, budget_teamlead_project and budget_project are used
to check if the logged-in user can see the budgets.
Budget type
Kimai knows two budget types. The default budget type is lifetime (which is used if the budget type is empty),
the other available budget type is monthly.
Lifetime budget- uses all records of all times to calculate progress and budget usageMonthly budget- uses all records of the selected month to calculate progress and budget usage
Limitations
No matter which budget type is used, it does not influence invoice amounts. There is no automatism that will add a monthly budget to your invoice (you have to create expenses or time records for that).
Monthly budgets are used for every month, no matter how many days are recorded. Kimai does not take range limits into account to calculate partial budgets (e.g. project start/end or the first record created for a customer).
Money budget
Money budgets will be used to calculate reports.
For Kimai there is no difference between money and time budgets. If there are multiple people with a different hourly rate working on the same tasks, then money and time budget will differ in their outcome.
Only billable records will be used to calculate the remaining budget.
Time budget
The time budget should be entered in the format hh:mm or decimal hh.m.
Time budgets will be used to calculate reports.
If you are using money budget and want to show progress to your users, it is a good idea to calculate the hourly rate by using money budget / average hourly rate.
Only billable records will be used to calculate the remaining budget.
Prices
You can configure prices on different levels in Kimai. It starts from the user hourly prices and goes from Customers to Projects and Activities. Please read the price documentation to find out more how rates are calculated.
On the detail page of the selected item (which you find by clicking a row in the listing table or select Show from the dropdown menu)
you find the Hourly price section. By default, you see the message No prices have been configured.

You configure new price rules by clicking the + button in the upper-right of the Prices table.
A user needs the two permissions to be able to see and edit prices:
- one of:
view_project,view_team_project,view_teamlead_project - one of:
edit_project,edit_team_project,edit_teamlead_project
Edit price screen
The edit price screen has four settings:
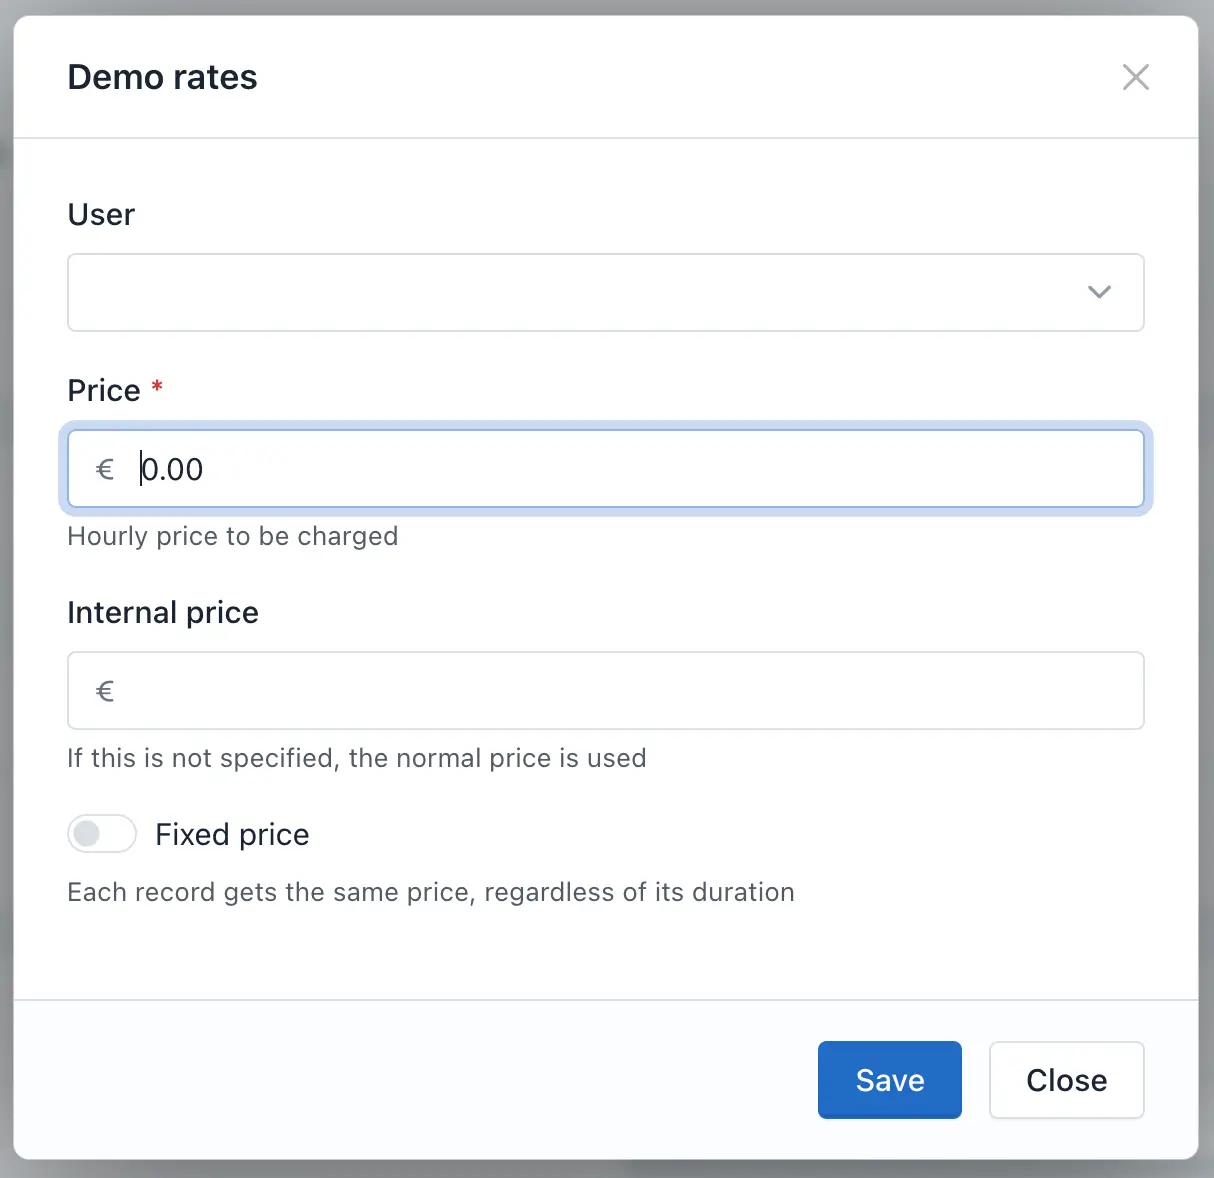
User- the user this price applies to - if no user is chosen it applies to everyone without explicit personal rulePrice- the price to be charged (per hour)Internal price- the internal price (or “costs” if you will) to apply (per hour); if this is not specified, the normal price is used for calculation.Fixed price- if this is ticked, each time record gets the configuredPricevalue applied, regardless of the record duration
Catch-all price
If no user was chosen, this rule applies to every user, except those who have a explicit User specific price configured.
User specific price
Every rule the defines a user is a user specific price and those always win over Catch-all price configurations.
Pricing example
The following example contains two price rules:
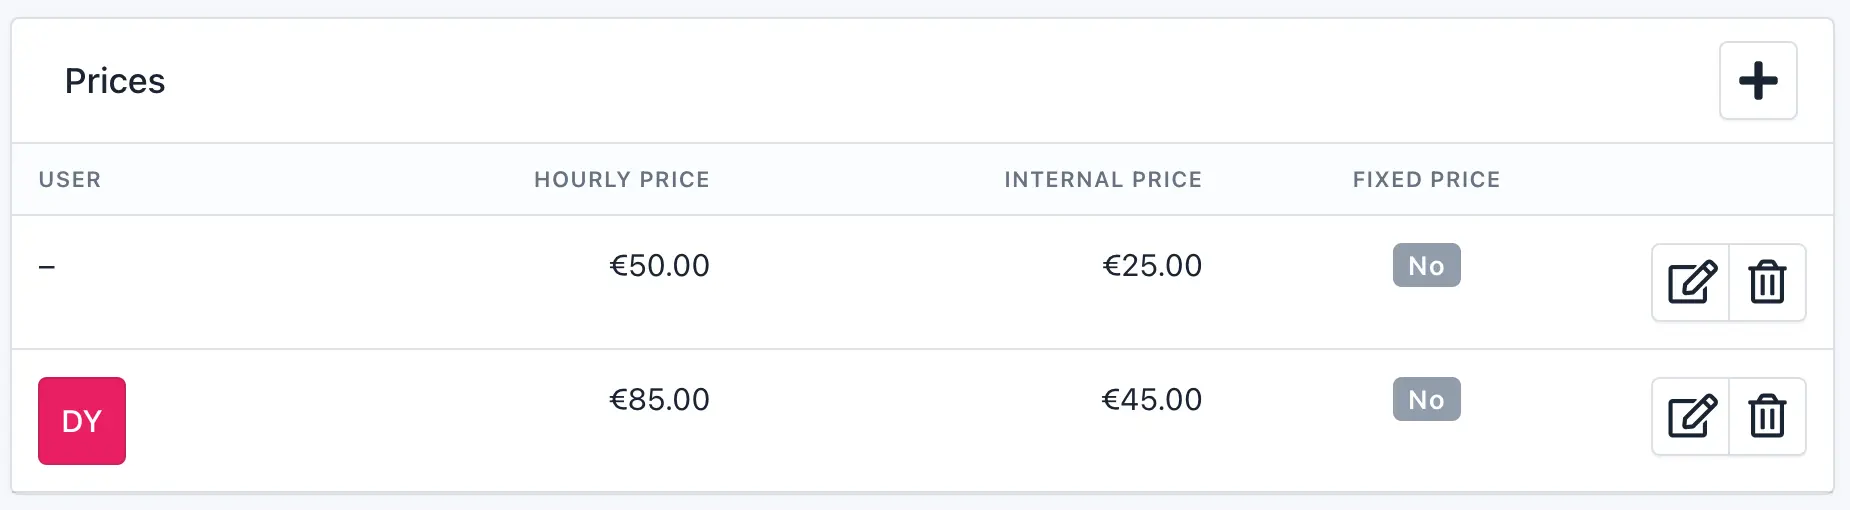
The first one is a Catch-all price that applies to everyone who is recording times for this project.
So every hour counts with 50 € towards the budget of this project and has internal costs of 25 €.
Every recorded hour has a gross margin of 25 € / hour.
The second rule applies to the user DY who (as only user) has a User specific price for this project.
Even though she has a higher internal cost of 45 € / hour, her work earns 85 € / hour, which leads to a gross margin of 40 € / hour.
Visibility
By toggling the visibility on a project, you:
- hide the project from all drop-downs
- hide the project from the default list in the project administration
- hide the activities for this project from all drop-downs, regardless of their visibility state
- hide the activities for this project from the default list in the activities administration
Please note:
- All currently linked objects will still show the project in the dropdown as pre-selected option
- You can still change the project on timesheet records and activities, which used it before
- You cannot create new activities for this project
- You cannot create new timesheet records for this project
- You can still access invisible projects by changing the visibility filter on the listing view
Project number
Every project can have a number: a short identifier, which is shown in the listing and detail pages
and which is available in exports and invoice templates.
The number is optional, it is a free text field and by default it has to be unique.
Automatic number generation
Kimai calculates a number whenever a new project is created: when you open the
create project form, the number field is already pre-filled.
The same happens when a project is created through the API or when an existing project is copied.
The pre-filled value is only a suggestion:
- you can overwrite it or empty it before saving
- you can change it later on the edit screen
- existing projects are never renumbered, a changed format only applies to newly created ones
The format is configured at System > Settings > Project > Project number format and its
default value is {pc,4}. If the format is emptied, no number will be generated and the field stays empty.
The number is calculated when the create form is opened, not when it is saved. If two users open the create form at the same time, both will see the same number and the second one to save runs into the “number already used” validation error (unless duplicates are allowed, see below).
Format and replacer
The format is a free text, in which the following replacer can be used:
| Replacer | Description | Example |
|---|---|---|
{pc} |
Project counter | 2 |
{Y} |
Year 4 digits | 2025 |
{y} |
Year 2 digits | 25 |
{M} |
Month with leading zero | 04 or 10 |
{m} |
Month 1 or 2 digits | 4 or 10 |
{D} |
Day with leading zero | 04 or 23 |
{d} |
Day 1 or 2 digits | 4 or 23 |
{YY} |
Like {Y}, but the increment is added to the year (default increment is 1) |
2026 |
{yy} |
Like {y}, but the increment is added to the year (default increment is 1) |
26 |
{MM} |
Like {m}, but the increment is added to the month (default increment is 1) |
5 |
{DD} |
Like {d}, but the increment is added to the day (default increment is 1) |
24 |
Each replacer supports an increment/decrement (e.g. {pc+100}) and a length formatter, which prepends
leading zeros (e.g. {pc,4}).
Every character outside a replacer is copied as-is, but { and } are reserved and cannot be used.
An unknown replacer (e.g. {foo}) is not replaced and ends up in the number as written.
Counter
The counter {pc} is not derived from the highest number in use, it is calculated from the
amount of existing projects:
counter = amount of existing projects + 1 + increment
The increment defaults to 1 (see below), therefor the first project in an empty installation
receives the counter value 2 and with 41 existing projects the next one receives 43.
Because the counter is based on the record count, deleting projects lowers it again, which would lead to numbers that were used before. Kimai detects and skips used numbers (see Uniqueness), but if you want a permanently higher counter, use the increment.
If several projects are created within one request, each of them receives the next free counter value.
Increment and decrement
Every counter and every “incrementing” date replacer can be shifted by a fixed amount, by adding +X or -X:
{pc+100}- adds 100 to the counter instead of the default1{pc-1}- subtracts 1 from the counter
The default increment is 1 and it cannot be set to 0, so {pc} behaves exactly like {pc+1}.
The increment is applied to {pc}, {YY}, {yy}, {MM} and {DD}.
It is ignored by {Y}, {y}, {M}, {m}, {D} and {d}, which always return the current date.
This also means that {YY} does not “increment until a free number was found”, it is simply “the current year
plus the increment”: {YY} and {YY+1} return next year, {YY-1} returns the last year and {YY-2} the year before.
Length formatter
Adding ,X to a replacer prepends leading zeros, until the result is X characters long:
{pc,4}- results in0043for the counter value43- a result which is already longer than
Xcharacters will not be shortened
The length formatter is always the last part of a replacer and it can be combined with the increment and
decrement, e.g. {pc+100,5}.
Uniqueness
The setting System > Settings > Project > Allow multiple usages of the same number defines
whether the same number may be used more than once:
No(default) - saving a project with an already used number fails with a validation errorYes- the same number can be used by multiple projects
Independent of this setting, the generator always avoids numbers which are already in use: if the calculated number exists, the counter is increased and the number is calculated again, for a maximum of 100 retries.
If no free number can be found, the field is left empty. That happens for example with a format which does not
contain a counter (like {Y}), because every retry produces the same result.
Limits
- The number can be at most 10 characters long
- These characters are not allowed:
<>"=
Examples
The following examples assume that today is the 9th of July 2025 and that 41 projects exist:
| Format | Result | Description |
|---|---|---|
{pc} |
43 |
the plain counter |
{pc,4} |
0043 |
the counter with four digits |
{pc-1} |
41 |
the counter, shifted down by one |
{pc+100} |
142 |
the counter, shifted up by 100 |
{Y}-{pc,3} |
2025-043 |
year and a three digit counter |
{y}{M}{D}-{pc} |
250709-43 |
date and counter |
K-{Y}-{pc,4} |
K-2025-0043 |
a static prefix, the year and the counter |
Access permissions
- Inherit permissions from their linked customer
- Accessible to all users if no teams are assigned at customer and project level
- If one or more teams are assigned to the project, only members of these teams can use it, while also respecting the customer teams
Project listing
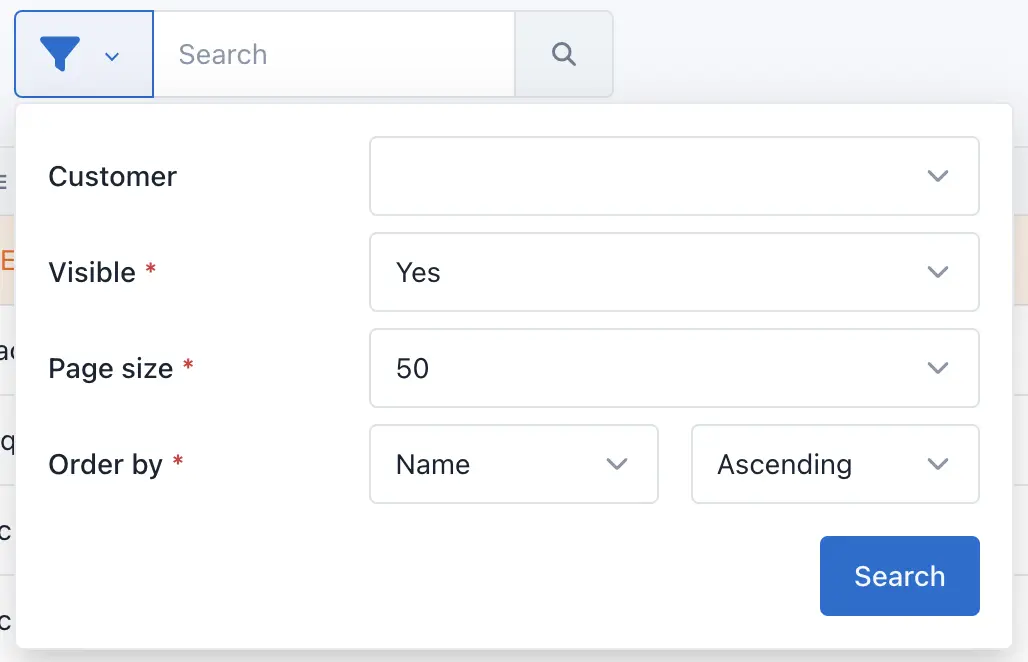
The Visible filter in the toolbar has three states:
Yes- all visible projects: the project itself and its customer are visibleNo- all projects that are exclusively invisible by their own visibility stateBoth- all projects: not filtering on their own or the customer visibility
Invisible projects
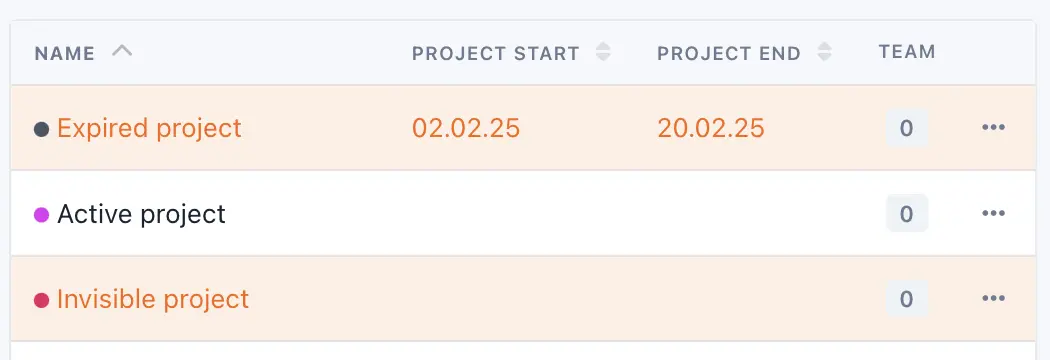
Projects can be invisible or inactive (due to end or start date). By default, only visible projects will be shown. But you can use the project filter to show all or only invisible projects.
Invisible projects will be highlighted in the listing table:
Filter and search
The search supports filtering by the fields:
customervisibility
Besides these filters, you can query for a free search term, which will be searched in the fields:
namecommentorderNumber
Additionally, you can filter for custom fields by using a search phrase like location:homeoffice.
This would find all entries with the custom field location matching the term homeoffice.
The search terms will be found within the full value, so searching for office would find:
I love working in my officeOfficeThis office is beautifulOur offices are very noisy
Attention: checkboxes have the values 0 (not checked) and 1 (checked).
You can mix the search term and use multiple meta-field queries:
location:homeoffice hello- find all entries matching the search termhellowith the custom fieldlocationmatching the termhomeofficelocation:homeoffice contract:fulltime- find all entries with the custom field combination:locationmatchinghomeofficeandcontractmatchingfulltimeexpired:0finds all items whoseexpiredcheckbox isoff
There are also special operators, which can be used in conjunction with custom fields:
- The
location:) will find all entries whose value in thelocationfield is either empty or not existing - The
~search term (e.g.location:~) will find all entries that are missing the custom field (created before the field was created) - The
*search term (e.g.location:*) will find all entries that have any value in thelocationfield (basically the opposite of~)
Delete a project
Projects can be deleted from the Project listing view.
Usually it is not a good idea to delete a project that was used before, as all linked activities and especially timesheets will be deleted as well. Consider to switch the visibility instead to hide it.
Right-click on a row (or open the action dropdown at the end of it) to see all available actions for the selected project.
The last action in the list is Delete - once you click it you wil get a feedback screen which either tells you that the
project is unused and can be safely deleted, or it will show you quick stats of the project and then ask you to re-assign
the attached timesheets to another project.