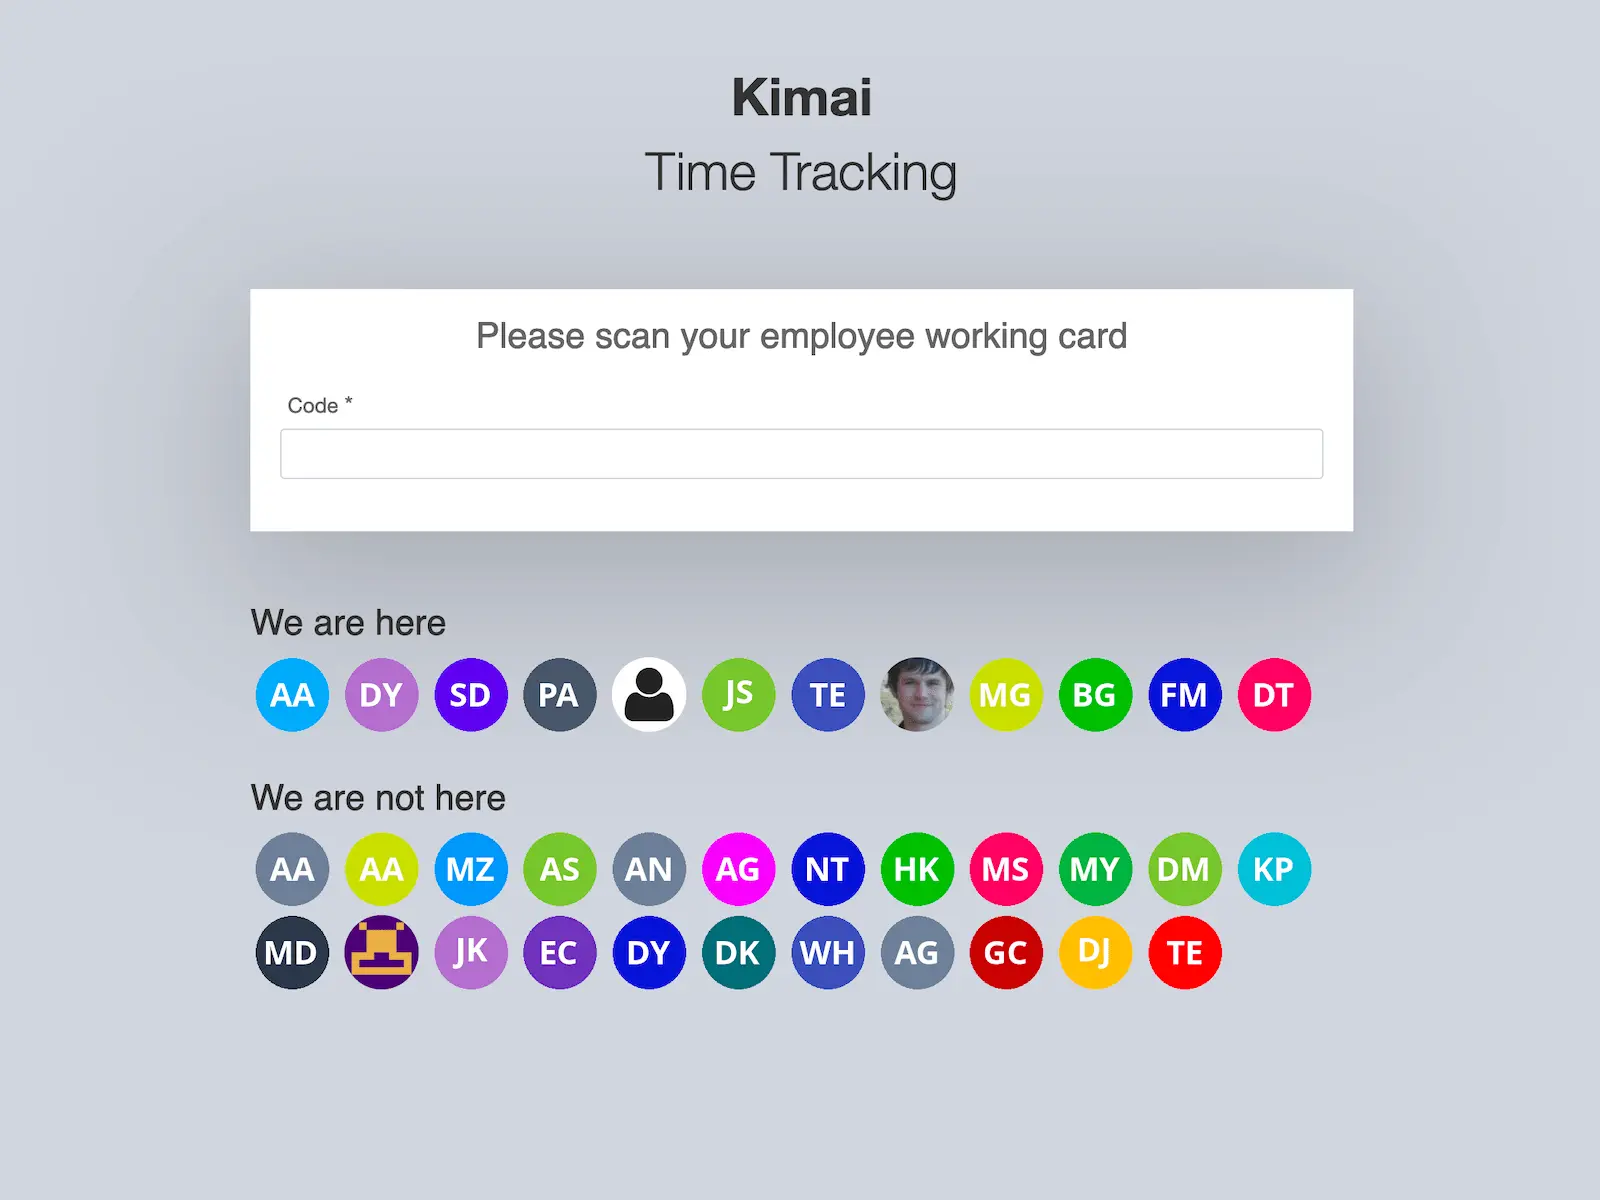
Modalità kiosk con supporto per codici a barre, RFID, Web NFC
Partecipazione al monitoraggio del tempo in un ambiente in cui l'utente non ha accesso a Kimai (ad esempio in un magazzino), usando codici a barre o scanner RFID per avviare e interrompere i fogli di presenza.

Kevin Papst
A Kimai plugin, which allows using barcodes for punch-in and punch-out time tracking with Kimai.
You can use it with a barcode scanner, with a web-camera, with a RFID reader or an NFC reader.
It also supports a “freestyle” mode, which allows to enter any free configurable code (up to 120 characters), so you can also use other devices for starting/stopping:
- an electronic USB number-pad
- an RFID scanner that acts as keyboard
- an Android device with Web NFC support (only Chrome browser)
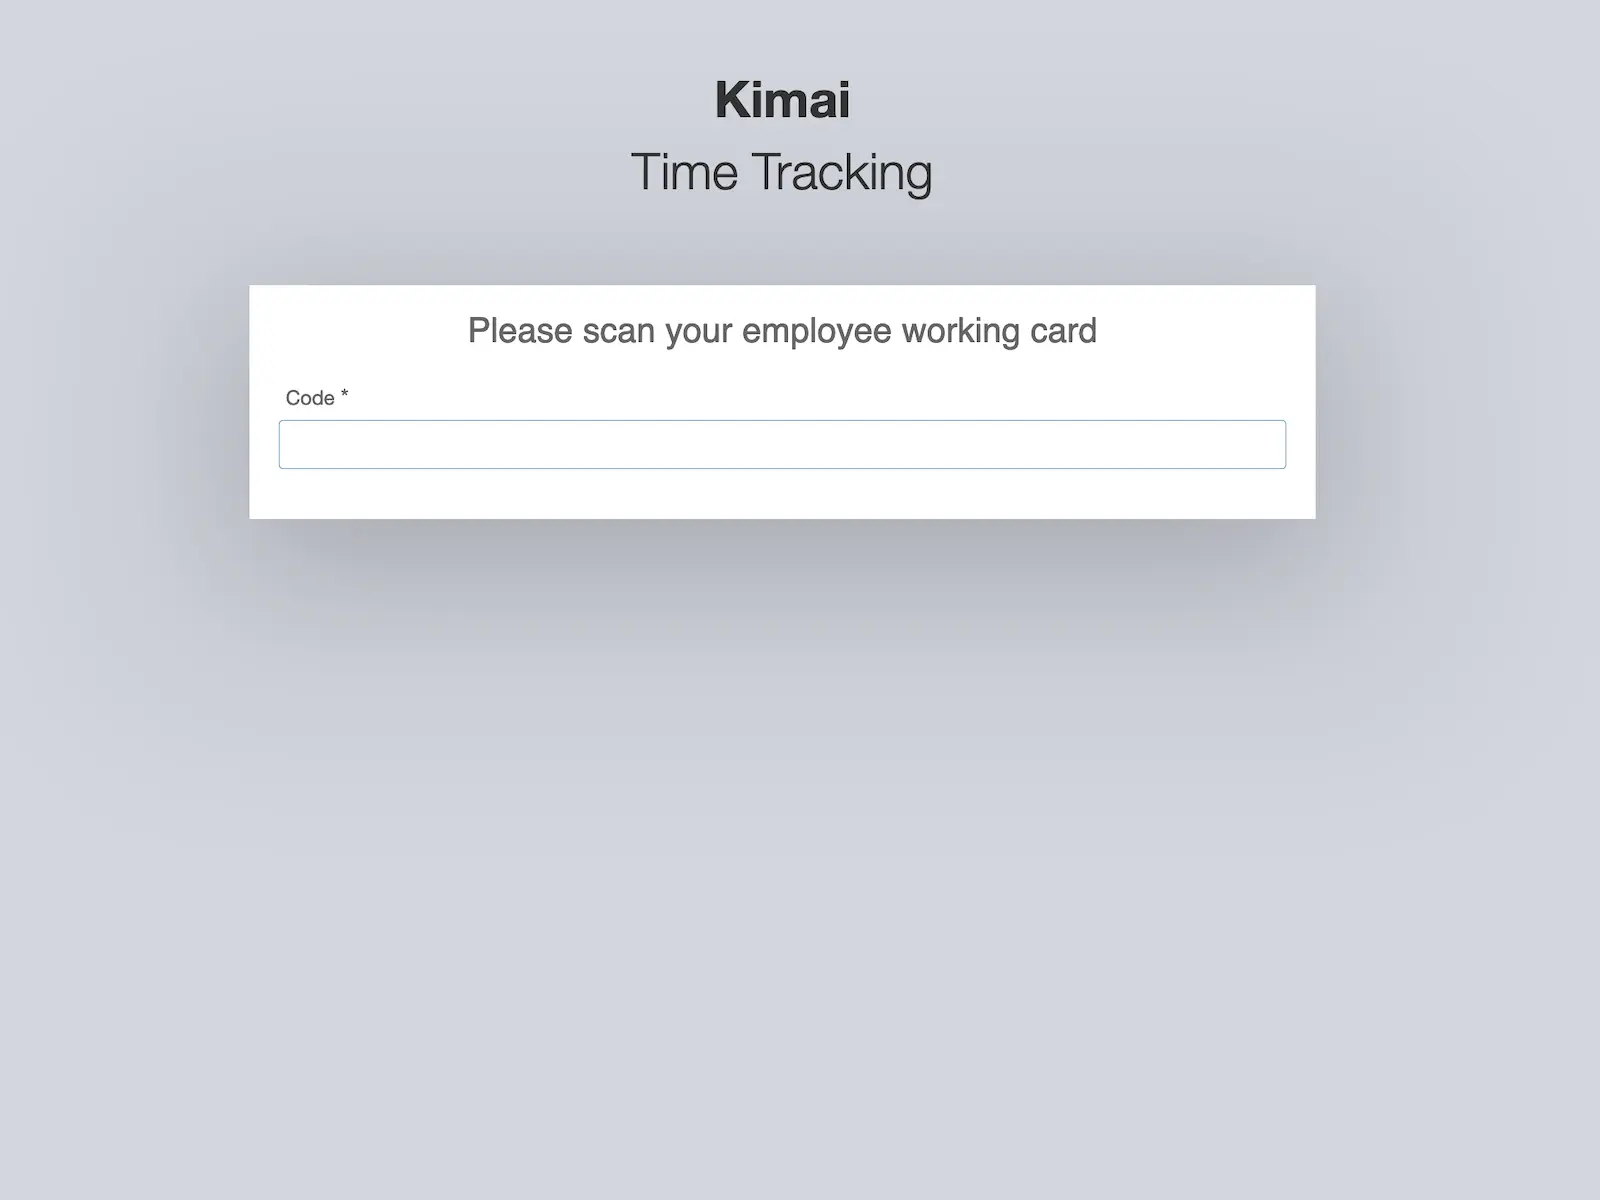
This bundle is the solution for you, if you want to use Kimai in a kiosk mode, where users register their attendance time through punch-in (coming) and punch-out (leaving) mode.
It could be as simple as:
- Hand out NFC or RFID tokens to your employees
- Mount a tablet to the wall in your entrance room
- Let your users check-in & check-out when entering the building by scanning their tokens
You can test it in the “Plugins” demo.
Features
- Start/Stop work with
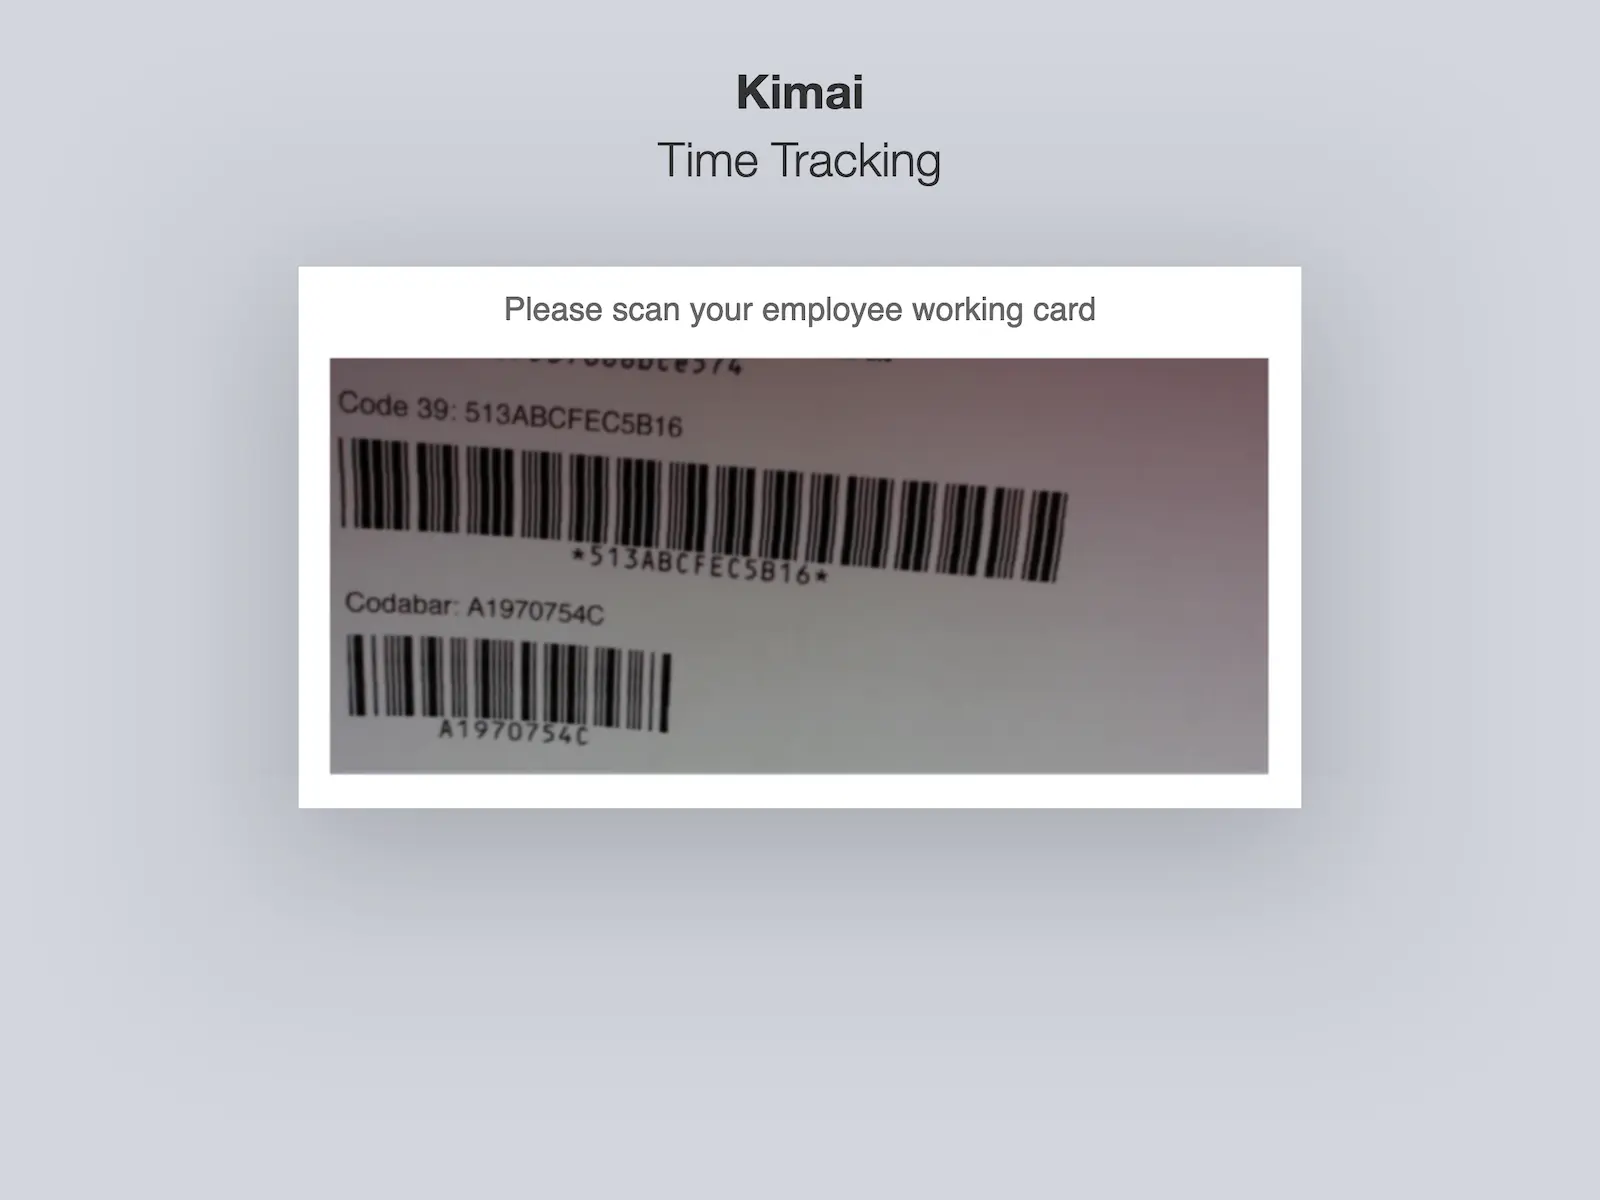
- Barcode scanner (via device camera, only works via HTTPS)
- Barcode scanner (via USB or Bluetooth)
- RFID scanner (via USB or Bluetooth)
- Web NFC (see docs)
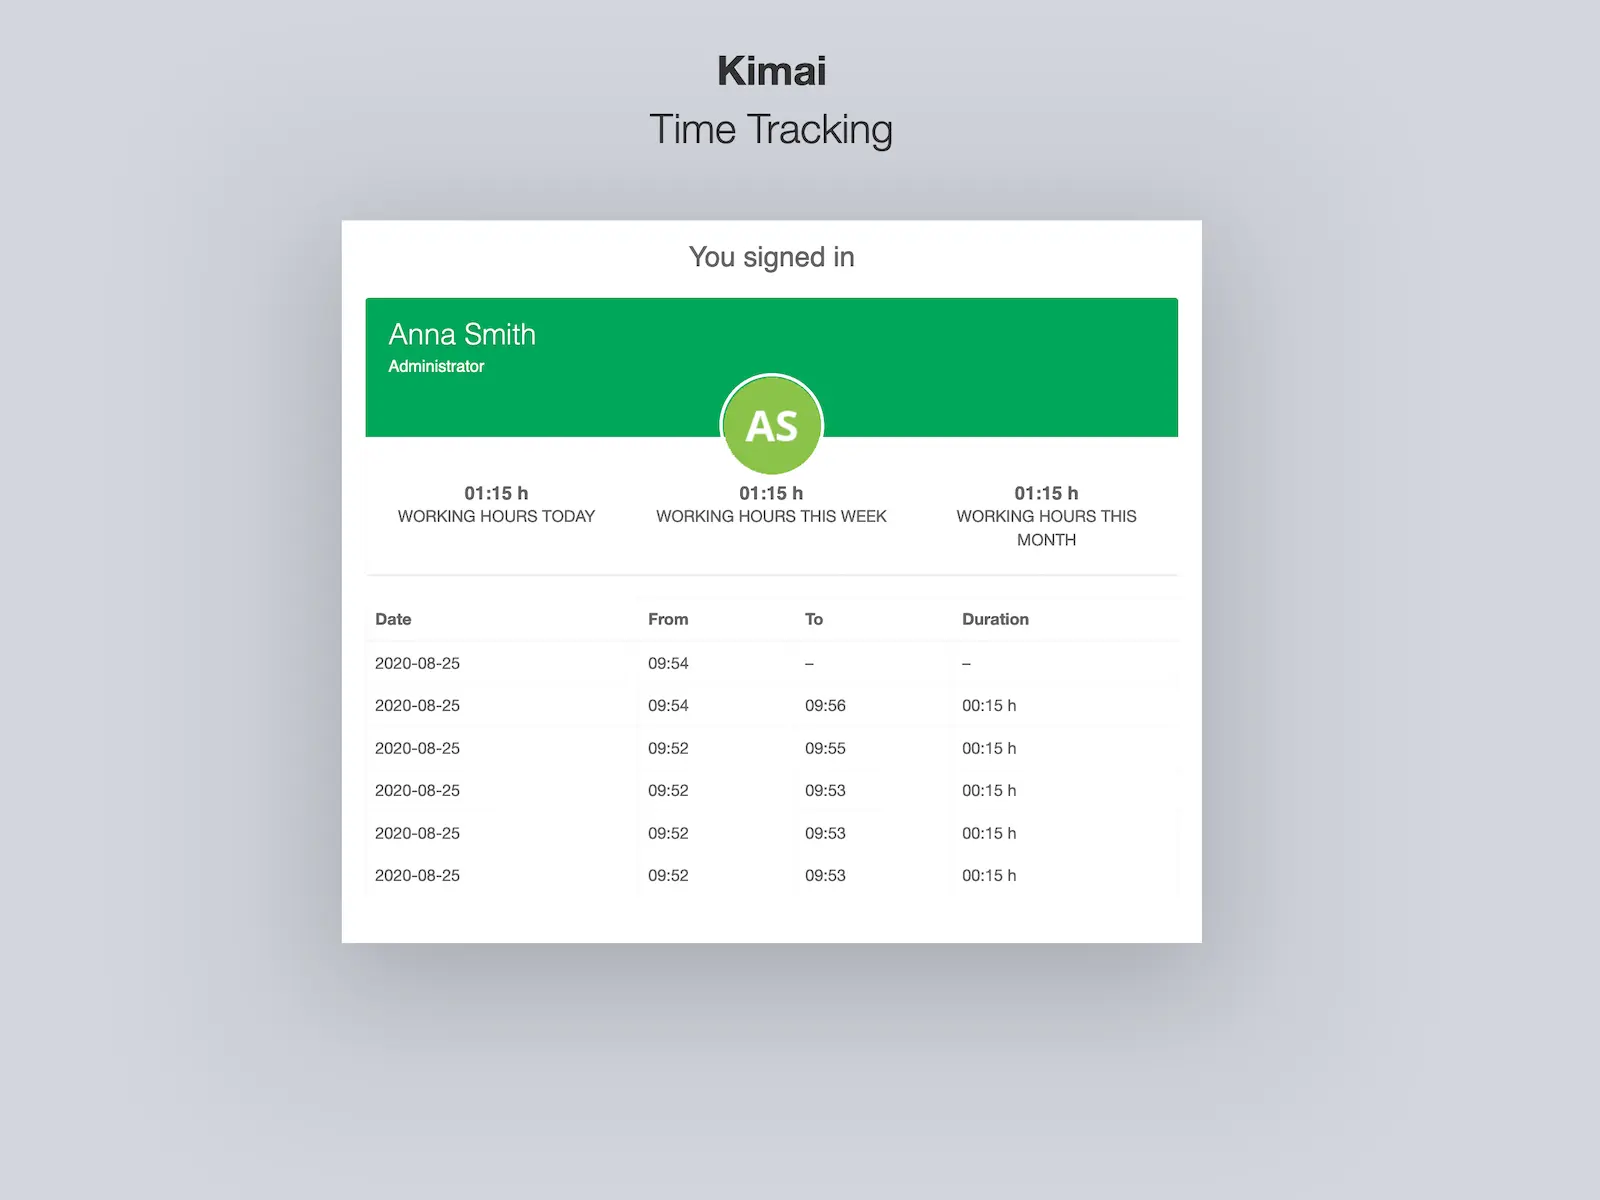
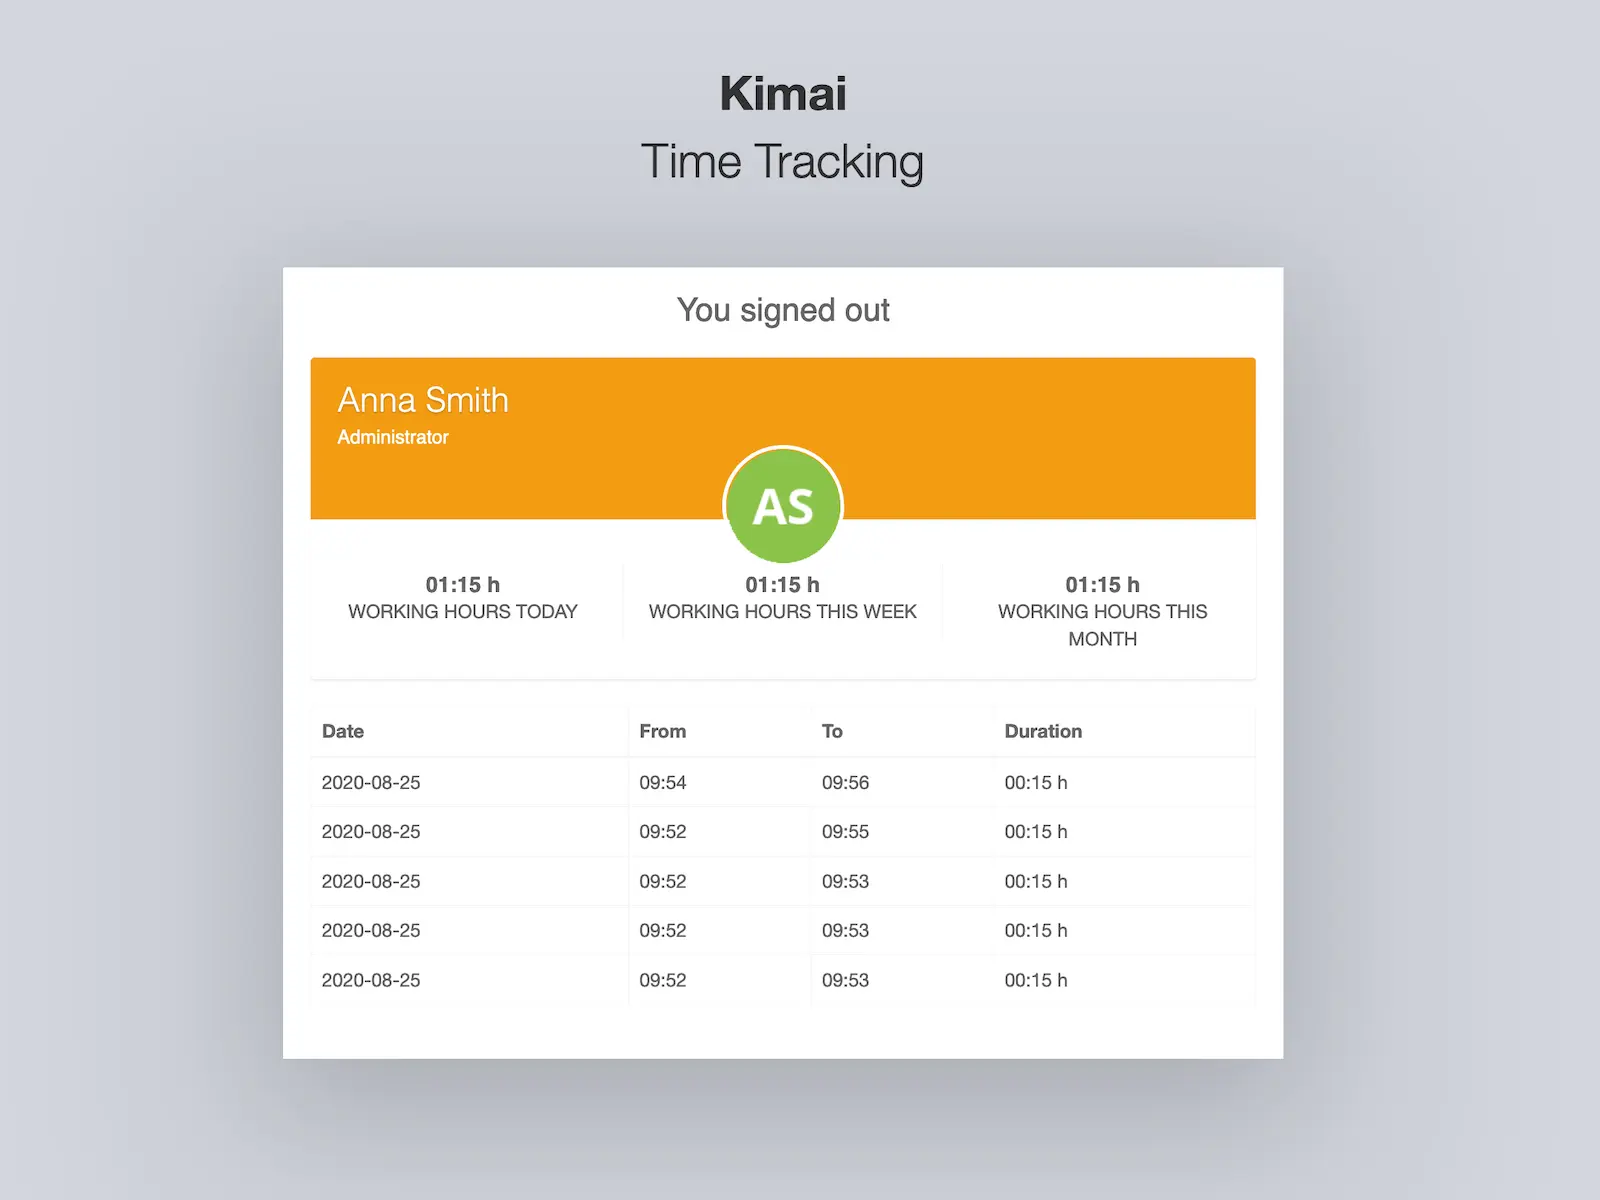
- Upon starting/stopping a record via this plugin, the user will see a short overview screen with the entries of the current week (including some statistics)
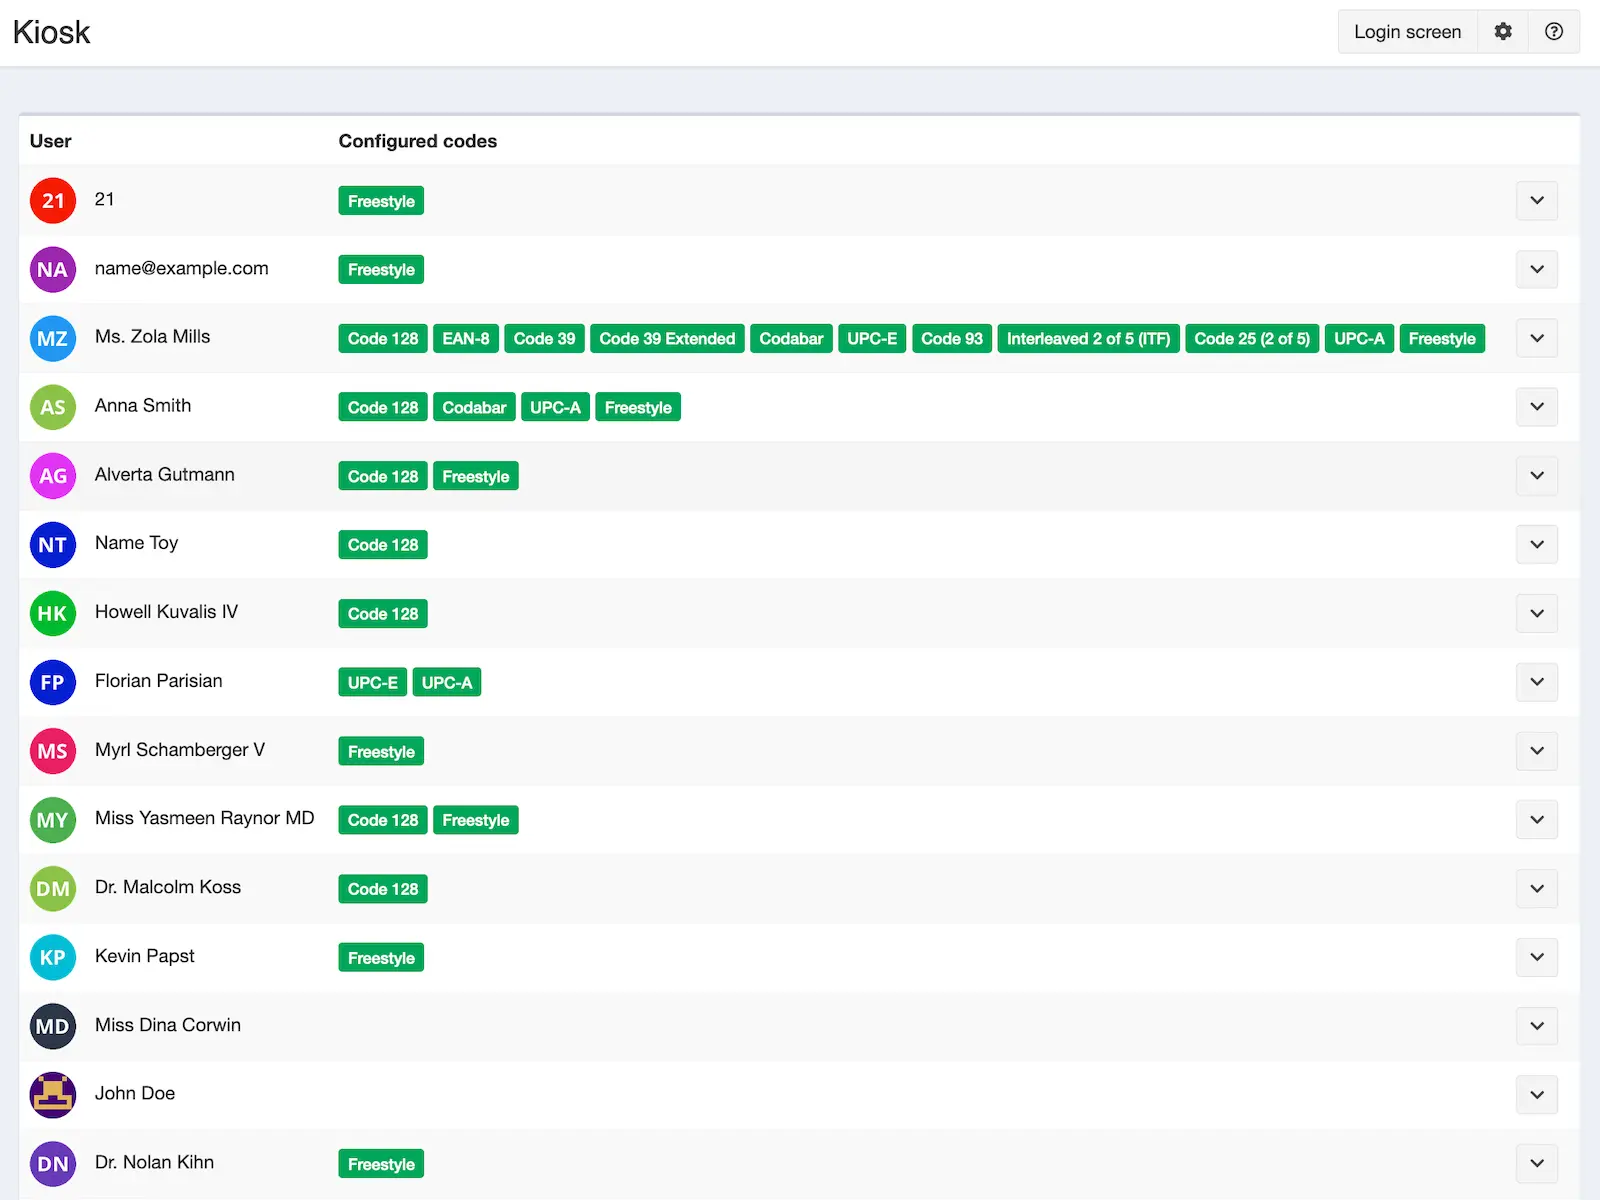
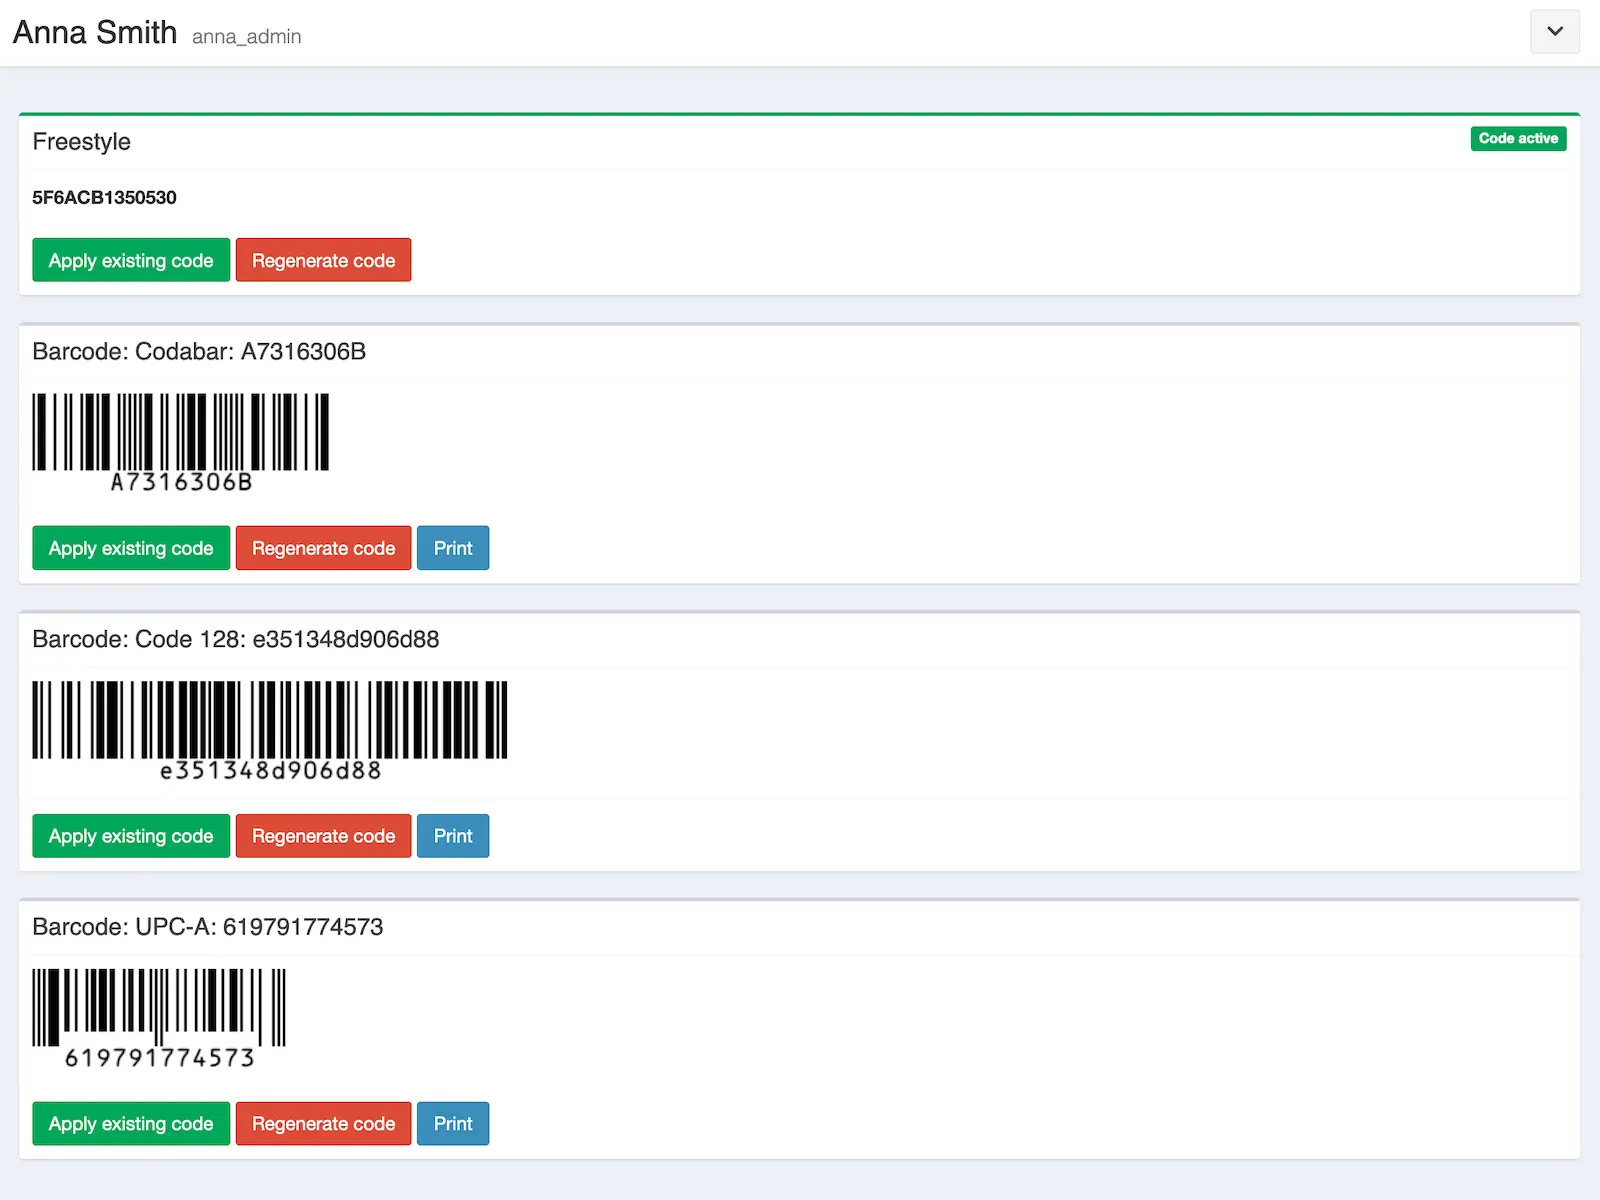
- New user profile screen for the “codes”
- Display all codes for user
- Generate a random code (automatically done if none is existing yet for the active code-type)
- Re-use existing code for user by entering (or scanning) it manually
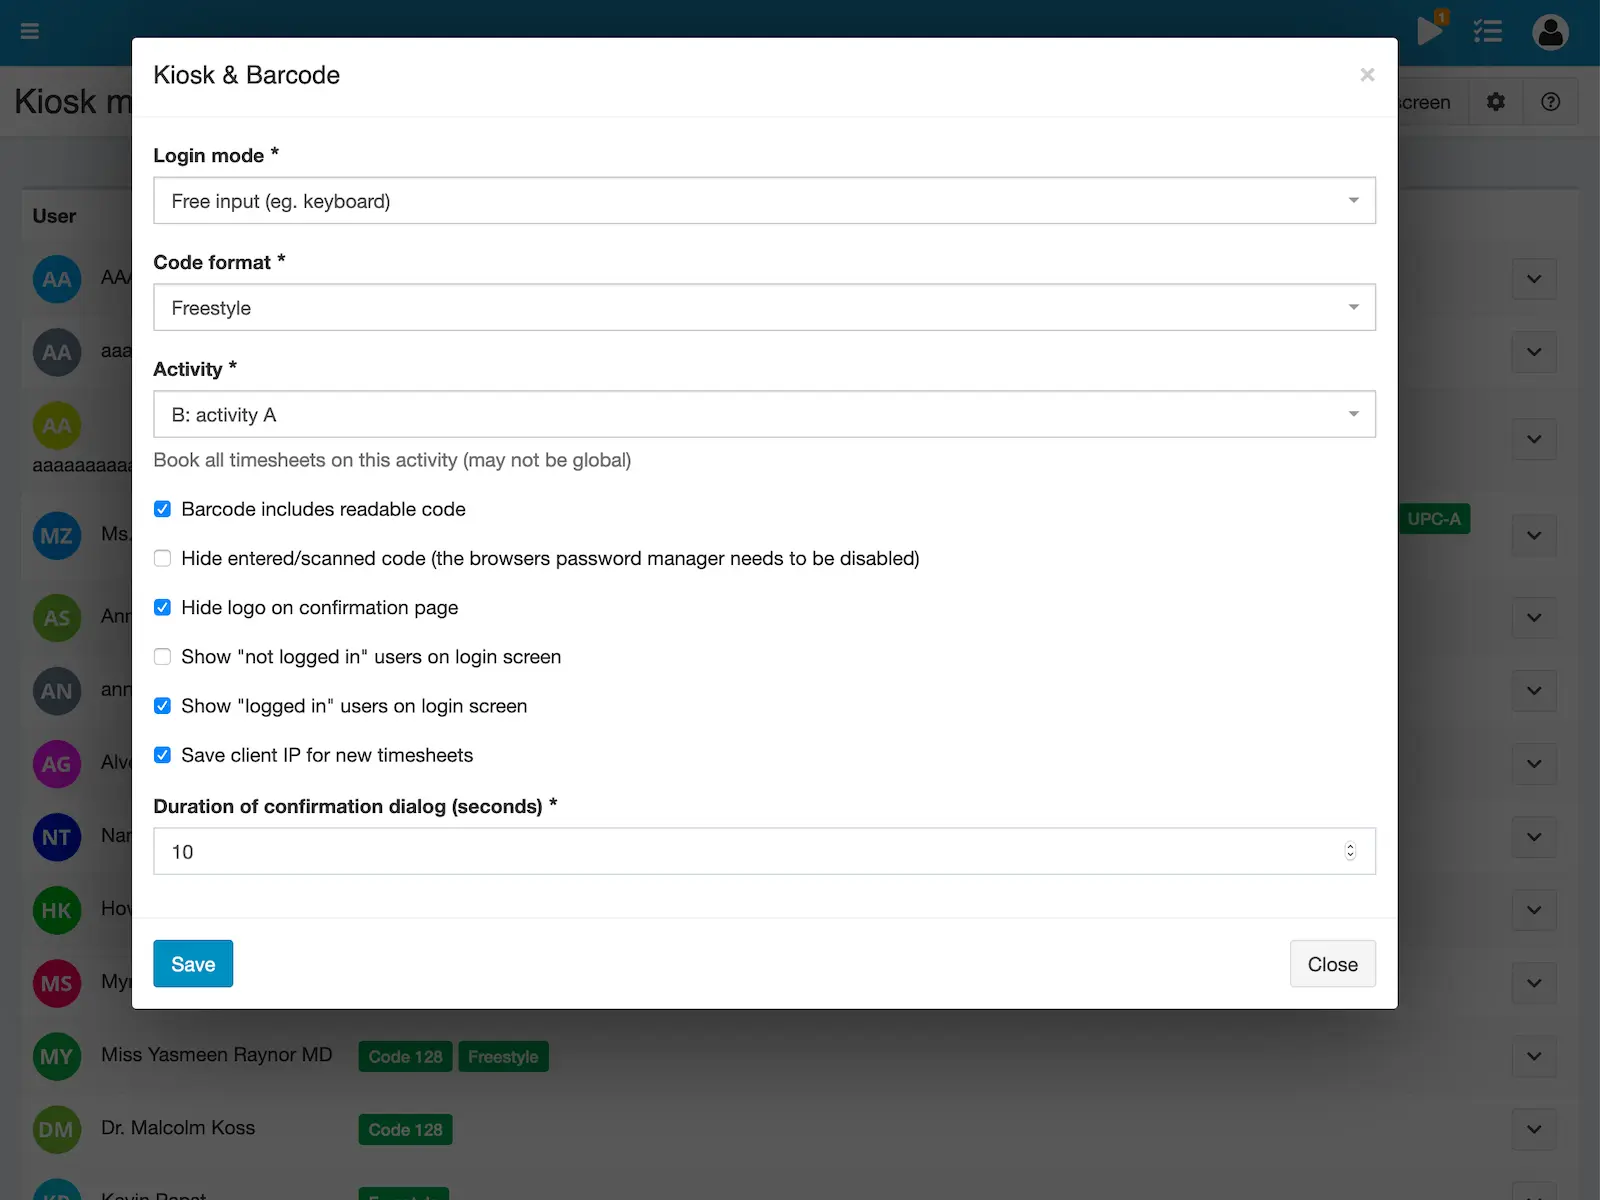
- User specific settings to configured allowed start and end working time (user can only clock in between these times)
- Supports the following 1D barcodes:
Code 128Code 39-
UPC-A(scanner needs to transmit check digit) Code 2 of 5Code 2 of 5 interleaved-
Codabar(scanner needs to transmit start & stop digits)
- Optional: show active / inactive users in login screen
- Many CSS classes to customize the look with Custom CSS
You need to configure a non-global activity for starting the record via this plugin. This will be used for every recorded timesheet that is created using the kiosk mode.
Hardware
The Kiosk does not come specialized hardware. Instead, it follows the Open-Source philosophy and lets you choose what works best for you.
We have tried various ways and all of them work. Our own use-case could be best solved with a NFC tablet, so this is what we would recommend in most cases.
Meeting-Room Tablet
Tablet which can be wall- and VESA mounted, has WLAN and only needs a tiny AC adapter. The NFC reader is on the front, so users can easily scan their tokens.
Can be purchased at AllNet DE AllNet AT (this only works if you switch to the AT Shop through the dropdown in the header of the Shop).
Landi 15.6” Display System
PoE, WiFi, IP55-rated for dust and water resistance, Bluetooth, 4GB/32GB, SD Card, USB-TypeC, USB-A, RS232/RJ22, RJ45, Android 13.0
Can be purchased at Etiden.
Kiosk application
The Android tablets need a Kiosk application, which makes sure that users always see the login screen:
- Kiosk application: Android Kiosk
NFC Token
And you need a bunch of NFC tokens:
- NFC tags: NFC Tag Shop
Self-built setups
This is NOT a hardware recommendation, but more an idea for possible use-cases.
I tried the linked products and even though all scanner are rather cheap, they work without problems.
- Raspberry PI setup with touch screen (eg. for wall mount)
- RFID scanner by Neuftech (desktop version)
- RFID scanner by KKMoon (desktop version)
- Barcode scanner which can also scan codes from mobile phones (desktop version)
- Barcode scanner classic hand-held version
Above are affiliate links for Amazon (Germany) where I bought them myself.
Installazione
Copia file
Extract the ZIP file and upload the included directory and all files to your Kimai installation to the new directory:
var/plugins/KioskBundle/The file structure needs to look like this afterwards:
var/plugins/
├── KioskBundle
│   ├── KioskBundle.php
|   └ ... more files and directories follow here ...
Cancella cache
After uploading the files, Kimai needs to know about the new plugin. It will be found once the cache was re-built. Call these commands from the Kimai directory:
How to reload Kimai cache
bin/console kimai:reload --env=prod
It is not advised, but in case the above command fails you could try:
rm -r var/cache/prod/*
You might have to set file permissions afterwards:
Adjust file permission
You have to allow PHP (your webserver process) to write to var/ and it subdirectories.
Here is an example for Debian/Ubuntu, to be executed inside the Kimai directory:
chown -R :www-data .
chmod -R g+r .
chmod -R g+rw var/
You might not need these commands in a shared-hosting environment.
And you probably need to prefix them with sudo and/or the group might be called different from www-data.
Crea database
Run the following command:
bin/console kimai:bundle:kiosk:installThis will create the required database tables and update them to the latest version.
If you see an error like There are no commands defined in the "kimai:bundle:XYZ" namespace.,
then either the directory has a wrong name (must be var/plugins/KioskBundle/) or you forgot to clear the cache (look above).
Installa risorse
The following command will install the required assets (images, javascripts, styles):
bin/console assets:installAggiornamenti
Updating the plugin works exactly like the installation:
- Delete the directory
var/plugins/KioskBundle/ -
Execute all installation steps again:
- Copia file
- Cancella cache
- Update database with
bin/console kimai:bundle:kiosk:install - Update assets with
bin/console assets:install
Registro delle modifiche
Version 2.16.1
Compatibility: requires minimum Kimai 2.36.0
- Fix configuration problem after adding and then removing all screensaver days from config
Version 2.16.0
Compatibility: requires minimum Kimai 2.36.0
- Show company name next to logo
- Added Screensaver
- Fix NFC button in “Android Kiosk” app
- Unified URLs to merge all under /auth/kiosk/* (old URLs keep working)
Version 2.15.0
Compatibility: requires minimum Kimai 2.36.0
- Added
group by daysetting for login and logoff screen to show entire week (turned on by default) - Show
working time summaryin an additional tab in the welcome screen - Always show the entire week (ascending order) in the welcome screen
- Support showing
Break timesin the welcome screen - Change the default login mode to
Keyboard(might need config change after update toScanner) - Detect if
barcodeis used and only then display barcode related system configurations - New input mode to differentiate between
external scannerandkeyboard onlyusage - Always assume
Keyboardif no barcode is used - Copy user-code into clipboard upon click in listing page
- Improve API definitions
- Remove unused
Activecolumn in user listing - Use translation from core
- Use non-deprecated method (bump required Kimai version)
Version 2.14.0
Compatibility: requires minimum Kimai 2.34.0
- Better search logic, including negated search terms
Version 2.13.2
Compatibility: requires minimum Kimai 2.30.0
- Hide System-Accounts from login screen
- Use translation from Kimai core for navigation
Version 2.13.1
Compatibility: requires minimum Kimai 2.30.0
- Fix error on empty code in login form
Version 2.13.0
Compatibility: requires minimum Kimai 2.30.0
- Use non-deprecated API to fetch timesheets
- Add “#kiosk-auth” to login screen for easier custom CSS rules
- Order users by Alias
Version 2.12.0
Compatibility: requires minimum Kimai 2.25.0
- Use translations from Kimai core
- Internal refactoring: PHPStan v2 with strict and deprecation rules
- Rename migration config for compatibility with new plugin installer
Version 2.11.1
Compatibility: requires minimum Kimai 2.21.0
- Use MapEntity for routes to fix deprecations
Version 2.11.0
Compatibility: requires minimum Kimai 2.21.0
- Removed duplicate “Barcode” link in user-profile
Version 2.10.0
Compatibility: requires minimum Kimai 2.21.0
- Refactoring: use new query and repository methods
Version 2.9.0
Compatibility: requires minimum Kimai 2.11.0
- Compatibility with composer installation
- Inline Nelmio API Doc configuration
- Inline JMS Serializer configuration
Version 2.8.2
Compatibility: requires minimum Kimai 2.11.0
- Added support for NFC with Android-Kiosk: www.android-kiosk.com
Version 2.8.1
Compatibility: requires minimum Kimai 2.11.0
Changed: link to new documentation page
Version 2.8.0
Compatibility: requires minimum Kimai 2.11.0
- Added: system configuration
kiosk.enabledto disable Kiosk via local.yaml - Added: allow to set NFC code in edit screen via WebNFC
- Changed: support attribute caching in Voter
- Changed: simplified buttons in users kiosk profile
Version 2.7.0
Compatibility: requires minimum Kimai 2.11.0
- Added: show kiosk codes as user profile tab
- Added: permission
kiosk_enabledto allow disabling Kiosk for entire user roles - Added: print barcode on click to the image
- Changed: removed
barcode_own_profileandbarcode_other_profilepermissions, replaced bykiosk_own_profileandkiosk_other_profile
Version 2.6.0
Compatibility: requires minimum Kimai 2.11.0
- Changed: CSS files and language handling, required for Kimai 2.11.0
- Changed: Replaced deprecated RestRoute attribute with SF native one
Version 2.5.0
Compatibility: requires minimum Kimai 2.1.0
Use annotation type for routes
Version 2.4.0
Compatibility: requires minimum Kimai 2.0.33
Fixed: possible pagination issues
Version 2.3.1
Compatibility: requires minimum Kimai 2.0.29
- Fixed: upgraded quagga from 0.0.18 to 1.8.2
- Fixed: upgraded bwip from 2.0.6 to 3.0.1
Screenshot
FAQ
Queste FAQ sono fornite dallo sviluppatore di questa offerta.
All paid plugins are annual subscriptions. Read more about the exact license details here.
You can buy the plugin via the Marketplace LemonSqueezy and pay with Credit Card or PayPal for immediate access. You can also get in touch and pay with wire transfer or SEPA, but you will have to wait a few days before getting access to the plugin.
Basic support is included and I am happy to help occasionally with simple issues. Larger support-questions, bug-reports and feature-requests will be answered in this Github repository. Customers who bought a plugin including support can write to support@kimai.org.
If you purchase a plugin subscription, you’ll receive all updates, bugfixes, and support for one year. After the subscription ends, your plugin will continue to work without any restrictions – you can keep using the last version you downloaded. This model is known as a perpetual fallback license. However, access to future updates, new features, and compatibility fixes require an active subscription.
No, refunds are not available. Kimai plugins are delivered as digital downloads and cannot be returned once the source code has been accessed. Additionally, payment providers charge non-refundable transaction fees, even if a refund were issued. For these reasons, all sales are final. The same applies for subscriptions that were not canceled in time. Please try the demo versions or contact us before purchase if you’re unsure whether a plugin fits your needs.