Управление расходами
Отслеживайте свои расходы по клиенту и проекту. Эти расходы могут быть категоризированы и включены в ваши счета.

Kevin Papst
Features
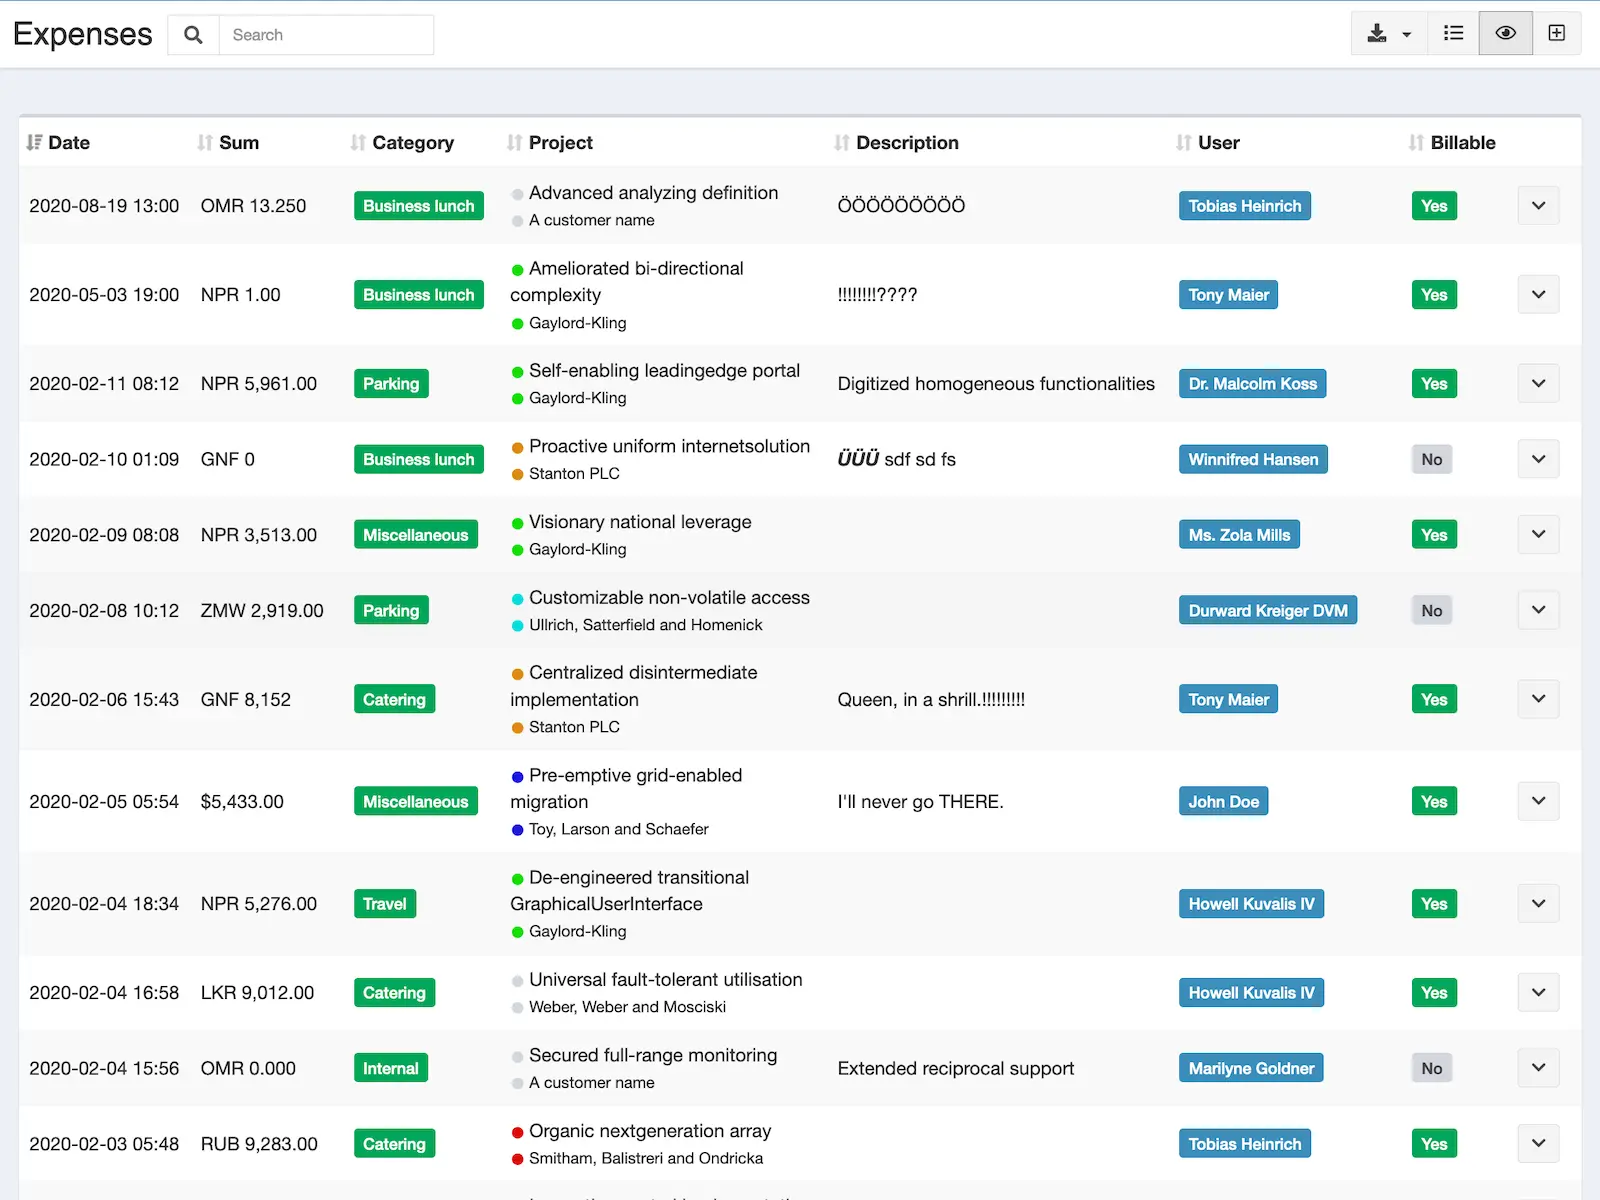
- Record all your expenses and show them in a table view
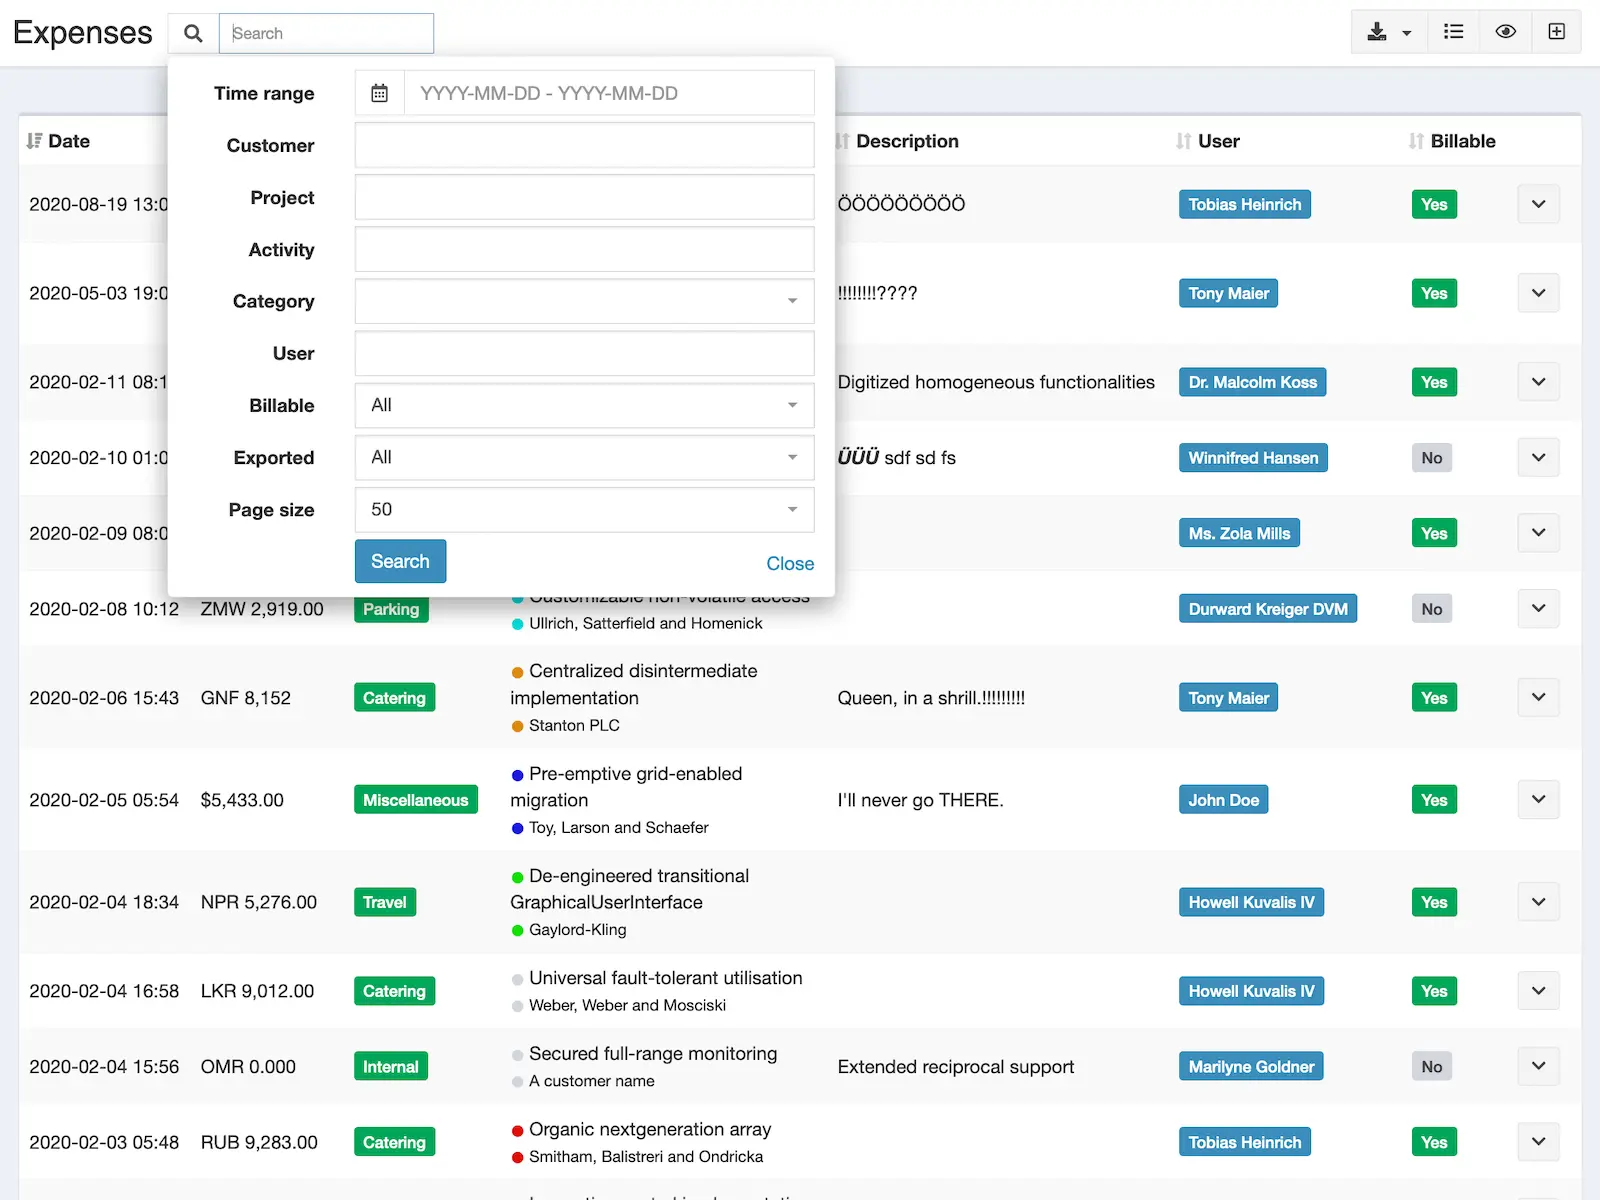
- The data can be searched- and filtered (see screenshots)
- All (billable) expenses will be automatically included in your invoices
- Negative amounts allow for complex bookings, budget and invoice adjustments
- Manage expenses via API
- Export expenses in: Excel, PDF, HTML
- Support for custom-fields
- Include expenses in Kimai export module
- Import expenses from Kimai 1
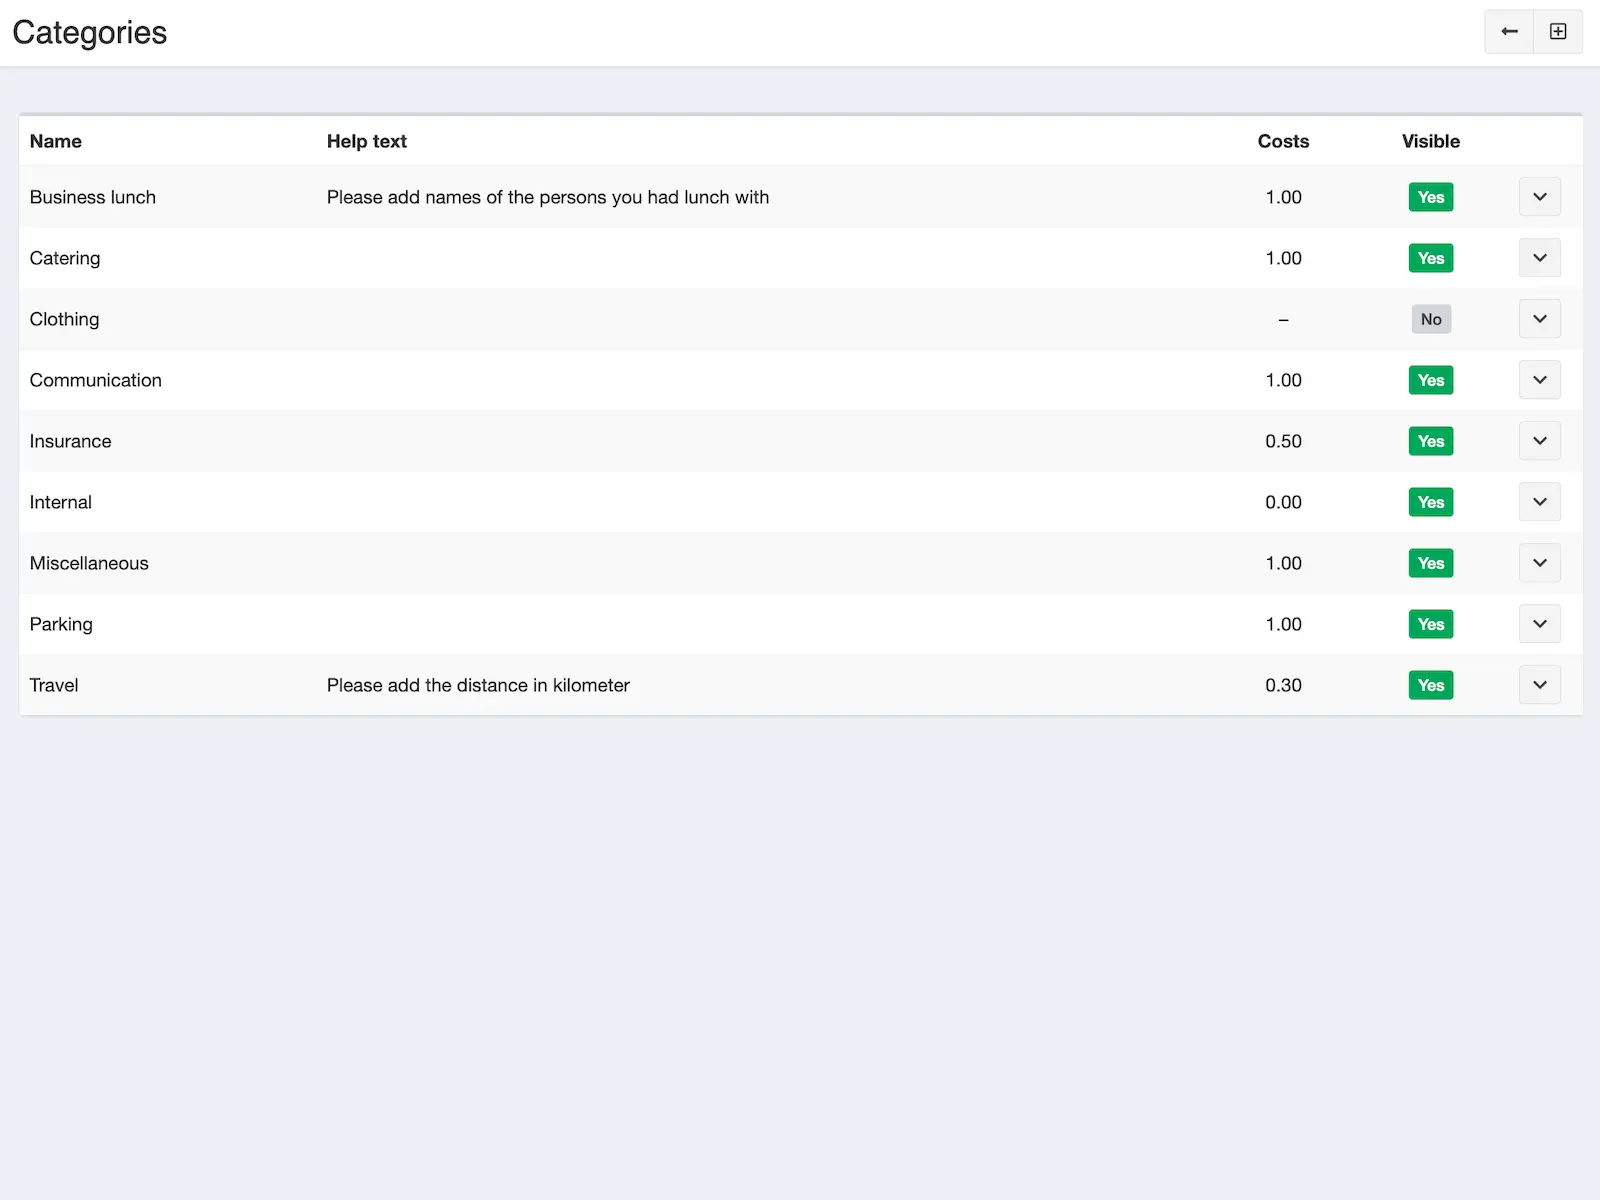
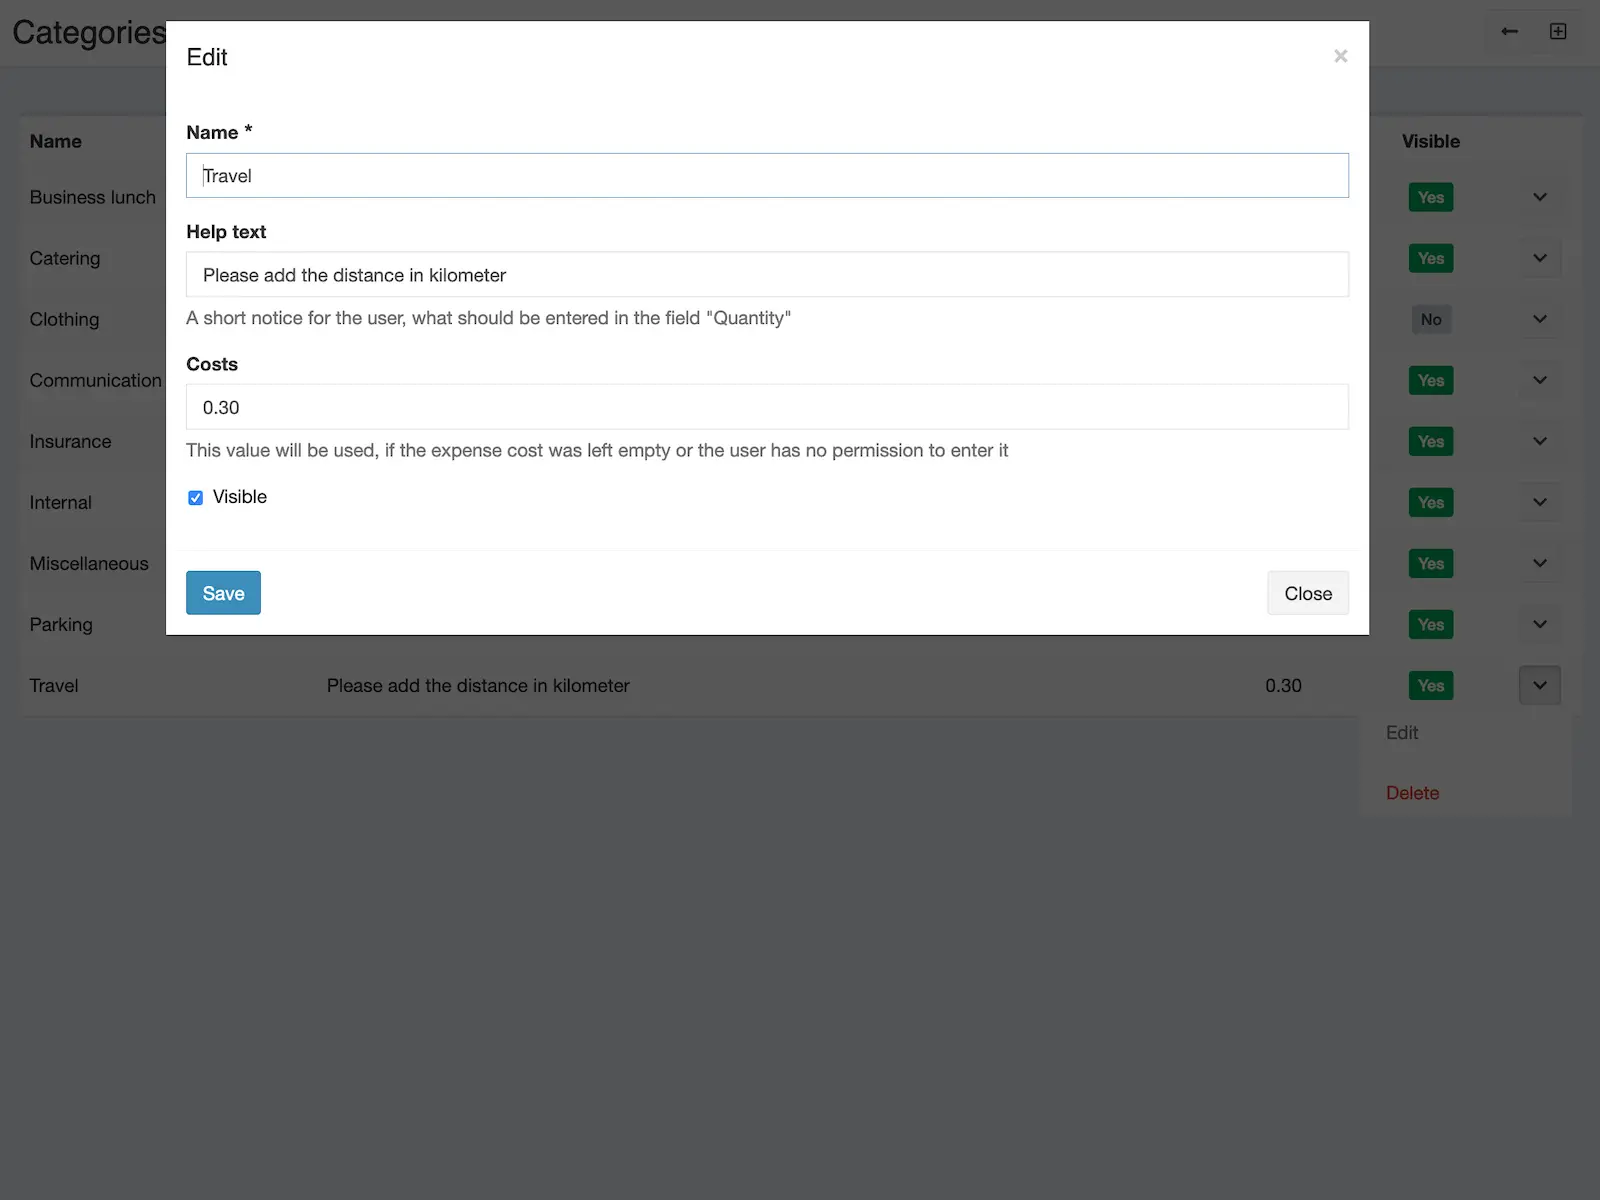
Expenses will be assigned to free configurable categories and each category has:
- name
- visibility flag
- default cost
- color
- help text (will be shown when creating an expense)
- description (will be copied into the expense description upon selection)
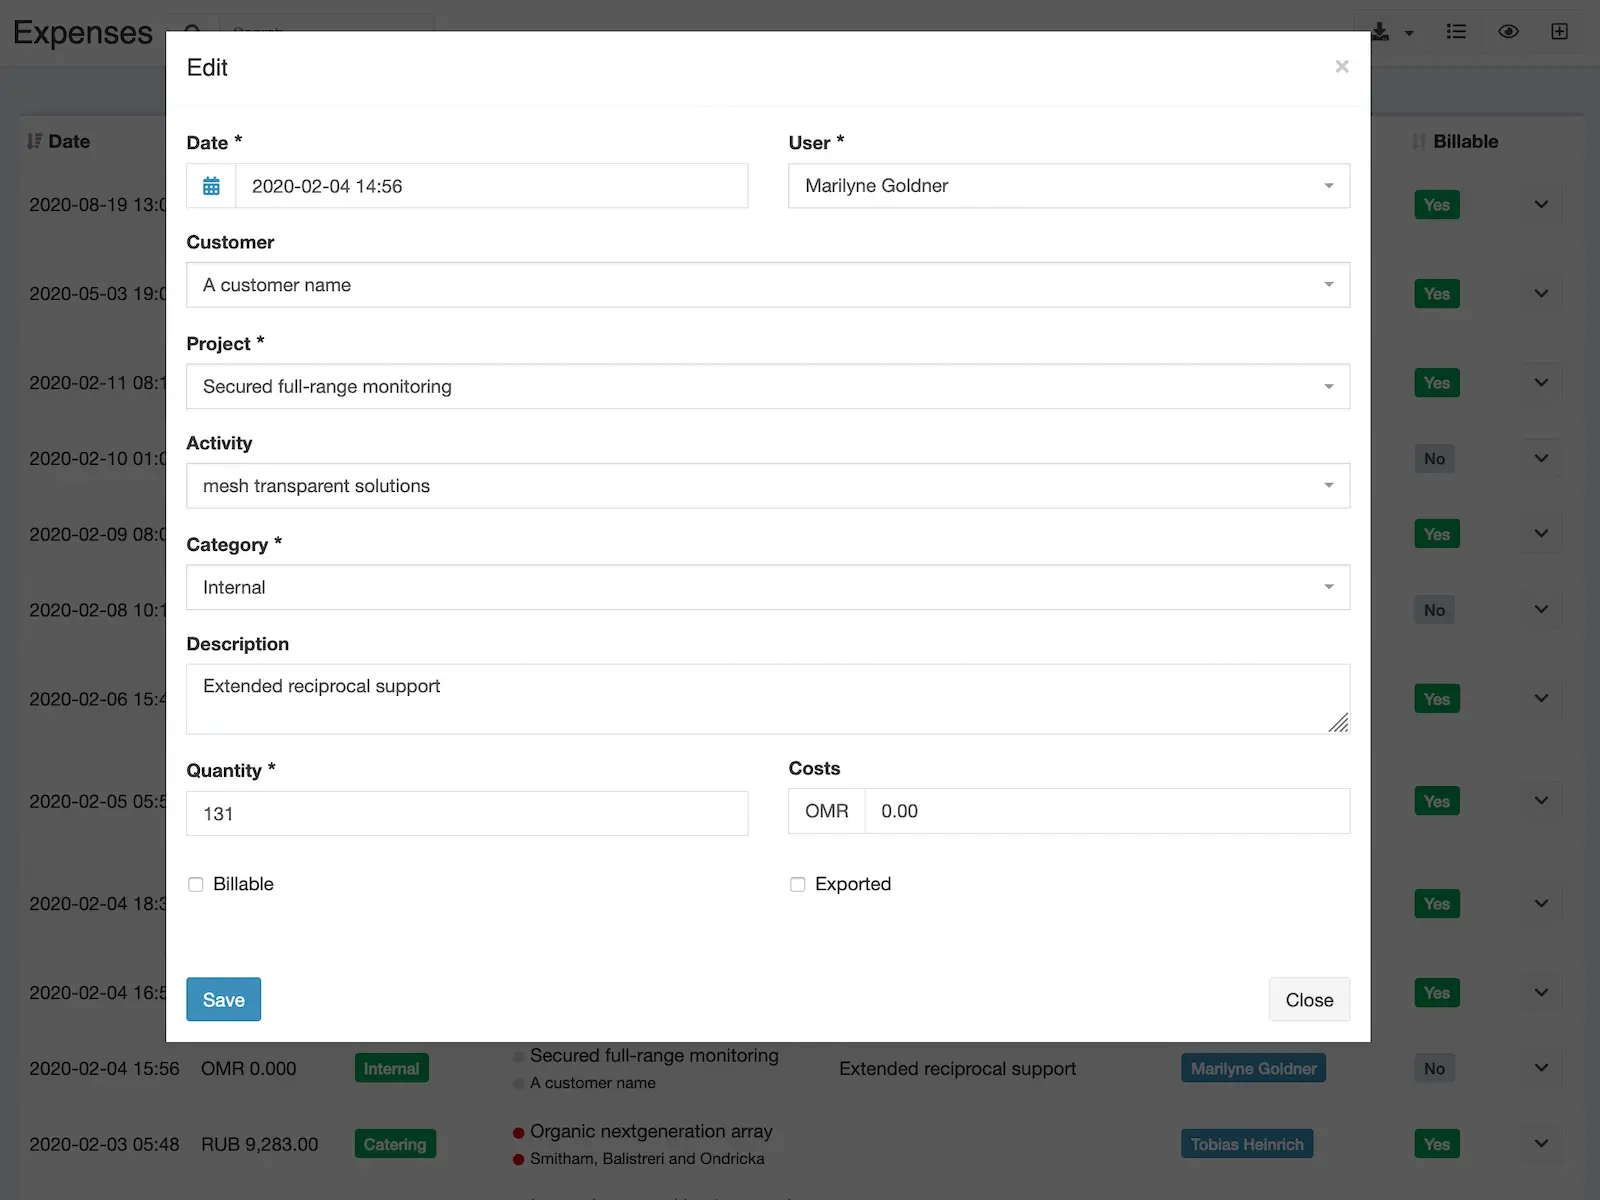
Each expense has the following fields:
- a date-time
- category (see above)
- user
- project (and customer)
- activity (optional)
- description (free text field)
- the cost (can be hidden for default user, if you use default cost via category)
- an amount (see it as multiplier, use 1 if you want to charge the cost only)
- a billable flag (non-billable expenses will not be added to your invoices)
- an export flag (to make sure, that each expense will be invoiced only once)
If turned on, Expenses count towards budgets and revenue statistics.
Expense summaries are displayed on the detail pages for customer, project and activity.
Invoice calculator
This bundle ships two new invoice calculator:
-
ExpenseActivityInvoiceCalculatorone entry per activity, expenses display description -
ExpenseCategoryProjectInvoiceCalculator- one entry for each expense category, timesheets are grouped into one entry per project
Importing from Kimai v1
This bundle supports data import from Kimai v1, but you need to imported the other data (like customers) first.
An example for the import command:
bin/console kimai:bundle:expenses:import-v1 "mysql://username:password@127.0.0.1:3306/database?charset=utf8" "kimai_"
Установка
Копировать файлы
Extract the ZIP file and upload the included directory and all files to your Kimai installation to the new directory:
var/plugins/ExpensesBundle/The file structure needs to look like this afterwards:
var/plugins/
├── ExpensesBundle
│   ├── ExpensesBundle.php
|   └ ... more files and directories follow here ...
Очистить кэш
After uploading the files, Kimai needs to know about the new plugin. It will be found once the cache was re-built. Call these commands from the Kimai directory:
How to reload Kimai cache
bin/console kimai:reload --env=prod
It is not advised, but in case the above command fails you could try:
rm -r var/cache/prod/*
You might have to set file permissions afterwards:
Adjust file permission
You have to allow PHP (your webserver process) to write to var/ and it subdirectories.
Here is an example for Debian/Ubuntu, to be executed inside the Kimai directory:
chown -R :www-data .
chmod -R g+r .
chmod -R g+rw var/
You might not need these commands in a shared-hosting environment.
And you probably need to prefix them with sudo and/or the group might be called different from www-data.
Создать базу данных
Run the following command:
bin/console kimai:bundle:expenses:installThis will create the required database tables and update them to the latest version.
If you see an error like There are no commands defined in the "kimai:bundle:XYZ" namespace.,
then either the directory has a wrong name (must be var/plugins/ExpensesBundle/) or you forgot to clear the cache (look above).
Обновления
Updating the plugin works exactly like the installation:
- Delete the directory
var/plugins/ExpensesBundle/ -
Execute all installation steps again:
- Копировать файлы
- Очистить кэш
- Update database with
bin/console kimai:bundle:expenses:install
Changelog
Version 2.24.0
Compatibility: requires minimum Kimai 2.41.0
- Use improved invoice calculator logic
Version 2.23.0
Compatibility: requires minimum Kimai 2.40.0
- Refactor PDF renderer for compatibility with next major release
Version 2.22.0
Compatibility: requires minimum Kimai 2.34.0
- Prevent unwanted date changes on unedited value
- Compatibility with 3.0 interface changes
Version 2.21.0
Compatibility: requires minimum Kimai 2.34.0
- Improve API docs
Version 2.20.0
Compatibility: requires minimum Kimai 2.34.0
- Better search logic, including negated search terms
Version 2.19.0
Compatibility: requires minimum Kimai 2.25.0
- Do never return export items, if export query included tags
Version 2.18.0
Compatibility: requires minimum Kimai 2.25.0
- Added empty “category” option, so the user has to choose one
- Support
Quantitycolumn in overview listing - Allow to hide
Customercolumn - Use translations from Kimai core
- PHPStan v2: Code syntax improvements (Refactoring)
Version 2.17.1
Compatibility: requires minimum Kimai 2.17.0
- Rename migration config for compatibility with new plugin installer
- Fix migration warning in newer Kimai versions
Version 2.17.0
Compatibility: requires minimum Kimai 2.17.0
- Category listing always shows fallback color in dots
Version 2.16.0
Compatibility: requires minimum Kimai 2.17.0
- Refactoring: new query types
- Refactoring: use attributes for export service injection
Version 2.15.0
Compatibility: requires minimum Kimai 2.17.0
- Inline Nelmio API Doc configuration
Version 2.14.0
Compatibility: requires minimum Kimai 2.17.0
- Added: new filter parameter for API collection call: users[], customers[], projects[], activities[]
- Added: unify API access permission check
Version 2.13.0
Compatibility: requires minimum Kimai 2.10.0
Fixed: error if category Default was hidden and no other category exists
Version 2.12.0
Compatibility: requires minimum Kimai 2.10.0
- Added: allow to filter expenses and expense categories from detail page listing
- Added: reload customer/project/activity detail page after expense was created
Version 2.11.0
Compatibility: requires minimum Kimai 2.10.0
- Changed: cache permissions in view
- Changed: support attribute caching in Voter
Version 2.10.0
Compatibility: requires minimum Kimai 2.10.0
- Fixed: use correct base class for migration - removes Doctrine deprecation warning
- Fixed: removed ApiSecurity annotation
Version 2.9.0
Compatibility: requires minimum Kimai 2.10.0
Added: System-Configuration to disable time field
Version 2.8.0
Compatibility: requires minimum Kimai 2.9.0
- Set “now” as pre-filled default value for an expense date
- Remove time field and set to 12:00:00 internally
- Fix “not null” category validator does not highlight correct field
- More DateTime to DateTimeImmutable refactorings
Version 2.7.0
Compatibility: requires minimum Kimai 2.9.0
- Changed: internal DateTime to DateTimeImmutable refactoring
- Changed: replace deprecated RestRoute attribute with SF native one
- Changed: replace deprecated Route vs Attribute annotations
Version 2.6.0
Compatibility: requires minimum Kimai 2.6.0
- Added: calculate “exported” vs. “not exported” statistics and provide for several statistics
- Added: sort invoice entries if “expense category project” grouping is activated
- Changed: re-use “Expenses” translation for configuration
- Fixed: broken “category” translation
Version 2.5.0
Compatibility: requires minimum Kimai 2.5.0
- Changed: create default category if none is existing yet
- Changed: moved some translations to core allowing more languages
Version 2.4.0
Compatibility: requires minimum Kimai 2.1.0
Use annotation type for routes
Version 2.3.0
Compatibility: requires minimum Kimai 2.0.33
Fixed: API pagination compatibility with Kimai 2.0.33
Демо
Вы можете протестировать этот плагин на demo.kimai.org:
Имя пользователя: susan_super
Пароль: password
Скриншоты
FAQ
These FAQs are provided by the developer of this offer.
All paid plugins are annual subscriptions. Read more about the exact license details here.
You can buy the plugin via the Marketplace LemonSqueezy and pay with Credit Card or PayPal for immediate access. You can also get in touch and pay with wire transfer or SEPA, but you will have to wait a few days before getting access to the plugin.
Basic support is included and I am happy to help occasionally with simple issues. Larger support-questions, bug-reports and feature-requests will be answered in this Github repository. Customers who bought a plugin including support can write to support@kimai.org.
If you purchase a plugin subscription, you’ll receive all updates, bugfixes, and support for one year. After the subscription ends, your plugin will continue to work without any restrictions – you can keep using the last version you downloaded. This model is known as a perpetual fallback license. However, access to future updates, new features, and compatibility fixes require an active subscription.
No, refunds are not available. Kimai plugins are delivered as digital downloads and cannot be returned once the source code has been accessed. Additionally, payment providers charge non-refundable transaction fees, even if a refund were issued. For these reasons, all sales are final. The same applies for subscriptions that were not canceled in time. Please try the demo versions or contact us before purchase if you’re unsure whether a plugin fits your needs.