Integração com Microsoft Teams
Ajuda a organizar arquivos relacionados aos projetos no Microsoft Teams

Klein IT Solutions
Microsoft Teams Integration for Kimai
Seamlessly connect Kimai with Microsoft Teams
Overview
The Microsoft Teams Integration Plugin enhances Kimai by synchronizing your customer and project structure directly into Microsoft Teams. Whenever you create customers or projects in Kimai, the plugin can generate matching teams and channels — ensuring consistent organization across both systems.
Designed for companies relying on Teams as their primary collaboration hub, this plugin streamlines document management, improves team alignment, and reduces manual setup time.
Key Features
- Automated creation of customer and project structures inside a chosen Microsoft Teams Tenant
- Fully integrated with Microsoft Graph API
- Central configuration directly within Kimai
- Live configuration and credentials health check
- Secure Azure AD authentication
- Works seamlessly with standard Microsoft Teams environments
- Ideal for agencies, IT service providers, and project-based teams
Installation Guide
1. Requirements
- Kimai 2.43+
- Azure App Registration: Tenant ID, Client ID, Client Secret
2. Upload the Plugin
Extract the ZIP purchased from the shop and upload it to:
/your-kimai/var/plugins/TeamsIntegrationBundle/
3. Install Azure App Registration
- Go to the Azure Portal.
- Navigate to Azure Entra → App registrations → New registration.
- Name your app (e.g., “Kimai Teams Integration”).
- Set Supported account types to “Accounts in this organizational directory only”.
- Click Register.
- After registration, note down the Application (client) ID and Directory (tenant) ID.
- Go to Certificates & secrets → New client secret. Add a description and set an expiration. Click Add and copy the secret value.
- Navigate to API permissions → Add a permission → Microsoft Graph → Application permissions.
- Add the following permissions:
Group.ReadWrite.AllUser.ReadBasic.AllTeamSettings.ReadWrite.All
- Click Grant admin consent for [Your Organization] and confirm.
- Your Azure App Registration is now set up.
4. Add Required Environment Variables
These variables are necessary for the plugin to authenticate with Microsoft Graph API.
4.1 For Non-Docker Users
Create .env in the main Kimai directory:
GRAPH_TENANT_ID=
GRAPH_CLIENT_ID=
GRAPH_CLIENT_SECRET=
4.2 For Docker Users
Add the following lines to your docker-compose.yml under the kimai service:
environment:
  - GRAPH_TENANT_ID=your_tenant_id
  - GRAPH_CLIENT_ID=your_client_id
  - GRAPH_CLIENT_SECRET=your_client_secret
Replace your_tenant_id, your_client_id, and your_client_secret with the actual values from your Azure App Registration.
5. Clear Cache
bin/console kimai:reload
Restart PHP-FPM if necessary.
6. Configure your instance
Look below for configuration details.
Optional: 7. Create Teams and Channels
To create teams and channels for existing customers and projects, run:
bin/console ms-teams:initialize
Please note:
- This command will create teams and channels for all existing customers and projects, which do not yet have a corresponding team or channel in Microsoft Teams.
- Make sure your Azure App has the necessary permissions and that the environment variables are correctly set before running this command.
- This operation may take some time depending on the number of customers and projects in your Kimai instance.
- Review the created teams and channels in Microsoft Teams to ensure they have been set up as expected.
- It is possible that you have to run this command multiple times if there are failures due to rate limiting or other transient issues.
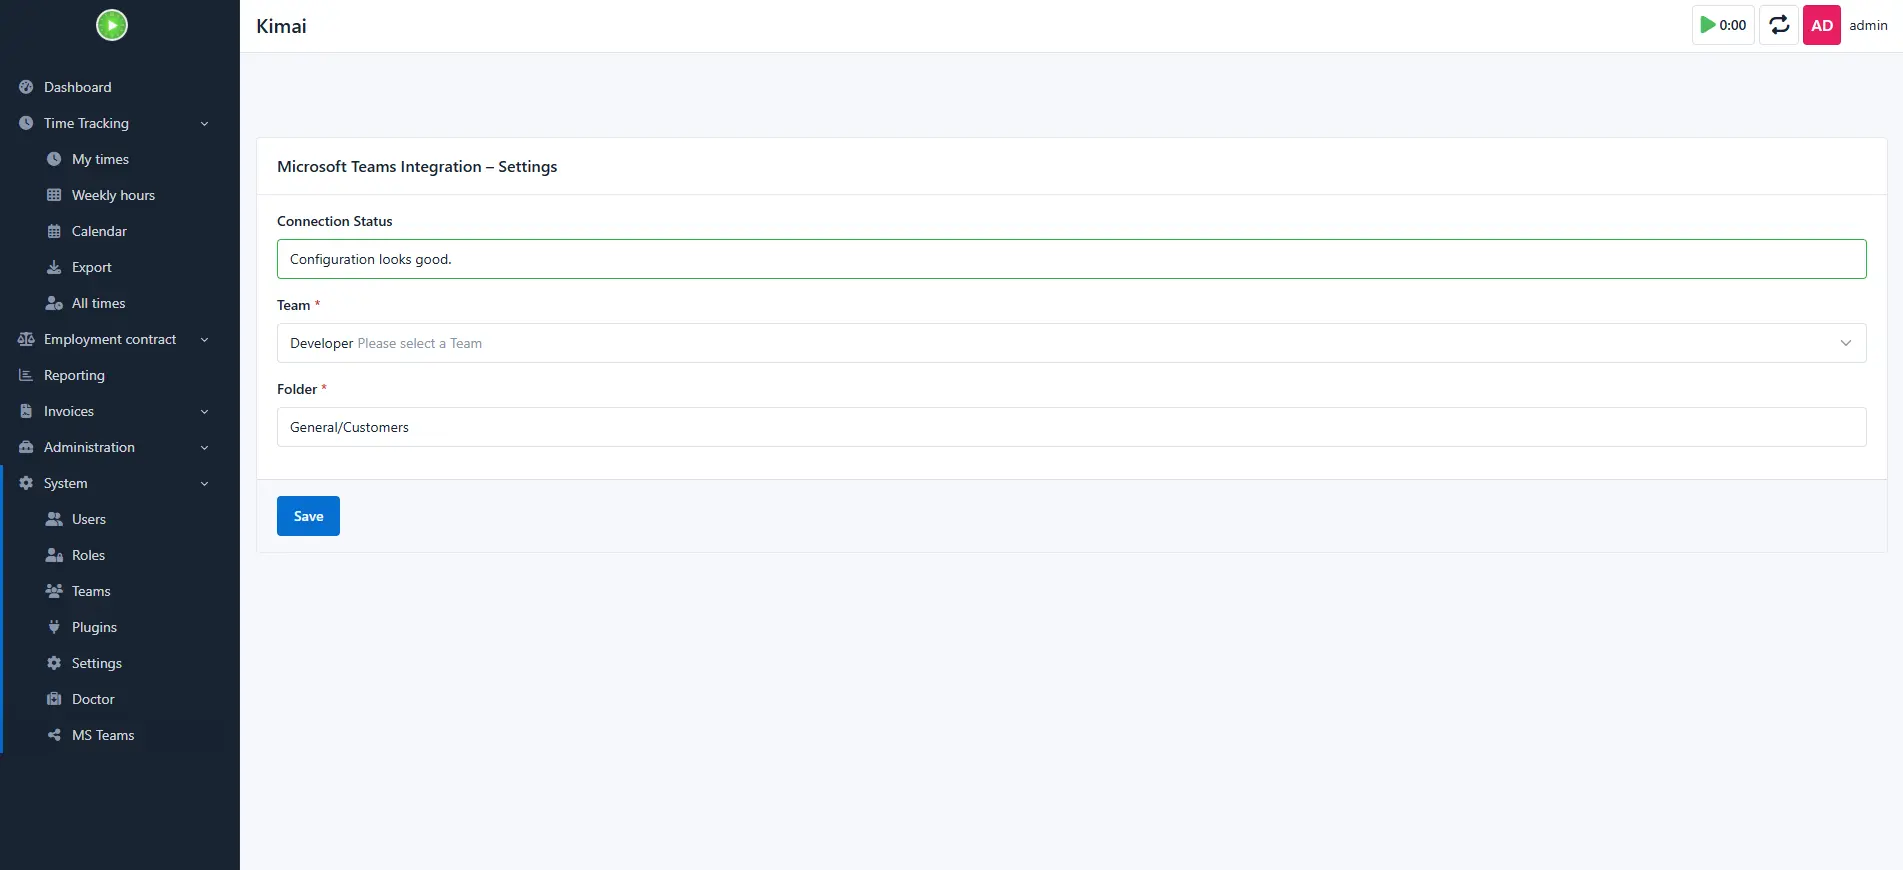
Configuration in Kimai
Go to:
Kimai → System → MS Teams
Here you configure exactly where Kimai will create customer and project folders inside Microsoft Teams.
Settings:
| Setting | Description | Default |
|---|---|---|
| Admin user for Microsoft Teams | The default user which is the owner of every team and channel. | none |
| Admin user for Kimai | The default user which is the owner of every team created in Kimai by the plugin | none |
| Customer | ||
| Name template for the team | Template for naming the Microsoft Teams and Kimai Teams, optinal variables are {name} and {id} |
{name} |
| Description template for the team | Template for the description of the Microsoft Teams and Kimai Teams, optinal variables are {name} and {id} |
Team for Customer {name} |
| Archive teams for deleted customers | If enabled, teams will be archived instead of deleted when a customer is removed in Kimai. | false |
| Project | ||
| Name template for the channel | Template for naming the Microsoft Teams channels and Kimai Teams, optinal variables are {name} and {id} |
{name} |
| Archive channels for deleted projects | If enabled, channels will be archived instead of deleted when a project is removed in Kimai. | false |
Azure credentials are taken from .env.
Configuration Health Check
The plugin validates:
- Azure credentials
- Access token generation
On success:
Configuration looks good.
Support
All support is provided by Klein IT Solutions:
Email: support@klein-it.solutions
Compatibilidade
A tabela a seguir contém uma comparação entre o plug-in e a versão mínima exigida pelo Kimai.
| Versão do pacote | Versão mínima do Kimai |
|---|---|
| 1.1.0 | 2.43.0 |
Instalação
Copiar os arquivos
Extract the ZIP file and upload the included directory and all files to your Kimai installation to the new directory:
var/plugins/TeamsIntegrationBundle/The file structure needs to look like this afterwards:
var/plugins/
├── TeamsIntegrationBundle
│   ├── TeamsIntegrationBundle.php
|   └ ... more files and directories follow here ...
Limpar o cache
After uploading the files, Kimai needs to know about the new plugin. It will be found once the cache was re-built. Call these commands from the Kimai directory:
How to reload Kimai cache
bin/console kimai:reload --env=prod
It is not advised, but in case the above command fails you could try:
rm -r var/cache/prod/*
You might have to set file permissions afterwards:
Adjust file permission
You have to allow PHP (your webserver process) to write to var/ and it subdirectories.
Here is an example for Debian/Ubuntu, to be executed inside the Kimai directory:
chown -R :www-data .
chmod -R g+r .
chmod -R g+rw var/
You might not need these commands in a shared-hosting environment.
And you probably need to prefix them with sudo and/or the group might be called different from www-data.
Criar um novo banco de dados
Run the following command:
bin/console ms-teams:sync-foldersThis will create the required database tables and update them to the latest version.
If you see an error like There are no commands defined in the "kimai:bundle:XYZ" namespace.,
then either the directory has a wrong name (must be var/plugins/TeamsIntegrationBundle/) or you forgot to clear the cache (look above).
Atualizações
Updating the plugin works exactly like the installation:
- Delete the directory
var/plugins/TeamsIntegrationBundle/ -
Execute all installation steps again:
- Copiar os arquivos
- Limpar o cache
- Update database with
bin/console ms-teams:sync-folders
Captura da tela