Keycloak SAML
Use Keycloak as SAML identity provider for Kimai
Go back to general SAML configuration for Kimai.
SAML authentication with Keycloak accounts has proven to work with the following configurations. This guide provides a complete working setup that has been tested and verified.
Screenshots might be outdated, please check the text version below each image.
Important settings
singleSignOnService.url:https://{keycloak-domain}/realms/{realm}/protocol/saml- In Kimai:
kimai.saml.connection.idp.x509cert= value from IdPds:X509Certificate - In Kimai:
kimai.saml.connection.security.authnRequestsSigned: true - In Kimai: Configure the
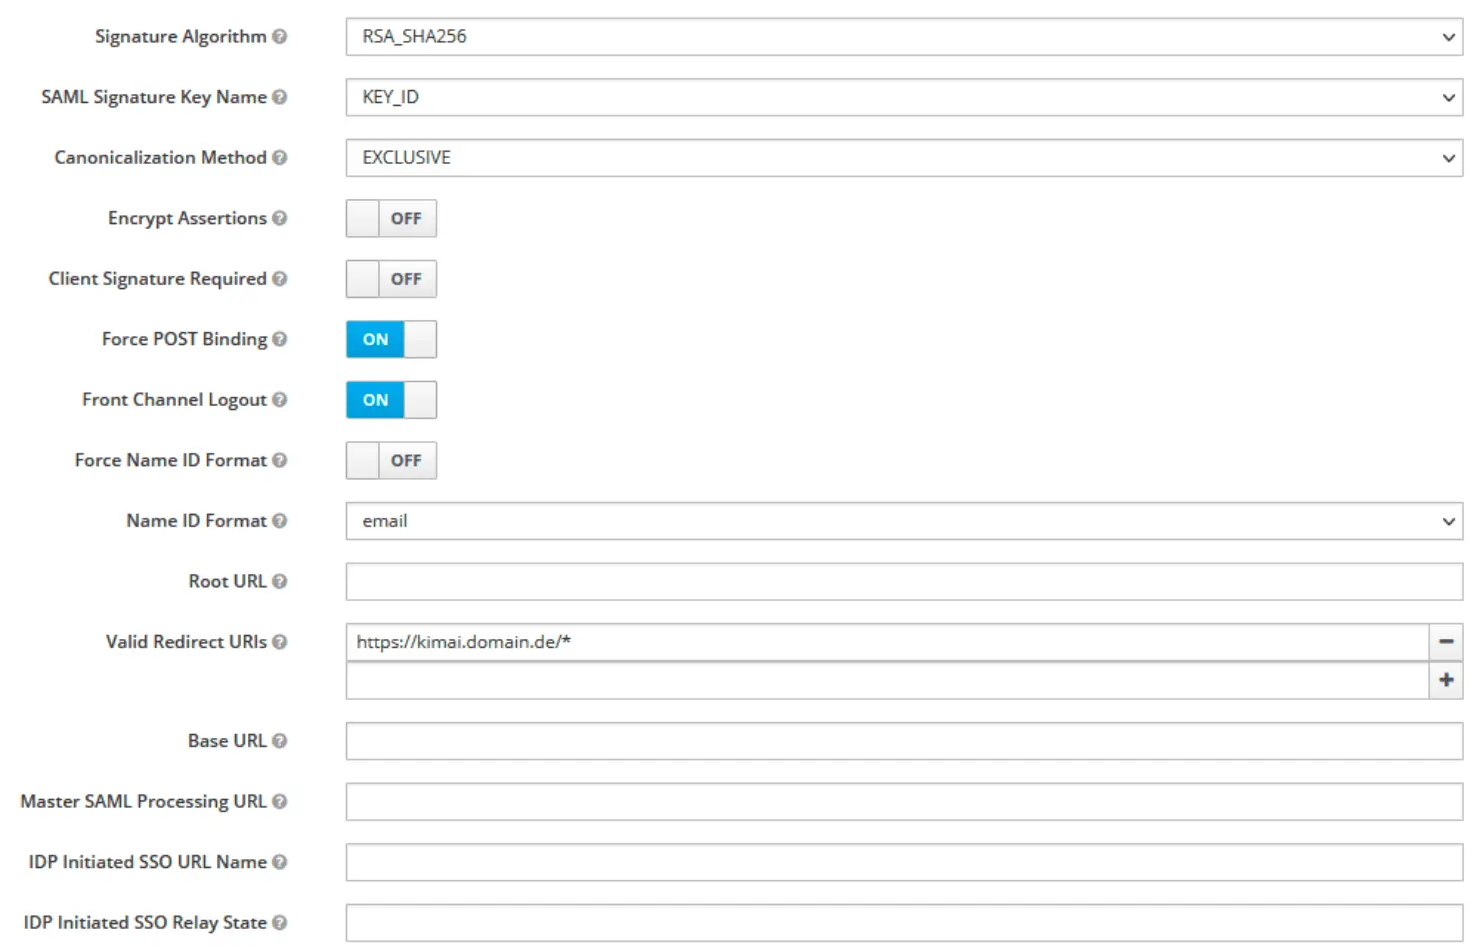
TRUSTED_PROXIESsetting, when using a reverse proxy to prevent login issues - In Keycloak: enable Force name ID format
- In Keycloak: enable Client signature required (this works with signed AuthnRequests)
Add a client for Kimai SAML
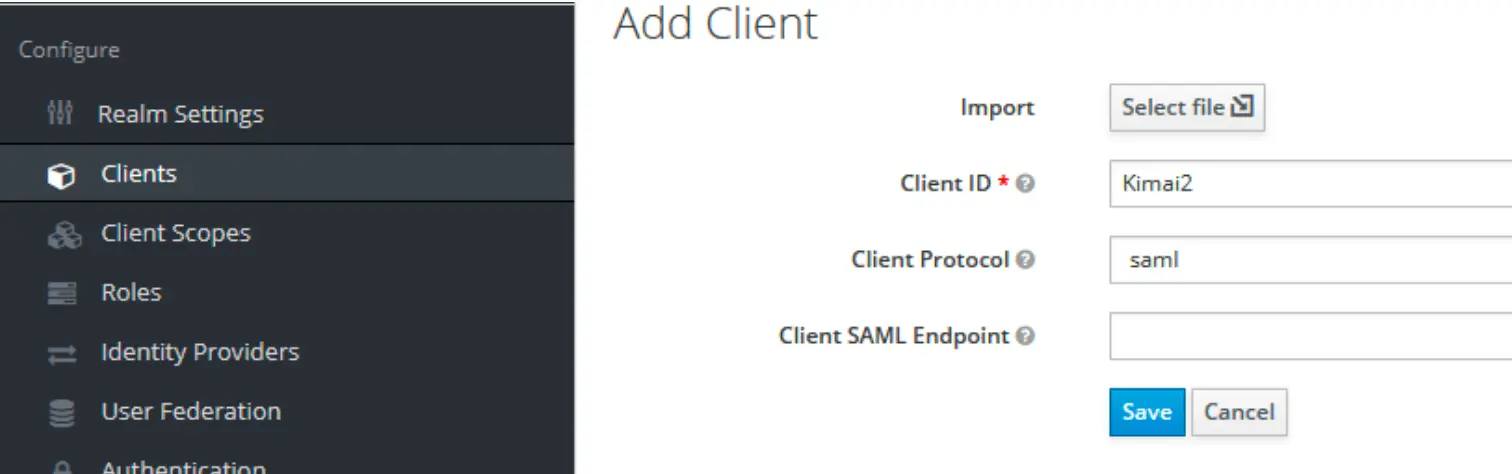
Configure the client
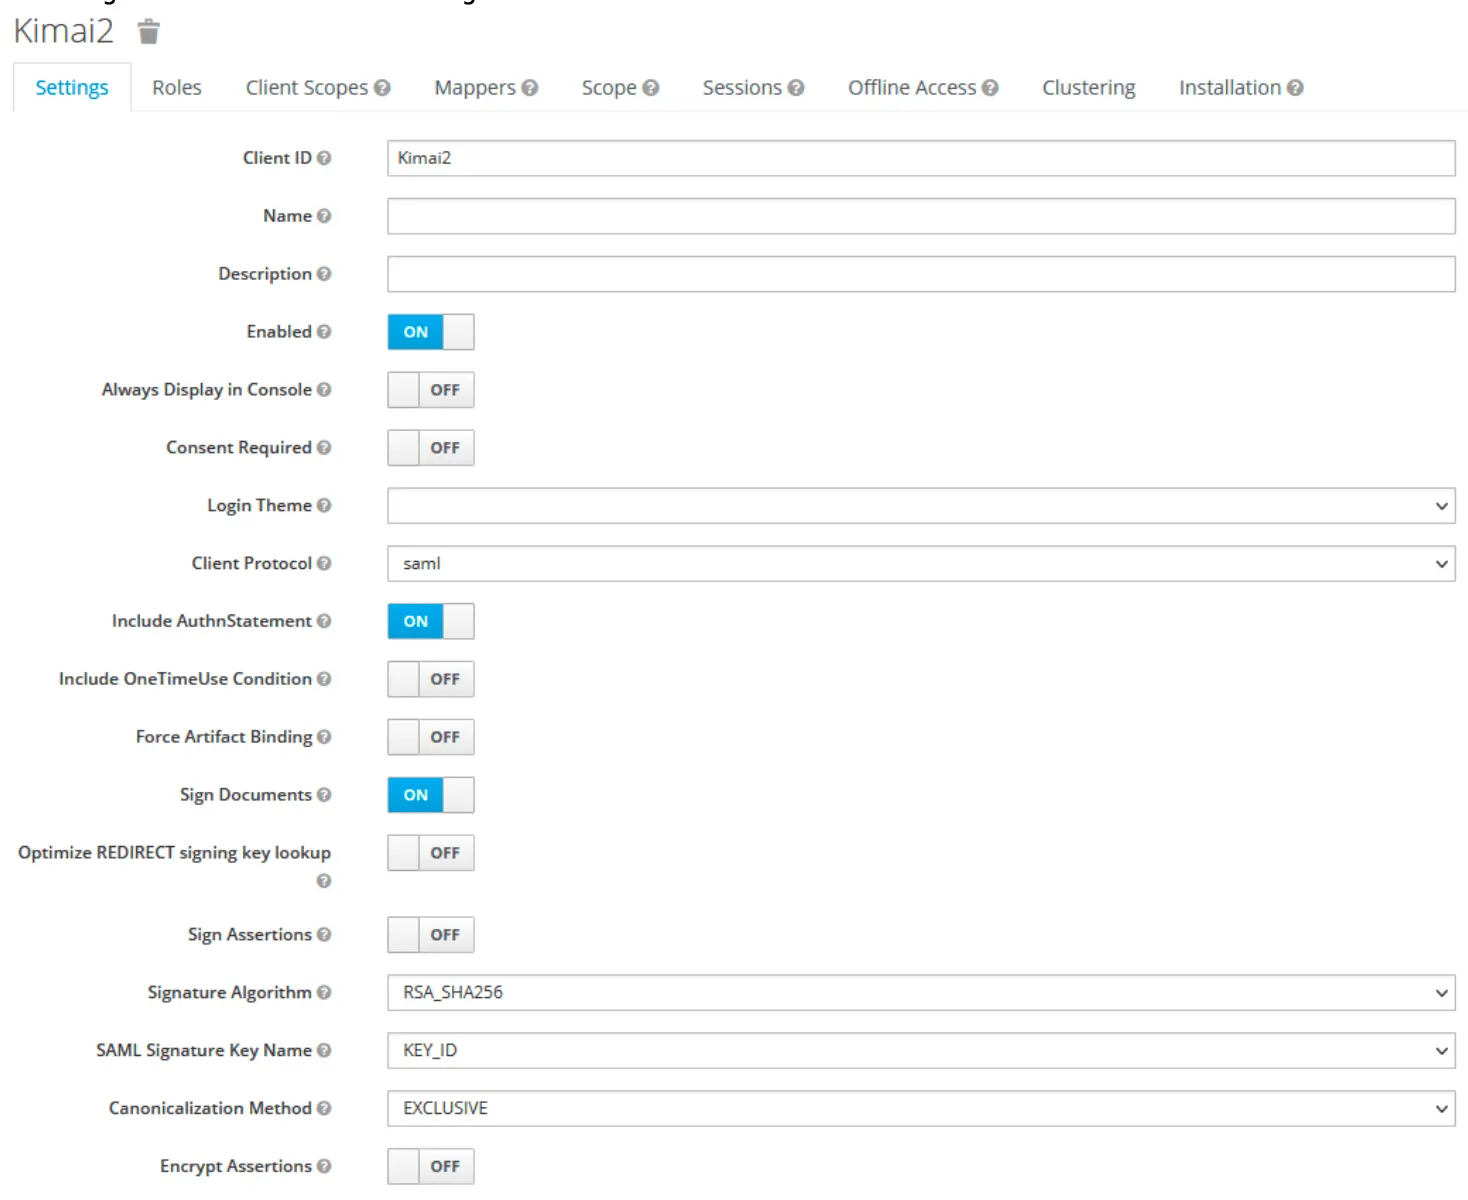
Note: The working setup uses Client Signature Required enabled, which works with signed AuthnRequests (authnRequestsSigned: true in Kimai configuration).
Certificates
-
IdP certificate: Obtain the
ds:X509Certificatefrom Keycloak’s SAML descriptor:
https://{keycloak-domain}/realms/{realm}/protocol/saml/descriptor
⚠️ Do not use the RS256 realm key from Realm Settings. -
SP keys: In Kimai config, set:
sp.privateKey→ private key generated in Keycloak (Clients → Kimai → Keys)sp.x509cert→ corresponding public key
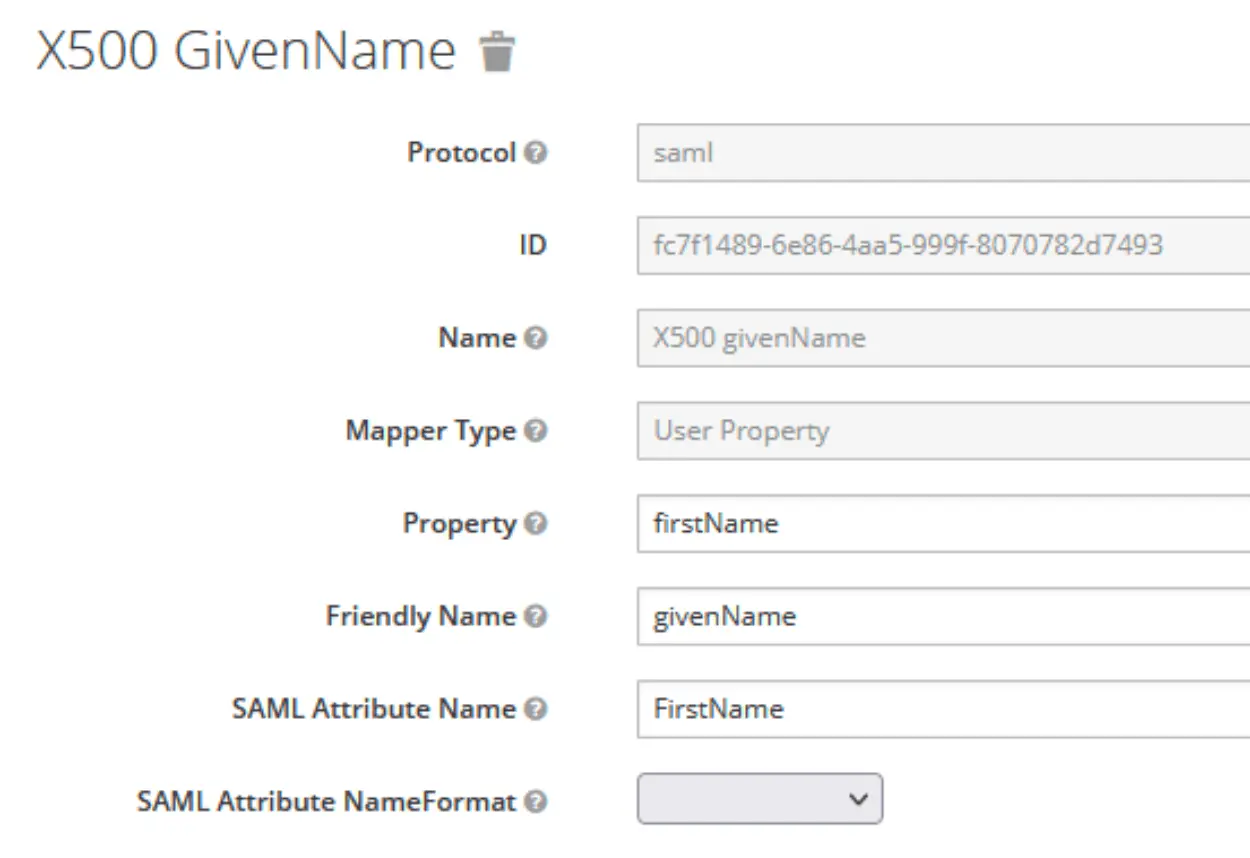
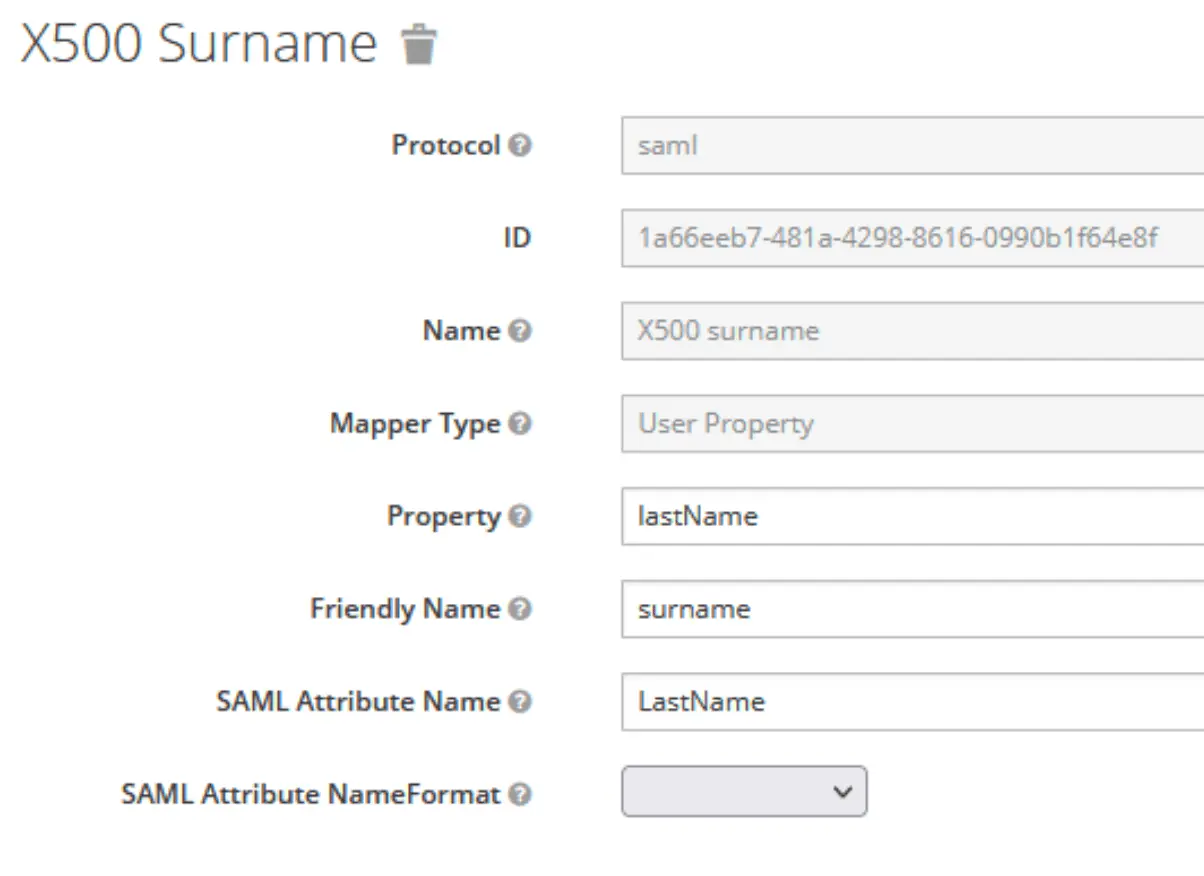
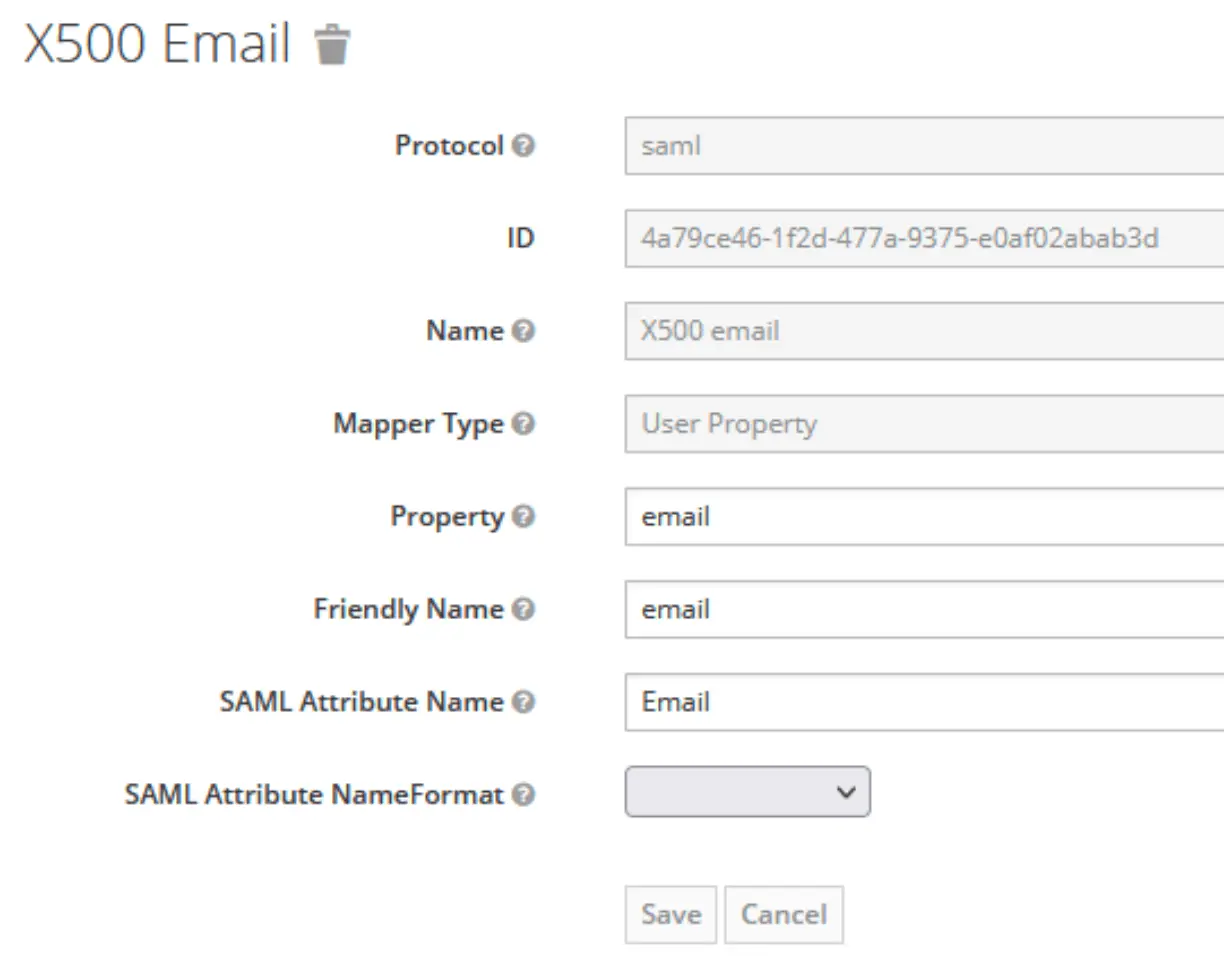
Create user attributes
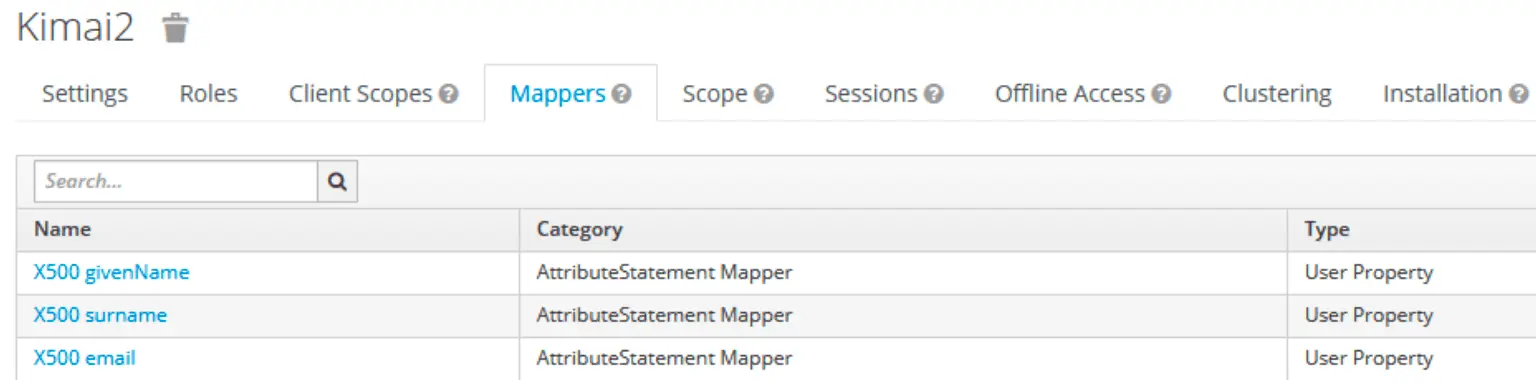
Keycloak client mappers (inside the {client}-dedicated scope)
Remove the default role list, then add:
- X500 email →
SAML Attribute Name: Email,SAML Attribute NameFormat: Unspecified - X500 surname →
SAML Attribute Name: LastName,SAML Attribute NameFormat: Unspecified - X500 givenName →
SAML Attribute Name: FirstName,SAML Attribute NameFormat: Unspecified - Role list →
Role attribute name: Roles,SAML Attribute NameFormat: Unspecified,Single Role Attribute: On
Client Scopes / Roles
Make sure to map unique Keycloak roles to Kimai roles.
If you reuse the same Keycloak role, the last mapping wins.
- Go to Configuration -> Client Scopes -> role_list
- Select Tab “Mappers”, edit “role_list”
- Set “Single Role Attribute” to “ON”
Working example with specific role naming convention:
{ saml: Admins, kimai: ROLE_SUPER_ADMIN }
{ saml: Management, kimai: ROLE_ADMIN }
{ saml: Teamlead, kimai: ROLE_TEAMLEAD }
Note: Using a consistent naming convention like Kimai-Role-* could help to avoid conflicts and makes role management clearer.
Configure local.yaml
Here is the complete working Kimai configuration that has been tested and verified:
kimai:
    saml:
        provider: keycloak
        activate: true
        title: Keycloak
        mapping:
            - { saml: $Email, kimai: email }
            - { saml: $FirstName $LastName, kimai: alias }
        roles:
            resetOnLogin: true
            attribute: Roles
            mapping:
                - { saml: Admins, kimai: ROLE_SUPER_ADMIN }
                - { saml: Management, kimai: ROLE_ADMIN }
                - { saml: Teamlead, kimai: ROLE_TEAMLEAD }
        connection:
            # Your SAML provider, here an example for Keycloak
            idp:
                entityId: 'https://example.com/realms/master'
                singleSignOnService:
                    url: 'https://example.com/realms/master/protocol/saml'
                    binding: 'urn:oasis:names:tc:SAML:2.0:bindings:HTTP-Redirect'
                x509cert: 'cert from https://{keycloak-domain}/realms/{realm}/protocol/saml/descriptor > ds:X509Certificate'
           # Your Kimai instance, replace https://127.0.0.1:8010 with your base URL
            sp:
                entityId: 'Kimai'
                assertionConsumerService:
                    url: 'https://example.com/auth/saml/acs'
                    binding: 'urn:oasis:names:tc:SAML:2.0:bindings:HTTP-POST'
                singleLogoutService:
                    url: 'https://example.com/auth/saml/logout'
                    binding: 'urn:oasis:names:tc:SAML:2.0:bindings:HTTP-Redirect'
                privateKey: 'private key generated in the Keycloak > Clients > Kimai > Keys'
                x509cert: 'public key generated in the Keycloak > Clients > Kimai > Keys'
            # only set baseurl, if auto-detection doesn't work
            baseurl: 'https://example.com/auth/saml/'
            strict: true
            debug: true
            security:
                nameIdEncrypted: false
                authnRequestsSigned: true
                logoutRequestSigned: false
                logoutResponseSigned: false
                wantMessagesSigned: false
                wantAssertionsSigned: false
                wantNameIdEncrypted: false
                requestedAuthnContext: true
                signMetadata: false
                wantXMLValidation: true
                signatureAlgorithm: 'http://www.w3.org/2001/04/xmldsig-more#rsa-sha256'
                digestAlgorithm: 'http://www.w3.org/2001/04/xmlenc#sha256'
            contactPerson:
                technical:
                    givenName: 'Kimai Admin'
                    emailAddress: 'kimai-tech@example.com'
                support:
                    givenName: 'Kimai Support'
                    emailAddress: 'kimai-support@example.com'
            organization:
                en:
                    name: 'Acme'
                    displayname: 'Acme'
                    url: 'https://www.example.com'
You should now be able to test the Login by visiting https://timetracking.example.com/ and clicking on the Keycloak title of the SAML method, you defined earlier.
Configuration Summary
This setup has been tested and verified to work with:
- Signed AuthnRequests (
authnRequestsSigned: true) - Keycloak client set to “Client signature required”
- NameID forced to email format
- Proper role mapping with consistent naming convention (
Kimai-Role-*) - Correct certificate configuration using IdP certificate from SAML descriptor
The configuration above provides a complete working setup for Kimai + Keycloak SAML integration.