Azure SAML
How to use Azure AD SAML identity provider with Kimai
Go back to general SAML configuration for Kimai.
SAML authentication with Azure accounts has proven to work. It requires four phases to get SAML configured. We will call them:
- Toolkit Setup
- Kimai Configuration
- Adding Users and Testing the Toolkit
Note: The Azure AD is a part of the Microsoft Cloud offerings; you will likely need either a Microsoft Cloud license or an Office 365 license associated with your domain. But it also works with a “Usage based Microsoft Azure Plan” account in which Azure AD can be used free of charge.
Toolkit Setup
Please check the following steps to set up an enterprise application using the SAML toolkit. This documentation is available in other languages as well in the Microsoft documentation
- Sign in to the Azure portal.
- On the left navigation pane, select the Microsoft Entra ID service.
- Navigate to Enterprise Applications and then select All Applications.
- To add new application, select New application.
- In the Add from the gallery section, type Microsoft Entra SAML Toolkit in the search box.
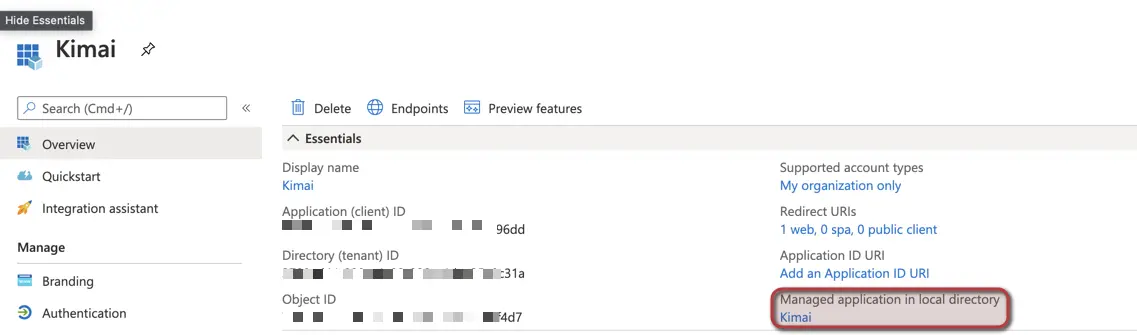
- Select Microsoft Entra SAML Toolkit from the results panel and then add the app with the name “Kimai”. Note: The name of the application has no technical effect, but could be displayed to users during login.
- On the left navigation panel, select the Microsoft Entra ID service.
- Navigate to Enterprise Applications and search for the app you just created
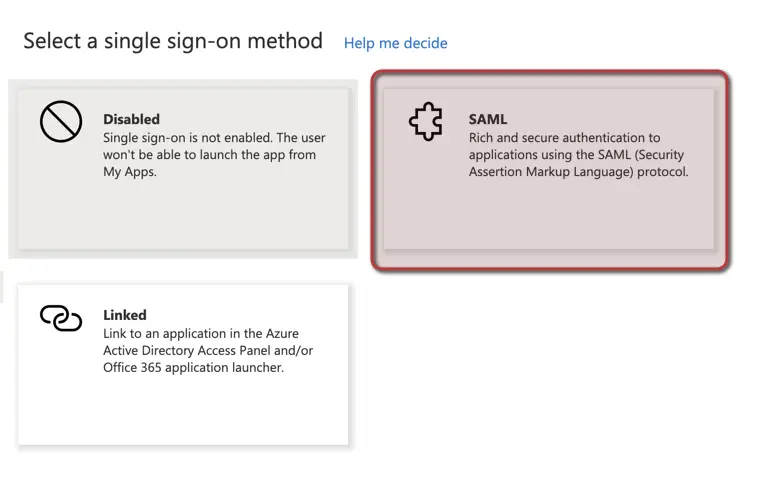
- Now navigate to Single sign-on on the left navigation and choose SAML as your choice:
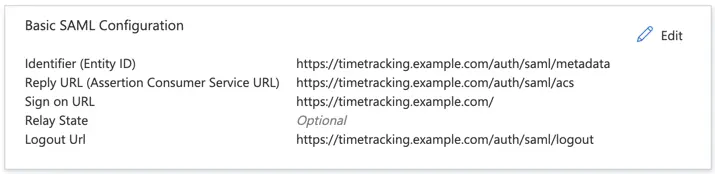
- Edit the Basic SAML Configuration at the top and add the required URLs:
| Setting | Value |
|---|---|
| Identifier (Entity ID) | https://timetracking.example.com/auth/saml/metadata |
| Reply URL (Assertion Consumer Service URL) | https://timetracking.example.com/auth/saml/acs |
| Sign on URL | https://timetracking.example.com/ |
| Logout Url | https://timetracking.example.com/auth/saml/logout |
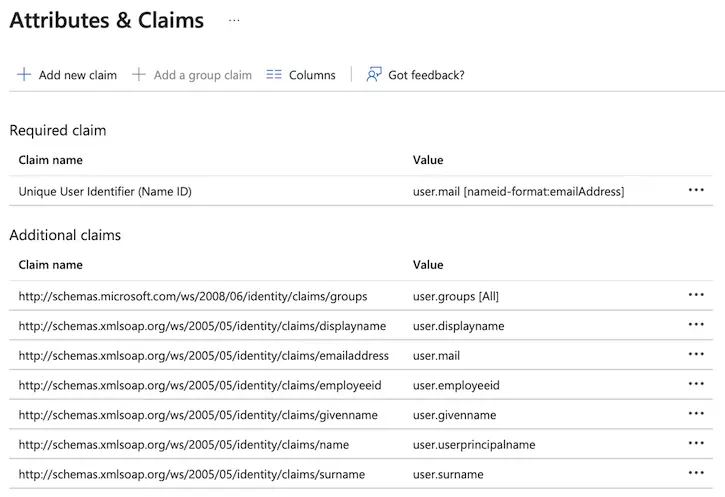
- Edit the User Attributes & Claims and ensure the following settings:
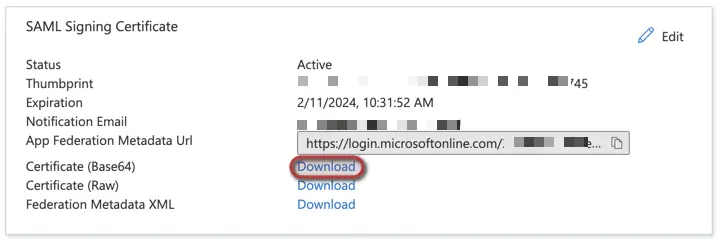
- Return to the Single Sign-On (visible in the left navigation panel) and download Certificate (Base64):
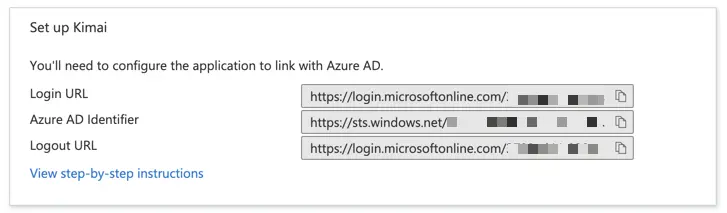
- Copy the three values of Set up Kimai, as we will need them to configure Kimai:
Kimai Configuration
Please copy & paste the entire SAML configuration. Adjust the following keys with your Azure / App specific settings:
kimai:
    saml:
        provider: microsoft
        activate: true
        title: Login with Azure AD
        mapping:
            - { saml: $http://schemas.xmlsoap.org/ws/2005/05/identity/claims/emailaddress, kimai: email }
            - { saml: $http://schemas.xmlsoap.org/ws/2005/05/identity/claims/givenname $http://schemas.xmlsoap.org/ws/2005/05/identity/claims/surname, kimai: alias }
            - { saml: $http://schemas.xmlsoap.org/ws/2005/05/identity/claims/displayname, kimai: title }
        roles:
            resetOnLogin: true
            attribute: http://schemas.microsoft.com/ws/2008/06/identity/claims/groups
            mapping:
                - { saml: xxxxxxxx-yyyy-xxxx-yyyy-xxxxxxxxxxxx, kimai: ROLE_ADMIN }
                - { saml: Azure-Group-Object-Id, kimai: ROLE_TEAMLEAD }
        connection:
            idp:
                entityId: 'https://sts.windows.net/****-****-***/'
                singleSignOnService:
                    url: 'https://login.microsoftonline.com/****-****-***/saml2'
                x509cert: 'ADD YOUR CERTIFICATE HERE'
            sp:
                entityId: 'https://timetracking.example.com/auth/saml/metadata'
                assertionConsumerService:
                    url: 'https://timetracking.example.com/auth/saml/acs'
                singleLogoutService:
                    url: 'https://timetracking.example.com/auth/saml/logout'
            security:
                requestedAuthnContext: false
- Change the title to the wanted text on the login button
title: Login with Azure - Change the idp configuration and add the before copied URLs:
entityId: 'https://sts.windows.net/****-****-***/' # Azure AD Identifier singleSignOnService: url: 'https://login.microsoftonline.com/****-****-***/saml2' # Login URL - Change the sp configuration, replacing https://timetracking.example.com with your Kimai URL:
entityId: 'https://timetracking.example.com/auth/saml/metadata' assertionConsumerService: url: 'https://timetracking.example.com/auth/saml/acs' singleLogoutService: url: 'https://timetracking.example.com/auth/saml/logout' - Change the x509cert by opening the earlier downloaded certificate file (in a text editor) and copy the content to the config file and change it to one line by removing the first line (BEGIN CERTIFICATE) and the last line (END CERTIFICATE) and then removing all line-breaks.
x509cert: 'REALLY LONG SET OF CHARACTERS' - Reload your cache
Adding Users and Testing the Toolkit
- Sign in to the Azure portal using either a work or school account, or a personal Microsoft account.
- On the left navigation panel, select the Azure Active Directory service.
- Navigate to App registrations and then select All Applications.
- Please click on the Kimai application , we called it Kimai, and then navigate to Users and groups on the left navigation bar.
- Click on Add user/group and add the groups or users, who should have access.
You should now be able to test the Login by visiting your Kimai URL and clicking on the title of the SAML method, you defined earlier.
Syncing Employee ID
This is not a standard attribute in Azure AD. But if you want to sync a unique “Employee ID”, you could add a field mapping for the account number:
- { saml: $http://schemas.xmlsoap.org/ws/2005/05/identity/claims/employeeid, kimai: accountNumber }
Syncing Groups
The example values for the group mapping from above:
    - { saml: xxxxxxxx-yyyy-xxxx-yyyy-xxxxxxxxxxxx, kimai: ROLE_ADMIN }
    - { saml: Azure-Group-Object-Id, kimai: ROLE_TEAMLEAD }
would lead with this Azure configuration
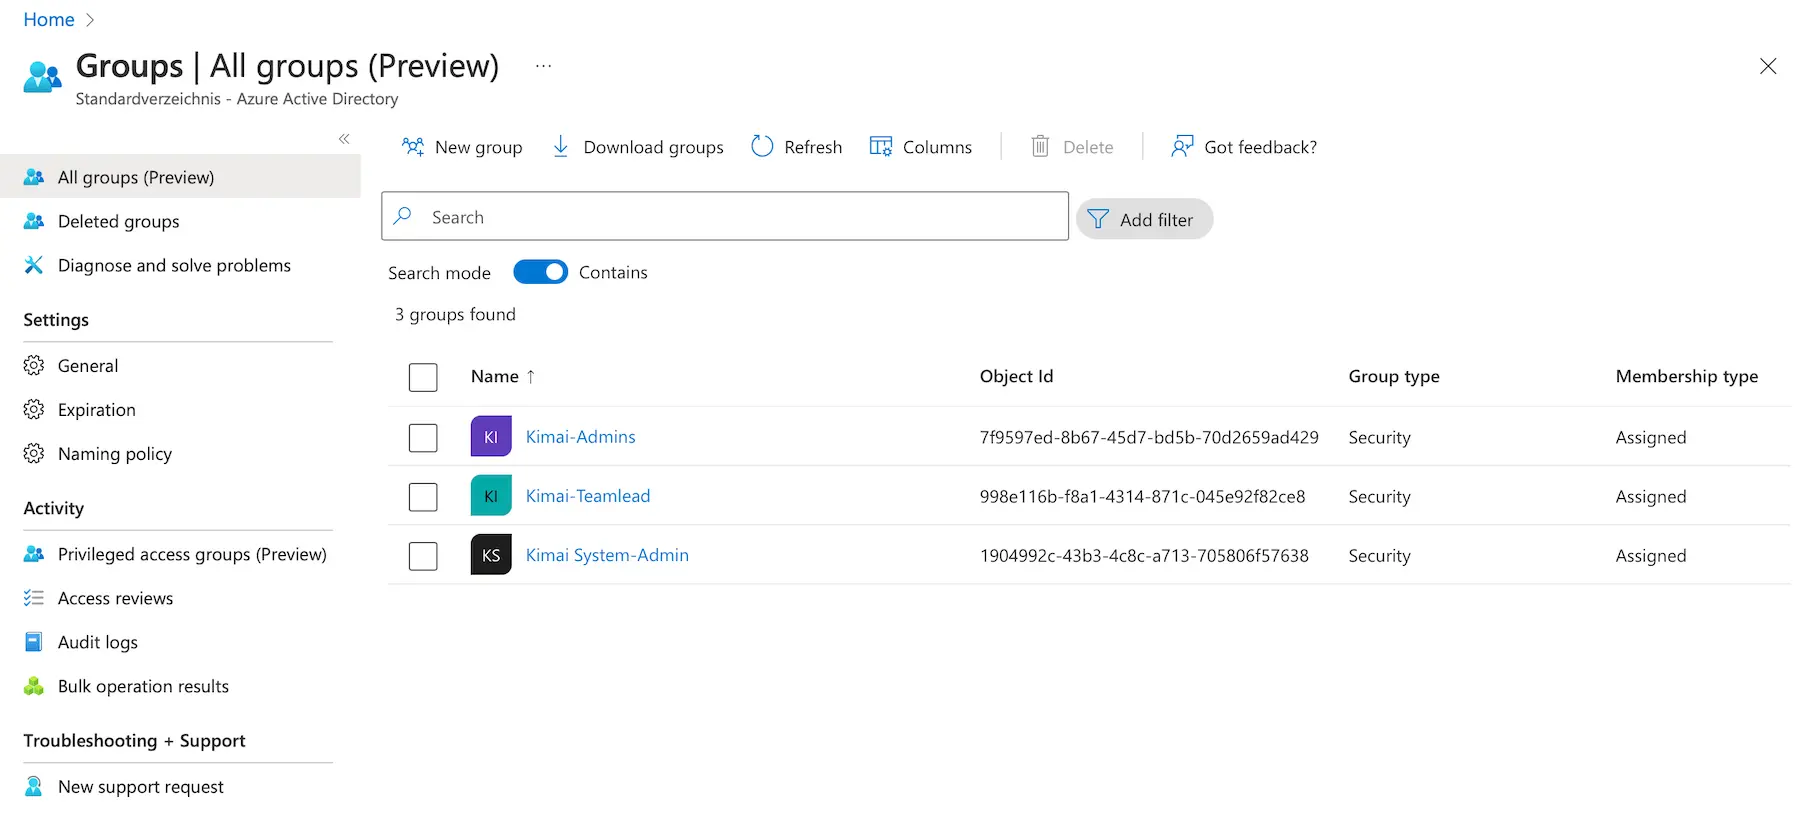
to this configuration:
    - { saml: 7f9597ed-8b67-45d7-bd5b-70d2659ad429, kimai: ROLE_ADMIN }
    - { saml: 998e116b-f8a1-4314-871c-045e92f82ce8, kimai: ROLE_TEAMLEAD }
The Kimai System-Admin group is not used in this example, but you would configure it in your local.yaml.