Single Sign-On (SAML)
Sign in to your Kimai Cloud with your company credentials
This feature is available for annual PRO subscriptions, check the feature comparison page for more details.
Your Kimai Cloud users can authenticate via any identity provider that supports SAML-based Single Sign-On (SSO). You’ll find the configuration after logging in at: My Kimai Cloud > SSO Authentication.
The following providers are currently supported:
- Google Workspace
- Microsoft Entra (formerly Azure AD)
- Keycloak
- Auth0
- Authentik
See below for integration details.
Important to know
- Existing cloud users are upgraded to SAML logins after their first SAML login, provided the identifier matches
- SAML users cannot log in with a password
- Without role mapping configured, every SAML user will only have the
Userrole — even administrators will be downgraded on every login
Additional settings
The SSO configuration includes three toggle settings:
Activate SSO Login— shows or hides the SSO login buttonActivate regular login with username— enables or disables the username/password form (can be turned off if all users log in via SSO)Reset assigned user roles during login— if enabled, user roles are reset on every login; custom role assignments are temporary and only last until the next login
Google SAML
Workspace configuration
- Go to https://admin.google.com/ac/apps/unified
- Choose Add app → Add custom SAML app
- Enter a name (e.g. “Kimai Cloud Live”) and add this image
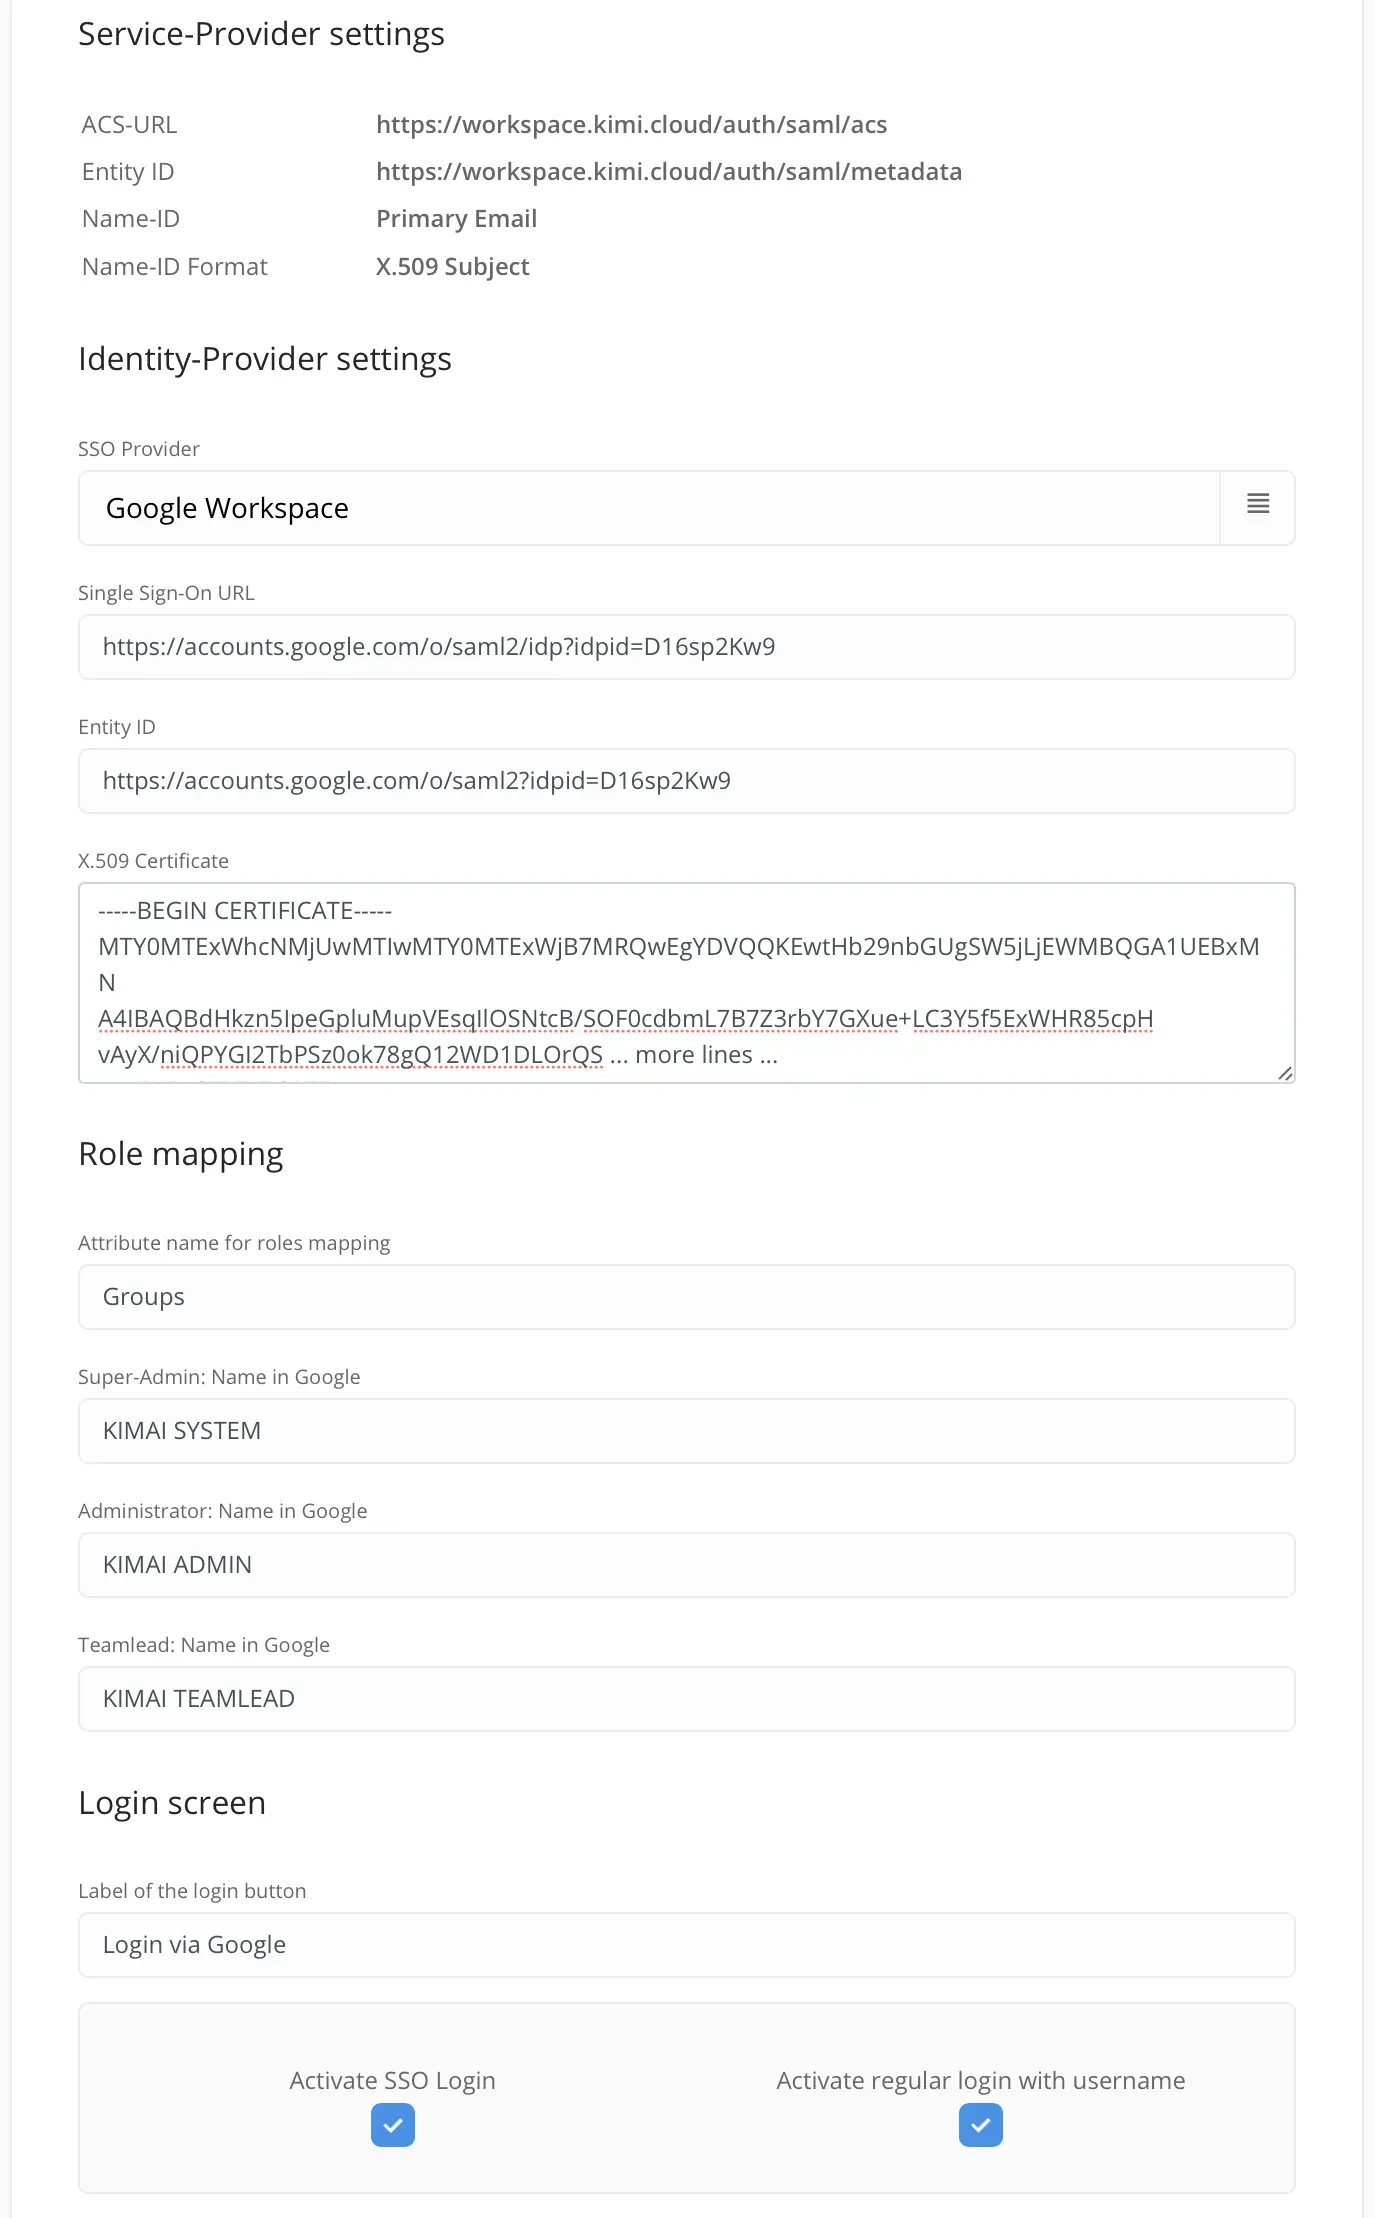
- Copy the values from the Google setup guide (page 2) into your Kimai Cloud SAML configuration:
SSO-URL→Single Sign-On URLEntity-ID→Entity IDCertificate→X.509 Certificate
- Copy the values from your Kimai Cloud SAML configuration into the Google setup guide (page 3):
ACS-URL→ACS-URLEntity ID→Entity-ID- Set
Name-ID Formatto “X509_SUBJECT” - Set
Name-IDto “Basic Information > Primary Email”
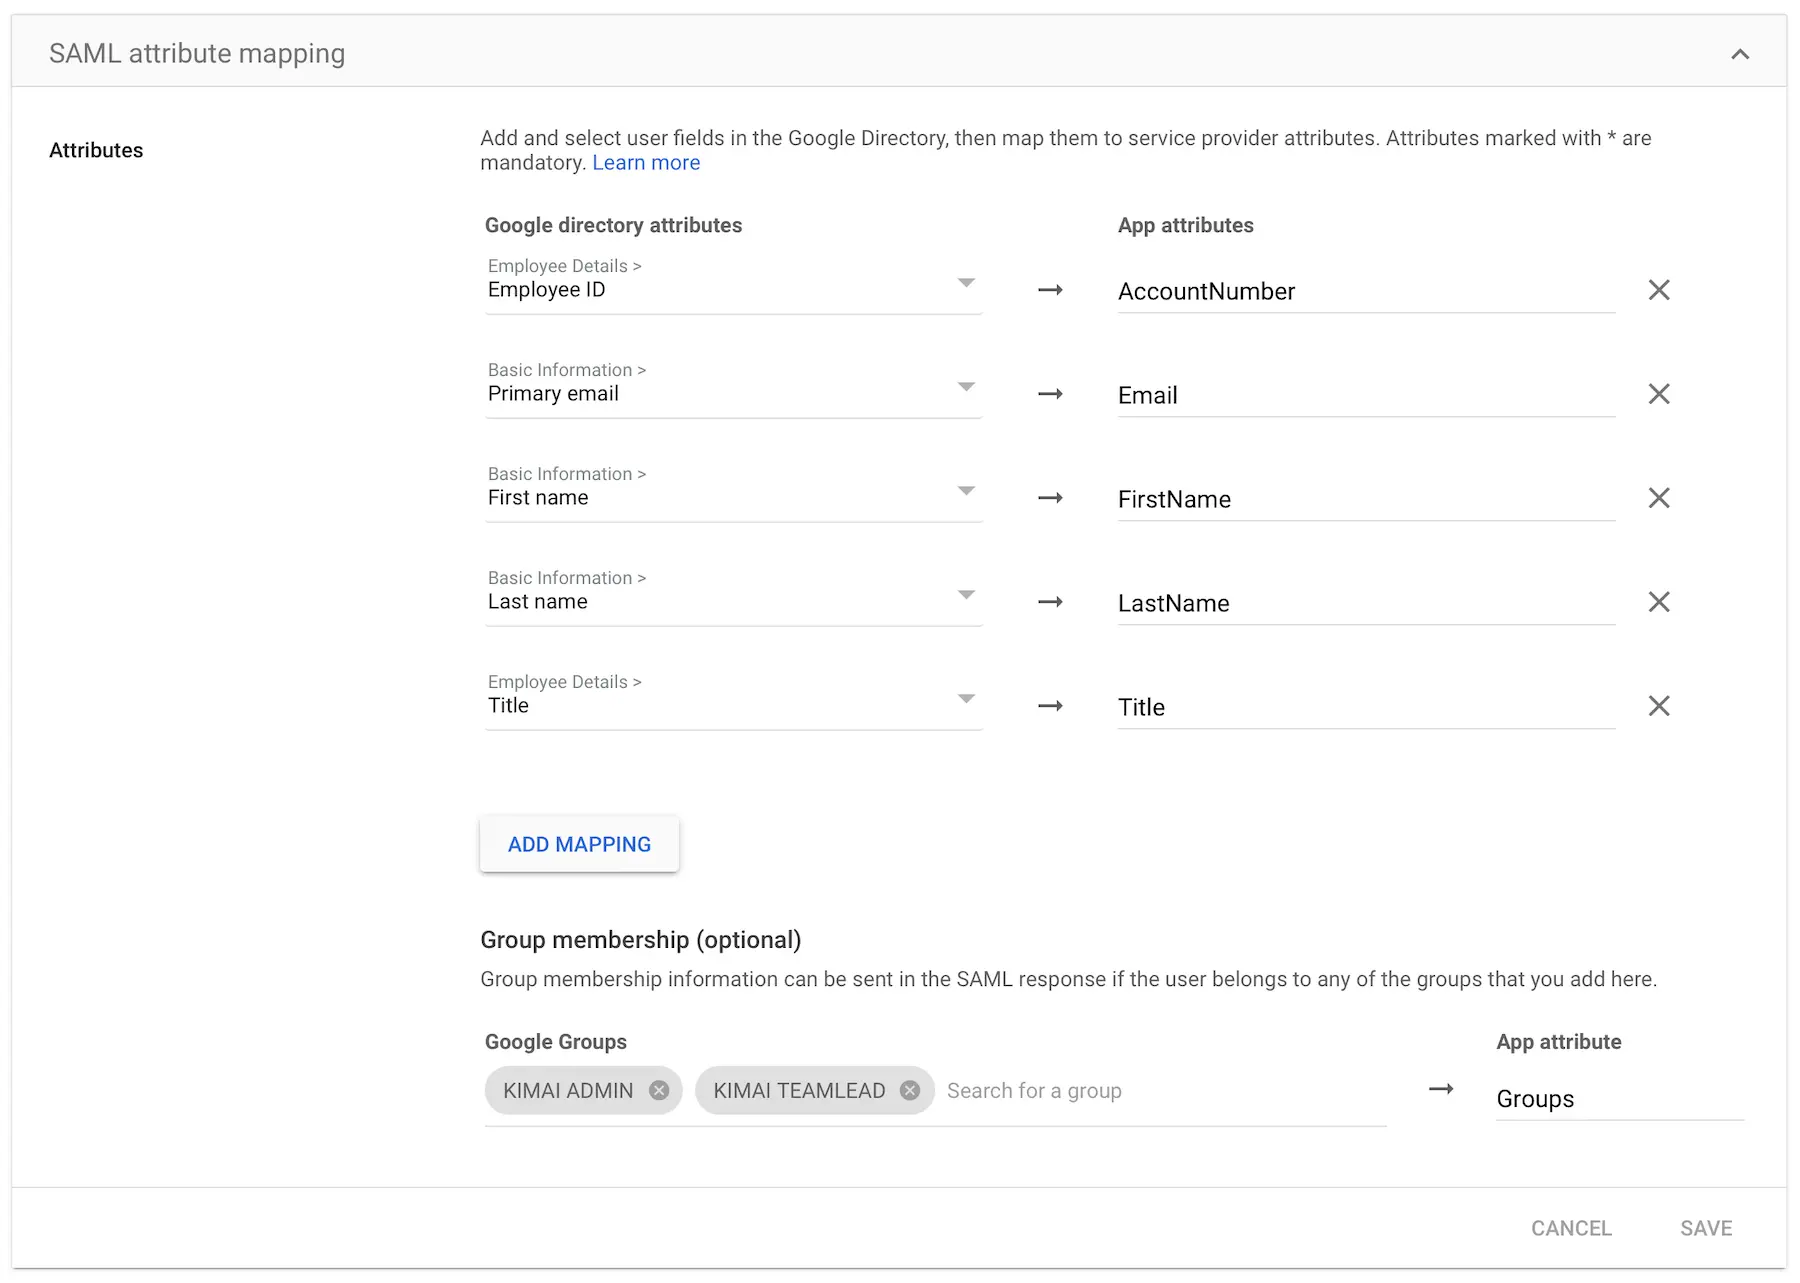
- On page 4 (
Attributes), define the user attribute mapping as follows (case is important; configure all attributes, even the ones you don’t use):Basic Information > Primary email→EmailBasic Information > First name→FirstName(optional)Basic Information > Last name→LastName(optional)Employee Details > Employee ID→AccountNumber(optional)Employee Details > Title→Title(optional)
- Return to the overview page and activate the new application for your users
- The final step is configuring
User rolemapping, which can be done in two ways:- Using Google Groups (recommended):
- Create groups for the Kimai roles you want to assign under Directory > Groups
- Assign those groups to your users
- Edit your SAML application and configure the optional group membership:
- Select all groups you configured for Kimai and map them to the App Attribute
Groups
- Select all groups you configured for Kimai and map them to the App Attribute
- Using a custom attribute:
- Create a user-defined attribute called
SAML Group - Add a field
KimaiRoleas a multi-value text type - Edit your users and set values for the new attribute:
Kimai-Systemmaps to the Kimai roleSystem-AdminKimai-Adminmaps to the Kimai roleAdministratorKimai-Teamleadmaps to the Kimai roleTeamlead
- Edit your SAML application and add one more attribute mapping:
- Google directory attribute
SAML Group > KimaiRole→ App AttributeGroups
- Google directory attribute
- Create a user-defined attribute called
- Using Google Groups (recommended):
You can use different names for your groups — the mapping is done in the next step in your Cloud configuration.
The following screenshot shows an example of the attribute mapping including groups:
Cloud configuration
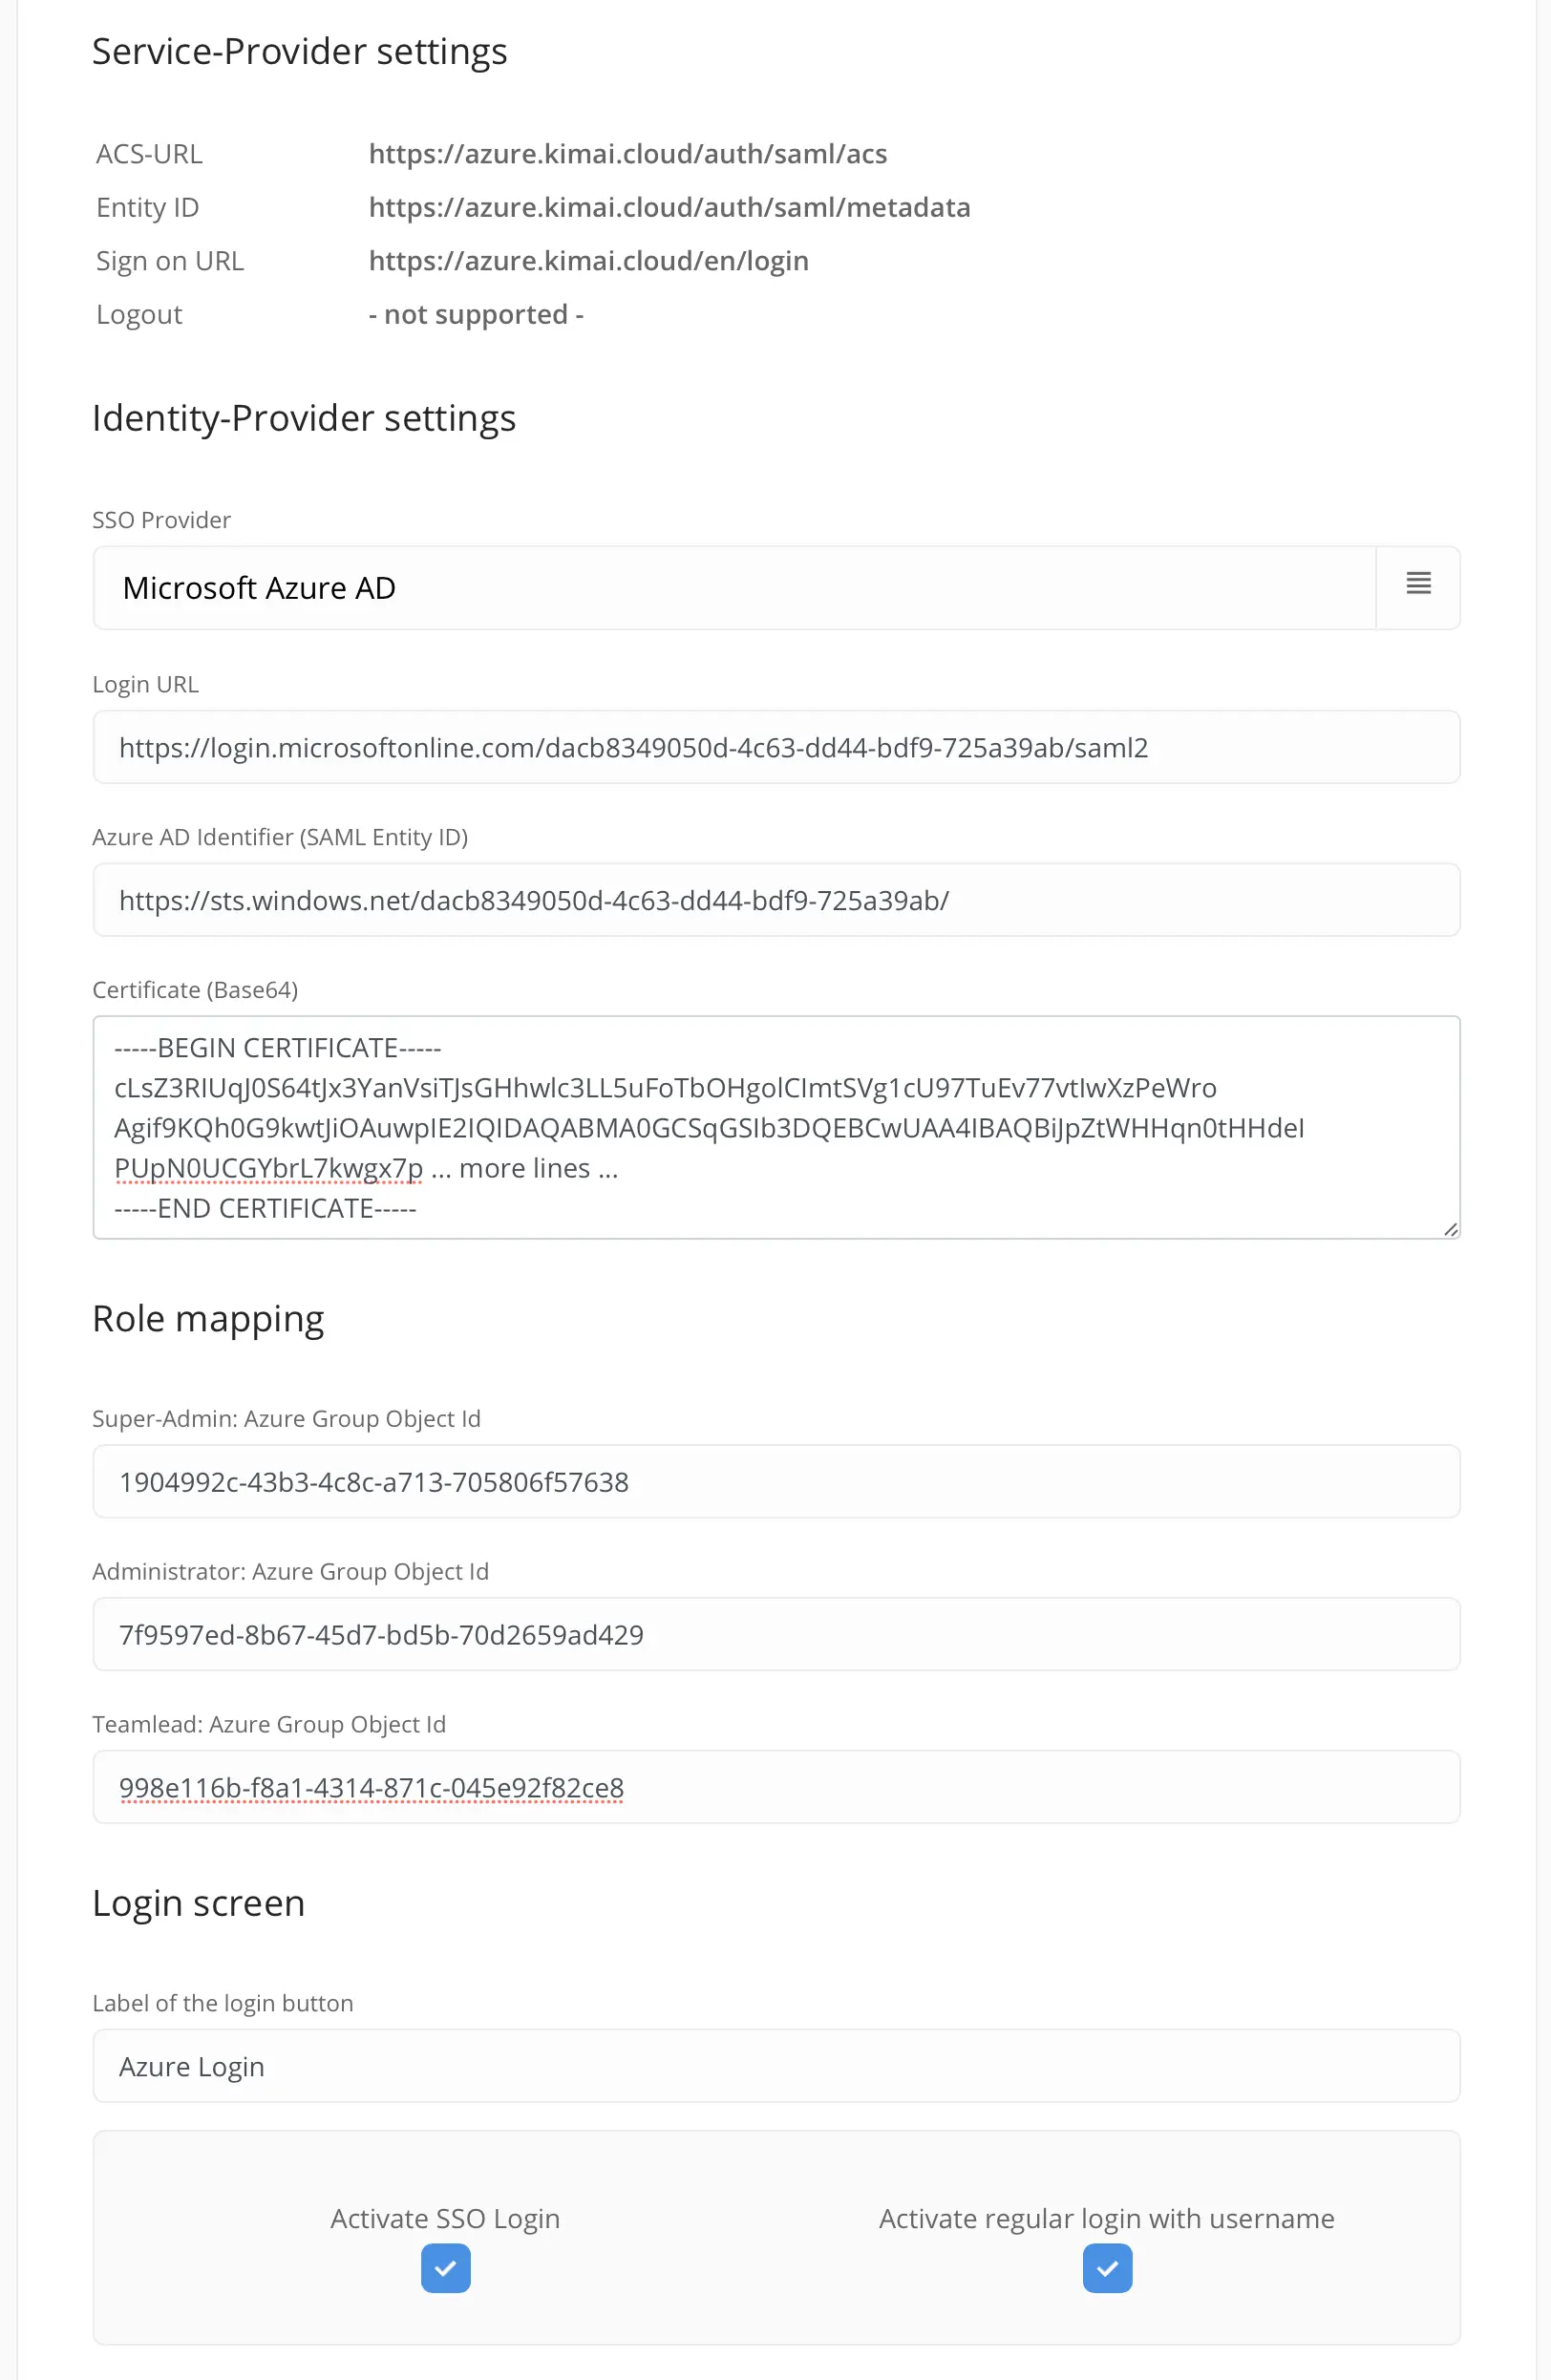
Microsoft SAML
Entra ID (formerly Azure AD) configuration
- Sign in to the Azure portal.
- Select the Microsoft Entra ID service from the navigation.
- Go to Enterprise Applications and select New application.
- Search for Microsoft Entra SAML Toolkit in the gallery and select it.
- Set the application name to “Kimai-Cloud”, click
Create, and wait for the app to be added. - On the Overview page, select Assign users and groups and add all users who should have access to Kimai.
- Back on the Overview page, select Set up single sign-on and choose SAML.
- Edit the Basic SAML Configuration and enter the required URLs (replace
foo.kimai.cloudwith your actual cloud domain):- Identifier (Entity ID):
https://foo.kimai.cloud/auth/saml/metadata - Reply URL (Assertion Consumer Service URL):
https://foo.kimai.cloud/auth/saml/acs - Sign on URL:
https://foo.kimai.cloud/ - Relay State: skip
- Logout URL: skip
- Identifier (Entity ID):
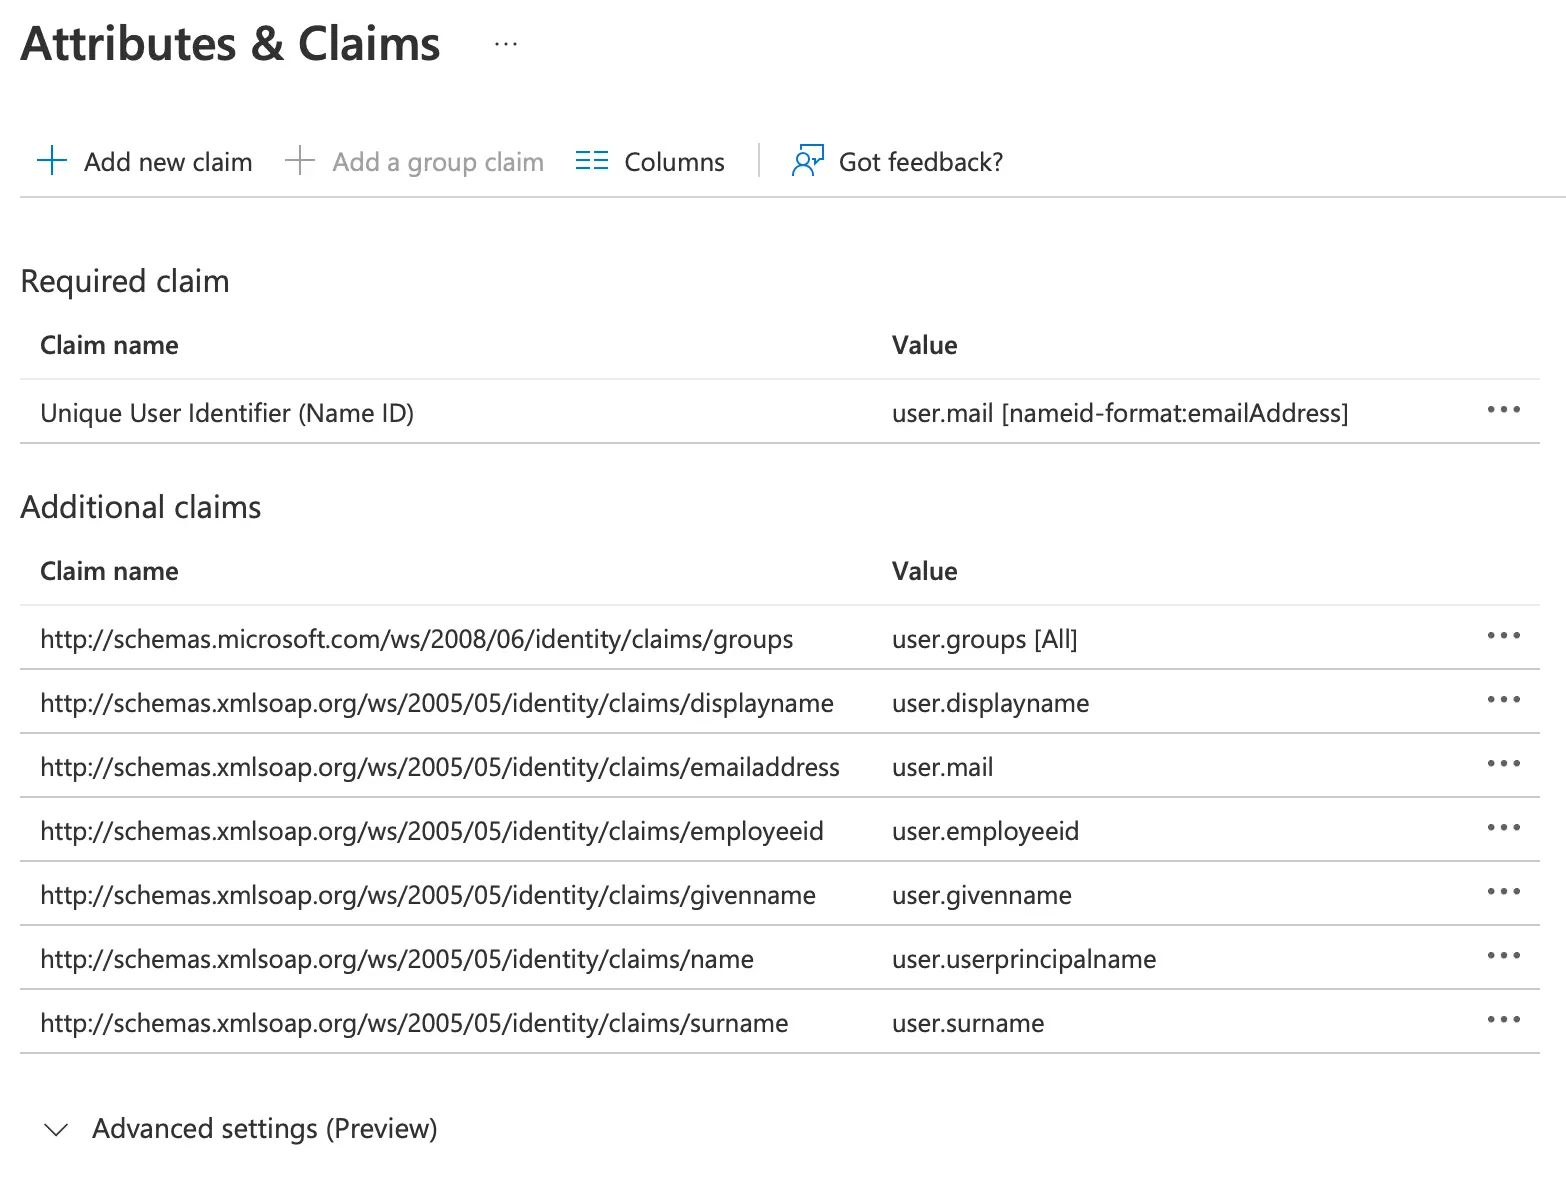
- Edit Attributes & Claims (see screenshot below):
- Change the
Source attributeofUnique User Identifier (Name ID)touser.mail - Select
Add a group claimwithAll groupsand Source attributeGroup ID - Optionally add claims from the
http://schemas.xmlsoap.org/ws/2005/05/identity/claimsnamespace:- Name:
givenname, Source attribute:user.givenname(optional) - Name:
surname, Source attribute:user.surname(optional) - Name:
displayname, Source attribute:user.displayname(optional) - Name:
employeeid, Source attribute:user.employeeid(optional)
- Name:
- Change the
- Download Certificate (Base64) from the SAML Signing Certificate section. Open the
Kimai Cloud.cerfile and paste its content into the Cloud configuration fieldX.509 Certificate. - Copy the values from the Set up Kimai-Cloud section into the Cloud configuration:
- Login URL →
Login URL - Microsoft Entra Identifier →
Azure AD Identifier (SAML Entity ID)
- Login URL →
Configure “Attributes & Claims”:
Configure “Groups”:
- In the Microsoft Entra ID section, choose Groups from the navigation.
- Click New group (group type: Security) and create one group for each Kimai role:
Kimai TeamleadKimai AdminKimai System-Admin
- Add the relevant members to each group.
- Copy the
Object IDof each group into the Cloud configuration (see screenshot below).
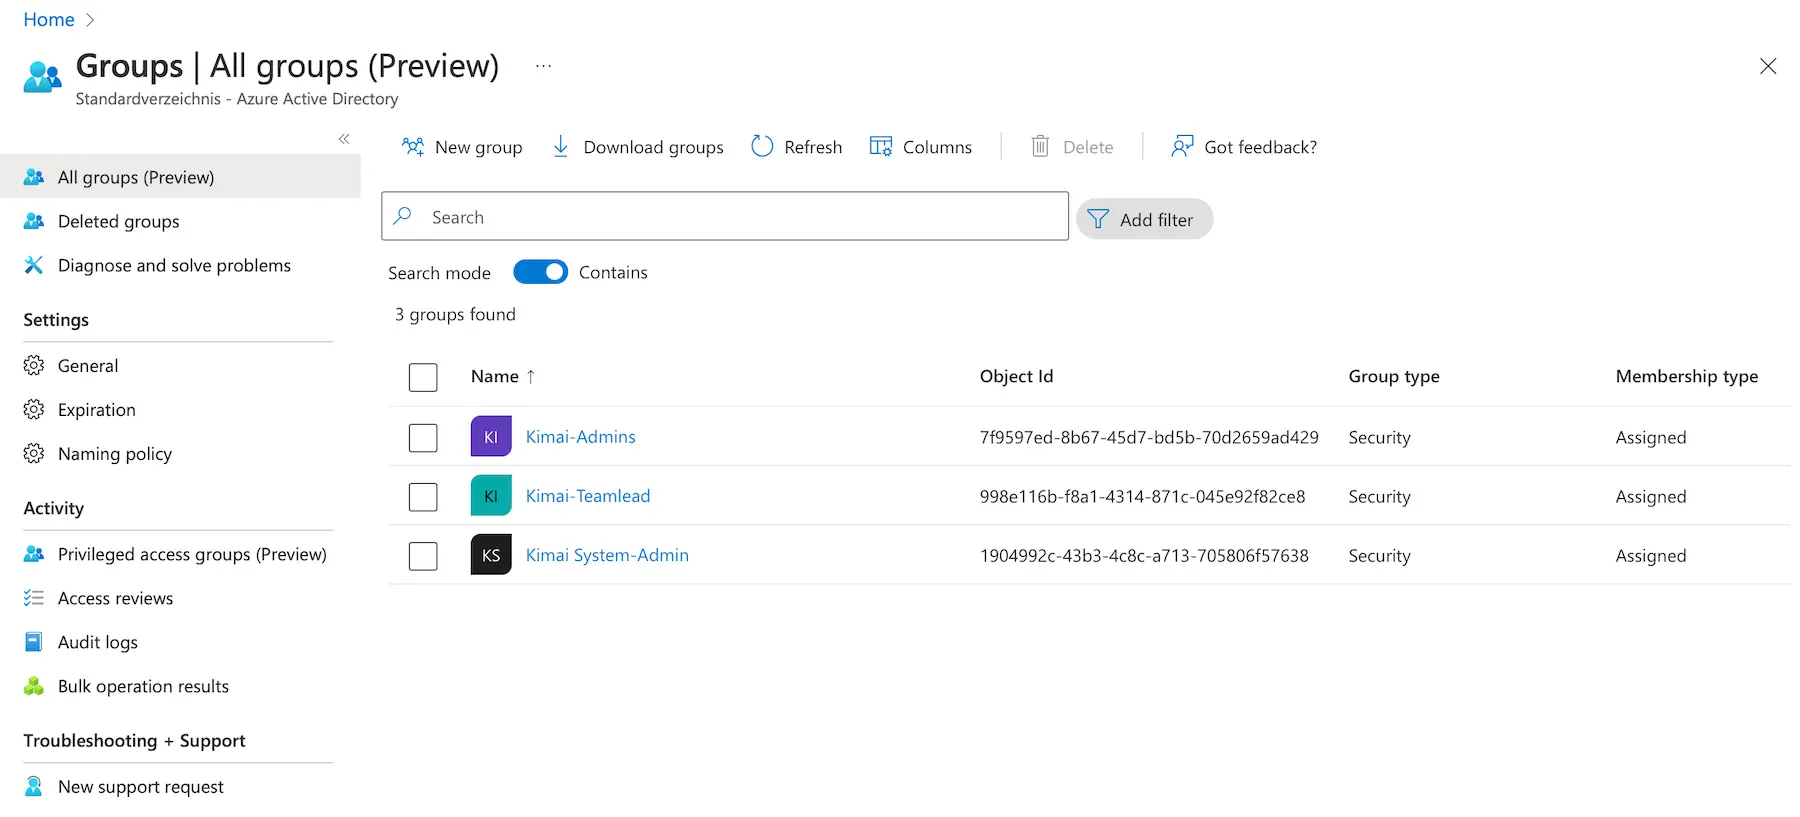
Cloud configuration
Keycloak SAML
Start by setting up Keycloak following the Keycloak documentation.
There is one difference for the Cloud: authnRequestsSigned is not enabled, so you need to disable Client signature required in Keycloak.
Define the user attribute mapping as follows (case is important; configure all attributes, even the ones you don’t use):
Basic Information > Primary email→EmailBasic Information > First name→FirstNameBasic Information > Last name→LastNameEmployee Details > Employee ID→AccountNumberEmployee Details > Title→Title
Also edit the SAML capabilities and set the Name ID format to email.
Auth0
Customers report successful use of Auth0 as Identity Provider with the following settings:
{
    "mappings": {
        "email": "Email"
    },
    "nameIdentifierProbes": [
        "Email"
    ],
    "nameIdentifierFormat": "urn:oasis:names:tc:SAML:1.1:nameid-format:emailAddress“
}