Простое резервное копирование
Плагин Kimai, который позволяет создавать резервные копии среды одним нажатием

Maximilian Gross
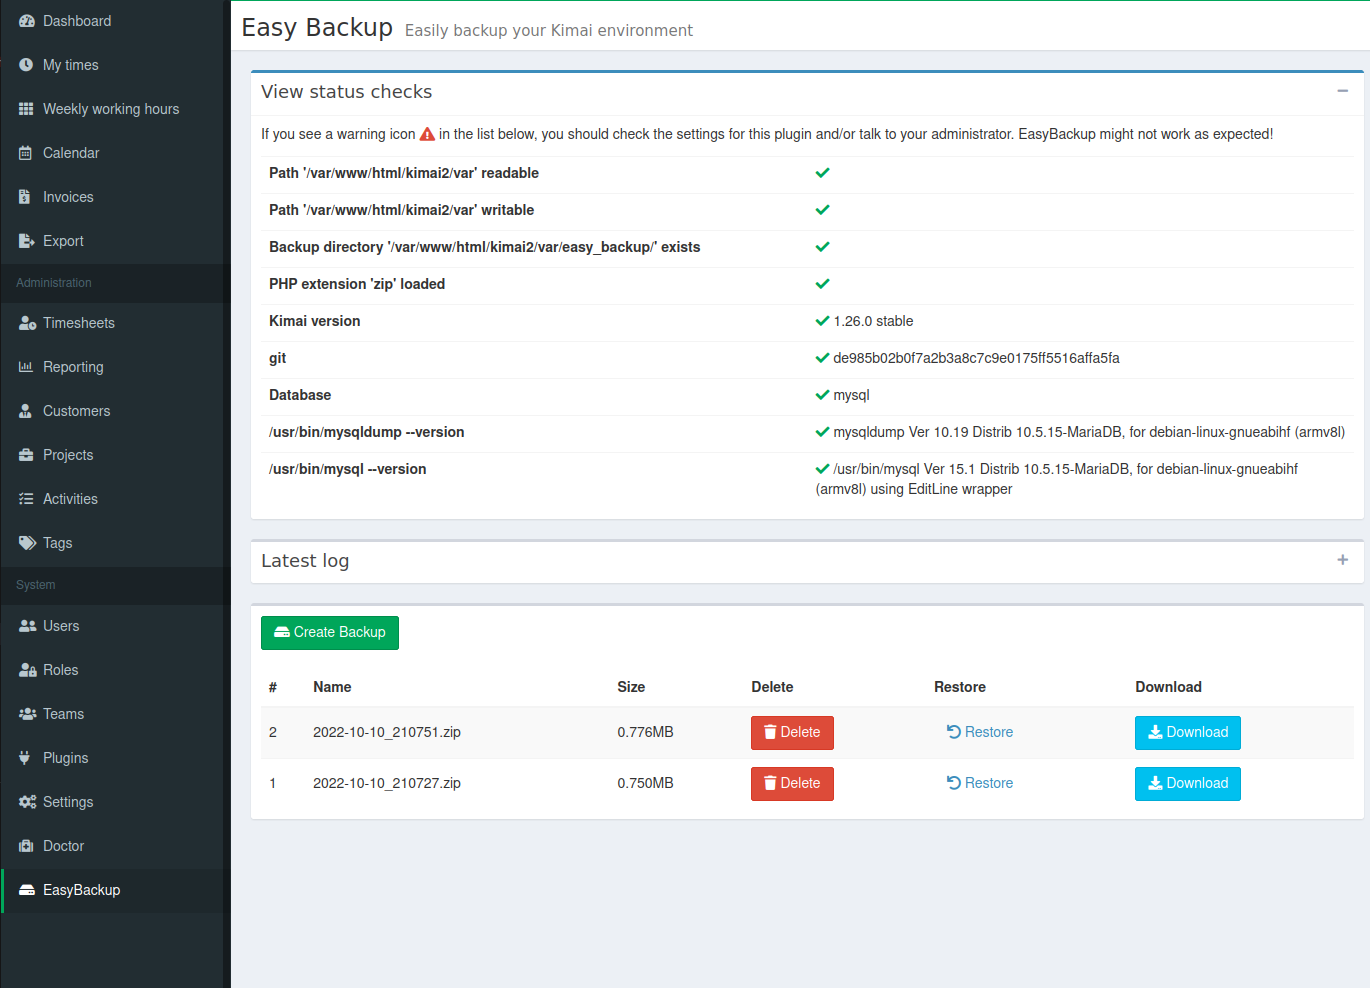
After the installation a new menu entry EasyBackup is created. There you can create a new backup
by clicking the Create Backup button. Afterwards all created backups will be listed at the page
and you can delete or download the created backup as zip file.
Please contact me via info@maximiliangross.de for any inquiry.
Storage
This bundle stores the backups zipped in the directory var/easy_backup.
Make sure its writable by your webserver! We don’t use the recommended
var/data/ directory, because it will be part of the backup’ed files!
What files are backed up?
Currently these directories and files are included in the backup:
.env
config/packages/local.yaml
var/data/
var/plugins/
According to the backup docu the kimai version should be saved to. Also the current git head. Therefor a Readme.txt file with the mentioned information is written and added to the backup.
Which tables are included iun the backup?
If you use sqlite, the database file is backuped because the var/data directory will be backuped by the plugin.
If you use mysql/mariadb the plugin will recognize it by reading the configured database connection url. Then it will execute a mysqldump command and create a sql dump file which will be added to the backup zip.
Please note: Currently the mysqldump command is used as /usr/bin/mysqldump. This will only work on systems where
mysqldump is available at this location. I will change it later on, but this should work on most environments.
Early development phase
If anyone will help me with testing or contributing it would be great.
Совместимость
Плагины всегда должны быть совместимы с более высокими версиями Kimai. Следующий список содержит версию плагина и необходимую минимальную версию Kimai.
| Версия сборки | Минимальная версия Kimai |
|---|---|
| 2.0.0 | 2.0.1 |
| 1.4.2 | 1.9.0 |
Установка
Копировать файлы
Extract the ZIP file and upload the included directory and all files to your Kimai installation to the new directory:
var/plugins/EasyBackupBundle/Or you can clone it directly to the var/plugins/ directory of your Kimai installation:
cd kimai/var/plugins/
git clone https://github.com/mxgross/EasyBackupBundle.git EasyBackupBundle
The file structure needs to look like this afterwards:
var/plugins/
├── EasyBackupBundle
│   ├── EasyBackupBundle.php
|   └ ... more files and directories follow here ...
Очистить кэш
After uploading the files, Kimai needs to know about the new plugin. It will be found once the cache was re-built. Call these commands from the Kimai directory:
How to reload Kimai cache
bin/console kimai:reload --env=prod
It is not advised, but in case the above command fails you could try:
rm -r var/cache/prod/*
You might have to set file permissions afterwards:
Adjust file permission
You have to allow PHP (your webserver process) to write to var/ and it subdirectories.
Here is an example for Debian/Ubuntu, to be executed inside the Kimai directory:
chown -R :www-data .
chmod -R g+r .
chmod -R g+rw var/
You might not need these commands in a shared-hosting environment.
And you probably need to prefix them with sudo and/or the group might be called different from www-data.
Обновления
Updating the plugin works exactly like the installation:
- Delete the directory
var/plugins/EasyBackupBundle/ -
Execute all installation steps again:
- Копировать файлы
- Очистить кэш
Скриншоты